
I’ve got to tell you, when I first tried making Chocolate Peanut Butter Pie, I thought, “How hard can it be?” Spoiler alert: super easy, and totally worth it. Just imagine creamy peanut butter blending with rich chocolate in every blissful bite. It’s become my go-to dessert, whether for a fancy dinner or a relaxed weeknight treat. Curious about how to whip up this dreamy pie? Let’s get started on creating something delicious together.
Why You’ll Love This Recipe
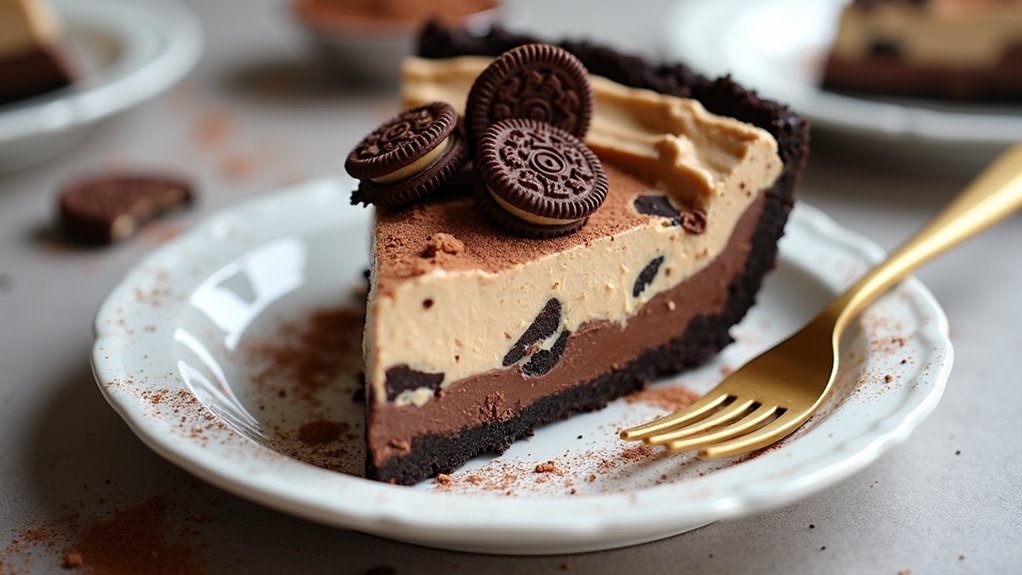
You’ll love this Chocolate Peanut Butter Pie, especially when you take a bite and realize just how easy it was to make. Seriously, you won’t believe how quickly it comes together!
The creamy filling, with that perfect balance of chocolate and peanut butter, feels like a hug on a plate. I still remember the first time I made it—I accidentally dropped half the Oreos. Guess what? It still turned out delicious.
And, can we talk about the whipped cream? It makes everything lighter, like a cloud of joy in each spoonful. Plus, it’s impressive enough for guests, but easy enough for a weeknight treat.
Honestly, you’ll be the star of any dessert table with this chocolate peanut butter pie.
Equipment List
When you’re ready to whip up this delightful Chocolate Peanut Butter Pie, having the right equipment can make the process even easier.
First, grab a 9-inch pie plate. Trust me, you don’t want to deal with a crust disaster in a too-small dish.
You’ll also need a mixing bowl for combining your Oreo crust and melted butter—easy peasy.
A hand mixer or a stand mixer is essential for beating that creamy peanut butter filling. An Essential Measuring Cup Set is crucial for precise measurements of all your ingredients.
Plus, don’t forget your measuring cups and spoons; you don’t want to guess how much peanut butter you’re adding. In fact, an Essential Measuring Spoon Set ensures accuracy in all your baking ventures.
Finally, a spatula helps fold the whipped cream without a whole messy scene, which, let’s be real, I’ve had before.
Our Ingredients
Alright, let’s talk about the star of the show—the ingredients for our rich and creamy Chocolate Peanut Butter Pie.
Have you ever had that moment when you’re ready to bake, only to realize you’ve forgotten something? I can’t tell you how many times I’ve ended up raiding my pantry mid-recipe. But fear not today, my friend, because this time we’re going to be super prepared!
Here’s what you’ll need to whip up this decadent dessert that’s sure to impress.
- 20 Oreo cookies, crushed
- 1/4 cup unsalted butter, melted
- 4 oz cream cheese, room temperature
- 1 cup creamy peanut butter
- 2 cups heavy whipping cream
- 1/4 cup powdered sugar
- 1 tsp vanilla extract
- Optional: chopped peanut butter cups for topping
Now, let me tell you a little something about these ingredients.
First off, don’t skimp on the peanut butter. I mean, this is peanut butter pie we’re making, so let’s make it luscious and velvety, right?
And speaking of cream cheese, it’s essential to use it at room temperature. Trust me, trying to mix cold cream cheese is like trying to swim with concrete shoes—unpleasant and difficult.
Also, feel free to get a little creative. Think about adding your favorite toppings, whether that’s more crumbled Oreos, a drizzle of chocolate sauce, or those beloved chopped peanut butter cups.
Because, really, who doesn’t want more peanut butter? Embrace it.
Now let’s get to making this pie—you’ll be the star of your next gathering. Just be ready for the compliments (and maybe a few requests for seconds).
Step-by-Step Instructions

Making a Chocolate Peanut Butter Pie is a delightful adventure filled with creamy layers and a crunchy crust. And good news—mixing the batter is quick and simple. Just follow these easy steps, and soon enough you’ll have a show-stopping dessert ready to dazzle your friends and family.
1. Prepare the crust. Start by crushing 20 Oreo cookies into fine crumbs. You can toss them in a food processor or bag them and crush them with a rolling pin—whichever suits your fancy. Once you’ve got those cookies resembling dirt, mix them with 1/4 cup of melted unsalted butter.
Now, press this crumbly mixture firmly into a 9-inch pie plate to create your crust. It should be perfectly compact and even because a good foundation is essential. Pop that crust in the fridge to chill while you whip up the filling.
2. Make the filling. In a mixing bowl, combine 4 ounces of room-temperature cream cheese and 1 cup of creamy peanut butter. Beat them together until it’s all smooth and creamy—think cloud-like texture. Add in 1/4 cup of powdered sugar and 1 teaspoon of vanilla extract, and continue mixing until everything is well-blended.
At this point, you might want to sneak a taste, but I won’t tell if you don’t!
3. Whip the cream. In a separate bowl, pour in 2 cups of heavy whipping cream. Time to whip it up! Beat the cream until it forms stiff peaks, which means it’ll hold its shape and won’t slump over.
This step is vital because it helps create that airy texture we’re aiming for in the filling.
4. Combine everything! Now, fold your whipped cream into the peanut butter and cream cheese mixture. Go slow and easy here; you want to keep that lightness from the whipped cream.
Just gently incorporate it until you don’t see any more white streaks—don’t overmix, or you’ll lose all that fabulous fluffiness.
5. Fill the pie crust. Retrieve your chilled crust and carefully spread the luscious filling into it. Use a spatula to smooth the top—make it as pretty as you can because we eat with our eyes first, right?
If you’re feeling extra, now is the perfect time to sprinkle on some chopped peanut butter cups for that wow factor.
6. Chill. Cover your pie with plastic wrap and stash it in the fridge for at least 2 hours. This chilling time is important; it allows the filling to set up beautifully and helps the flavors marry together—like a great romance, but for your taste buds. Additionally, while enjoying your pie, consider exploring artisan cheese making kits as a new culinary hobby.
And just like that, your glorious Chocolate Peanut Butter Pie is ready to serve. Prepare for the compliments to roll in, and maybe even a few requests for the recipe.
Enjoy every velvety slice—after all, you earned it!
Tips & Variations
While I’m a big fan of sticking to the classic Chocolate Peanut Butter Pie recipe, there’s always room for a little fun and creativity in the kitchen.
For an extra crunch, consider adding crushed pretzels to the crust—it’ll totally surprise your taste buds. If you’re feeling adventurous, swap out the cream cheese for mascarpone; it gives a lighter, airy texture.
I’ve even tried adding a splash of coffee into the peanut butter mix. Trust me; it’s dreamy.
And don’t forget about toppings—chopped peppermint patties or drizzled caramel can elevate your pie to a whole new level. Really, the sky’s the limit!
Just be prepared to share, or hide it away and enjoy it all by yourself.
How to Serve?
Once you’ve let that Chocolate Peanut Butter Pie chill to perfection, it’s time to serve it up and wow your friends or family—who mightn’t even believe you made it yourself. Start by slicing generous portions; I like to use a warm knife for clean cuts.
As you plate each slice, consider drizzling a bit of chocolate sauce or sprinkling with chopped peanut butter cups. Trust me, they won’t be able to resist.
When you serve it, watch their eyes light up. I mean, who doesn’t love that creamy blend of chocolate and peanut butter? Grab some forks, dig in, and don’t forget to savor each bite.
After all, I’m pretty sure calories don’t count when it’s this good—right?
Storage & Reheating Guide
After you’ve wowed everyone with your Chocolate Peanut Butter Pie and they’ve devoured their slices, you might find yourself with some leftovers—or, as I like to call them, “future indulgences.”
Storing this pie isn’t complicated, and it can stay delicious for up to a week in the fridge. Just cover it tightly with plastic wrap or pop it in an airtight container. To maximize freshness, choose airtight food storage containers, which can significantly extend the shelf life of your desserts. Additionally, using freezer storage bags can provide an excellent alternative for long-term storage of other treats.
Now, if you’re like me and can’t resist that creamy goodness, reheating isn’t necessary. But if you prefer a slightly softer texture, let it sit at room temperature for 15-20 minutes before digging in.
Honestly, I sometimes forget it’s in there and find myself happily surprised days later. What a treat!
Final Thoughts
No matter how many slices you’ve enjoyed, there’s just something about a Chocolate Peanut Butter Pie that leaves you craving more. I mean, can you blame me? The combination of creamy peanut butter and rich chocolate creates a balance that’s sheer bliss.
And let’s be real, pie is great for any occasion, whether it’s a birthday, holiday, or just because you deserve a treat. When I whip this up, I always sneak a bite before it even hits the table—guilty as charged!
Just remember, if you can manage to save some for later, your fridge will thank you. So go ahead, enjoy each delightful forkful and share the joy with friends or keep it all to yourself—no judgment here!