
Butterscotch cheesecake? It’s like a warm hug for your taste buds. Seriously, every bite is creamy, dreamy, and just sweet enough to make you forget your worries. I remember the first time I made it—let’s just say the kitchen looked like a butterscotch explosion. But hey, sometimes chaos leads to deliciousness. If you’re ready to impress your family and friends (or just yourself), stick around, because this recipe is a game changer.
Why You’ll Love This Recipe
When you take the first bite of this butterscotch cheesecake, it feels like a warm hug on a chilly day. Seriously, this loaded butterscotch cheesecake is a game changer.
The creaminess just melts in your mouth, and the butterscotch flavor? Wow. It’s like a sweet symphony playing a cozy melody. You might be wondering, how does it get so rich? Trust me, it’s all in the mix of butterscotch chips and that velvety cream cheese.
Every bite brings back memories of family gatherings, laughter, and an occasional food coma. I’ve even been known to eat it for breakfast, but hey, who’s judging? It’s just that good. You’ll fall in love with it, I promise.
Equipment List
Before diving into this incredible butterscotch cheesecake adventure, let’s take a moment to chat about the essential equipment you’ll need.
First off, I grab a 9-inch springform pan—trust me, it’s a lifesaver for easy removal. Choosing the right size springform pan can make all the difference in your baking success. You’ll also need a mixing bowl, a hand mixer, and a spatula, so we can get everything nice and creamy. Additionally, having grill barbecue smoker accessories can elevate your culinary experience when experimenting with flavors.
Don’t forget a measuring cup and spoons; accuracy is key, especially when you’re trying to impress. I always keep my trusty rubber scraper handy.
And, of course, an oven is essential for baking this beauty.
Our Ingredients
Alright, let’s talk about the deliciousness that’s butterscotch cheesecake. This isn’t just any dessert; it’s a little slice of heaven that can make any gathering feel extra special.
Imagine creamy goodness loaded with rich butterscotch flavor—seriously, it’s like a warm hug on a plate. So, if you’re ready to impress your friends, family, or even just yourself on a cozy night in, here’s what you need.
Ingredients:
- 1 ¾ cups graham cracker crumbs
- ¼ cup light brown sugar
- 7 tbsp unsalted butter, melted
- 24 oz cream cheese, room temperature
- ¾ cup light brown sugar
- 3 tbsp all-purpose flour
- 1 tsp vanilla extract
- ½ cup sour cream
- ½ cup heavy whipping cream
- 1 cup butterscotch chips
- 3.4 oz dry butterscotch pudding mix
- 4 large eggs, room temperature
Now, let’s break it down a bit. You might notice there are quite a few different types of sugar—why the extra brown sugar, you ask?
Well, it adds a lovely depth of flavor that pairs perfectly with the cream cheese. And cream cheese—oh, let’s not even get started on how pivotal that is. It’s what gives this cheesecake its silky, smooth texture.
If you can, use full-fat cream cheese; your taste buds will thank you later, and let’s be honest, we’re not here to be “healthy” today, are we?
Also, all those room-temperature ingredients—trust me, it makes a big difference. It helps everything blend together nicely, minimizing those unsightly lumps.
Step-by-Step Instructions
Making the butterscotch cheesecake is a delightful adventure, and it all starts with your trusty oven and a few essential steps. Don’t worry; you’ll have this creamy masterpiece ready in no time. Just follow these easy steps, and you’ll be savoring each smooth, rich slice before you know it.
1. Preheat your oven to 325°F (163°C). This first step is vital because you want your cheesecake to bake evenly. While the oven warms up, grab a 9-inch springform pan to create the perfect base for your cheesecake.
2. In a bowl, mix together 1 ¾ cups graham cracker crumbs**, ¼ cup light brown sugar, and 7 tablespoons unsalted butter, melted. Stir until the mixture resembles wet sand. Having premium baking equipment** makes this step even easier.
Now, press this mixture firmly into the bottom of the springform pan (think “tamping down a snowman” style). Bake for 8 to 10 minutes until it’s golden brown, and let it cool while you get busy with the filling.
3. In a large mixing bowl, beat 24 ounces of cream cheese** and ¾ cup light brown sugar** together until smooth and creamy. I highly recommend using an electric mixer for this part—your arms would thank you later.
Add 3 tablespoons of all-purpose flour and mix until everything is just combined (no lumps, please).
4. Now it’s time to add in the good stuff: pour in ½ cup sour cream** and 1 teaspoon of vanilla extract**. Mix it well to create a creamy, dreamy batter that’s going to be the filling.
Your kitchen should smell divine by now.
5. Meanwhile, melt 1 cup of butterscotch chips** with ½ cup heavy whipping cream (you can use a microwave or a stovetop double boiler). Stir until you get a luscious butterscotch sauce, then mix this into your cream cheese batter along with 3.4 ounces of dry butterscotch pudding mix**.
Combine everything until it’s smooth and blended.
6. It’s egg time! Beat in 4 large eggs****, one at a time. Make sure each egg is fully incorporated before adding the next one.
Don’t rush through this; you want that rich texture. Remember, we’re not going for scrambled here.
7. Once your filling is ready, pour it gently over the cooled crust in the springform pan. Smooth the top with a spatula if you’re feeling fancy.
8. Bake the cheesecake in the preheated oven for about 55 to 65 minutes. You’ll know it’s done when the edges are set, but the center still has a slight jiggle—this confirms it’ll remain creamy once it’s cooled.
9. Once baked, turn off the oven and crack the door ajar. Let your cheesecake cool gradually inside the oven for an hour.
After that, take it out and let it chill in the fridge for at least four hours, or overnight if you can resist. Seriously, the longer it chills, the better the flavors meld.
And just like that, you’ve crafted a butterscotch cheesecake that could earn you a gold star in baking! Enjoy the process, and don’t forget to sample as you go—you deserve it. Remember, having the right professional baking equipment can make a significant difference in your baking experience!
Tips & Variations
When it comes to adding a little flair to your butterscotch cheesecake, the possibilities are as delightful as the dessert itself. I often toss in crushed nuts or toffee bits for that extra crunch.
You could also swirl in some caramel sauce, just for fun—who doesn’t love a little gooey goodness? If you’re feeling adventurous, try using a different type of crust, like chocolate or even a cookie crust.
And hey, I’ve been known to top mine with a dollop of whipped cream or some fresh fruit. It’s all about making it your own.
Seriously, don’t be afraid to experiment. If it flops, at least you’ve got an excuse to make it even cheesier next time.
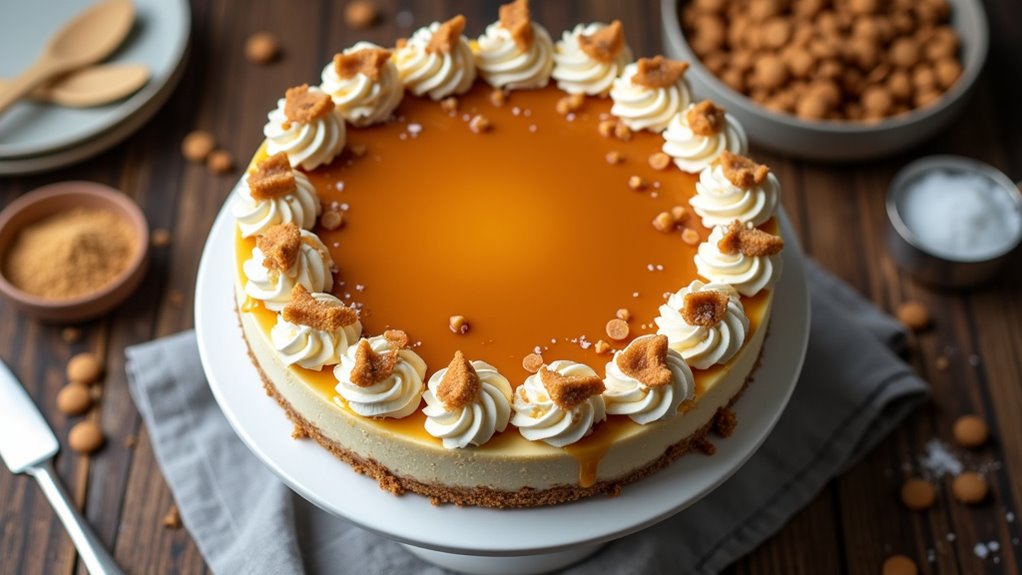
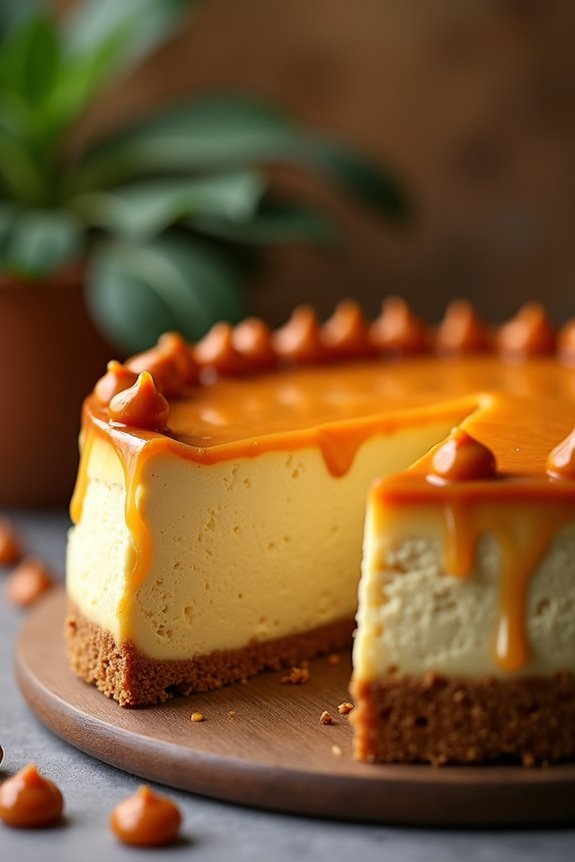
How to Serve?
Serving up your butterscotch cheesecake can be just as fun as making it, and it’s the perfect way to show it off to friends or family. I like to carefully slice my cheesecake into neat wedges, though I’ve to admit, sometimes I just plunge in with a spoon.
For presentation, a drizzle of warm butterscotch sauce really makes it pop. You can also toss on some extra butterscotch chips; trust me, they’ll disappear faster than you can say “cheesecake.”
If you’re feeling fancy, add a dollop of whipped cream on top. You know, for a touch of elegance. Remember, your cheesecake deserves the spotlight, so don’t hold back on the love you put into serving it.
Storage & Reheating Guide
You’ll be glad to know that storing your delicious butterscotch cheesecake is pretty straightforward. Just wrap it well in plastic wrap or place it in an airtight container. It’ll stay fresh in the fridge for up to a week, but honestly, I can never resist it that long. If you happen to have leftovers (a rarity at my house), you can also freeze it for 2-3 months. Just make sure to slice it first for easy serving later. Now, when you’re ready to enjoy, just let it thaw overnight in the fridge, or if you’re impatient like me, a quick 15-minute stint at room temperature works wonders. And trust me, it tastes just as divine as the day you made it. To ensure even longer freshness, consider investing in airtight food storage containers that can help preserve the flavor and texture of your cheesecake.
Final Thoughts
Nothing quite compares to the joy of slicing into a beautifully baked butterscotch cheesecake, am I right?
It’s like unwrapping a gift every time you dig in. Every bite is creamy, dreamy, and just sweet enough to feel like a hug in dessert form.
But let’s be real, I’ve definitely had my share of baking mishaps—like that one time I mistook salt for sugar. Yeah, lessons learned.
The best part? You can share it—or not. I mean, who wouldn’t want to keep this deliciousness all to themselves?
If you try this recipe, I promise it’ll be a huge hit at gatherings, or even on a cozy night in.
Just remember to save a slice for yourself—you deserve it.