

I’ve got to tell you about these Chocolate Covered Cherry Brownie Bombs. They’re like little treasures, bursting with cherry goodness wrapped in chewy brownie. Trust me, once you pop one in your mouth, you’ll get why they’re so addictive. I mean, who wouldn’t want gooey chocolate and sweet cherries in every bite? As I was whipping these up, I couldn’t help but think how impressively easy they are to make. Want to know the secret to perfecting these bites?
Why You’ll Love This Recipe
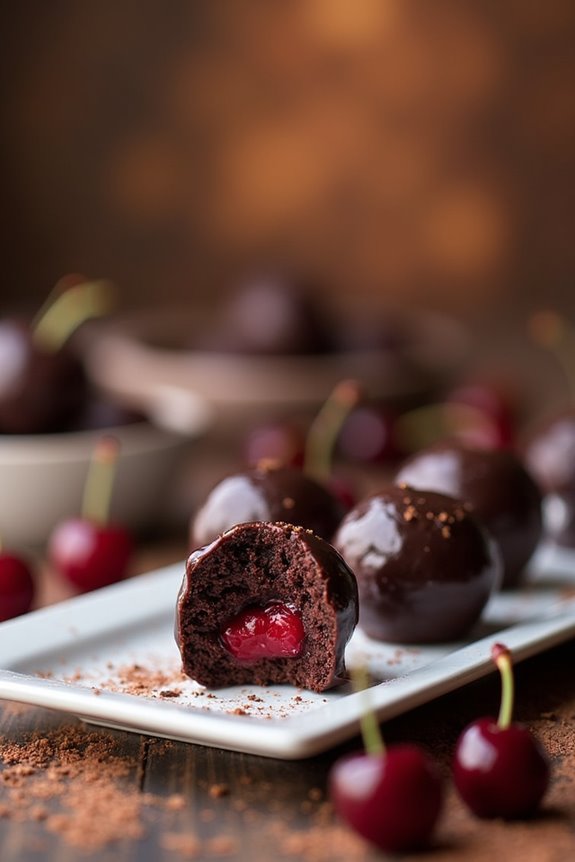
When you bite into one of these Chocolate Covered Cherry Brownie Bombs, it feels like a mini celebration for your taste buds—don’t you just love it when a dessert hits all the right notes?
I mean, who doesn’t appreciate a gooey brownie mingling with sweet cherries, all wrapped in a luscious chocolate coating?
Not to mention how simple they’re to make! Seriously, if I can whip these up without ending up covered in flour, anyone can.
Plus, they’re perfect for sharing—if you can resist eating them all yourself.
Each bite brings a delightful surprise, and it’s the kind of treat that makes you feel fancy at any gathering.
Trust me, you’ll be everyone’s favorite baker.
Equipment List
Before diving into this delicious journey of making Chocolate Covered Cherry Brownie Bombs, you might want to gather your trusty kitchen gear.
You’ll need a large mixing bowl for that brownie goodness and a sturdy spoon or spatula to give it a good mix.
A cookie scoop helps shape those perfect little balls, and trust me, I once used my hands and ended up with a chocolate-covered mess.
You’ll also want some parchment or wax paper to set your bombs on – otherwise, you could end up with a sticky situation.
Finally, don’t forget a microwave-safe bowl for melting that chocolate almond bark.
To make your mixing easier, consider adding an essential silicone spatula set to your kitchen toolkit, as silicone spatulas can handle heat and are easy to clean.
Just think of all the fun ahead, and get ready to get a little messy in the best way!
Our Ingredients
When it comes to whipping up a batch of Chocolate Covered Cherry Brownie Bombs, having the right ingredients is key to crafting these spherical bites of joy. Let’s gather what you’ll need, and trust me, once you taste one, you’ll be tempted to eat the whole batch (no judgment here).
This recipe will have you mixing, rolling, and dunking in chocolate, which is like a mini workout in the kitchen, if you think about it. With a little prep and some good tunes playing in the background, you’ll be on your way to dessert bliss in no time.
Here’s what you’ll need to make these delightful treats:
- 1 box chewy fudge brownie mix (plus ingredients to bake, like eggs, oil, and water)
- 3/4 cup whipped chocolate frosting
- 1 can cherry pie filling or maraschino cherries (make sure to drain them well)
- 15 oz chocolate almond bark (for that smooth, chocolatey coating)
Now, let’s talk about those ingredients a bit more. The brownie mix is your base, and picking a good quality one can make all the difference—who wants a dry brownie bomb? Not me.
And don’t skimp on the frosting; it’s what binds everything together and adds that rich chocolate flavor, so go for the whipped kind for extra creaminess. If you’re feeling adventurous, why not try a different type of cherry? A good maraschino cherry adds a fabulous pop of flavor, while cherry pie filling gives a more substantial bite. But hey, no pressure—stick with what you love.
And remember, when you’re melting that chocolate almond bark, take it slow; even though it’s tempting to blast the microwave on high, you might end up with a burnt chocolate disaster. Trust me, I’ve been there.
Step-by-Step Instructions
Making Chocolate Covered Cherry Brownie Bombs isn’t only fun but also a guaranteed way to impress your friends and family with your baking skills. Mixing the batter is quick and simple—just follow these easy steps to create these delightful treats from start to finish.
Step-by-Step Instructions:
1. Bake the Brownies: Start by preheating your oven to the temperature mentioned on the brownie mix box. Grab that 1 box of chewy fudge brownie mix and prepare it according to the package directions. (Don’t forget to include the eggs, oil, and water!) Bake until they’re puffed and a toothpick comes out with a few crumbs, usually about 25–30 minutes.
Once done, let those brownies cool completely. A little patience here goes a long way.
2. Crumble and Mix: After the brownies have cooled—now comes the fun part. Crumble them into a large bowl until they look like coarse crumbs (just think of it as brownie therapy). Add in 3/4 cup of whipped chocolate frosting and mix until it forms a nice, firm but rollable dough.
(Use your hands—don’t worry, they’ll survive the chocolate mess.)
3. Shape the Bombs: Grab 1.5 tablespoons of the brownie mixture and flatten it out in your hand. Place one cherry from the can of cherry pie filling or a maraschino cherry in the center. Carefully fold the brownie mixture around the cherry, sealing it off completely.
Roll the filled brownie mixture into a ball, and place it on a baking sheet. (Just a note, try to keep the cherry well-centered—no one likes a rogue cherry bursting out during the dipping process.)
4. Chill: Pop those balls into the freezer for about 20–60 minutes. This step is essential, as it makes coating them in chocolate much easier.
Trust me, trying to dip a warm brownie bomb is like trying to dunk a basketball with a rolled-up towel in your hands—it just doesn’t work.
5. Melt the Chocolate: While your balls chill out, it’s time to melt the 15 oz of chocolate almond bark. Go slow—either in a microwave at reduced power in short spurts or using a double boiler on the stove until it’s nice and smooth.
(No one wants a burnt chocolate disaster—I’ve made that painful mistake before!)
6. Dip the Bombs: Retrieve those chilled brownie bombs from the freezer. Using a fork, dip each ball into the melted almond bark, making sure to coat them fully.
Tap off any excess chocolate—you don’t want a chocolate flood on your plate. (Could you imagine? A chocolate avalanche.)
7. Set the Chocolate: Place the coated brownie bombs onto a piece of wax paper to dry. Once you’ve finished dipping all of them, let them chill in the refrigerator until the chocolate sets completely.
If you can wait, give them a little longer to develop that perfect shine. The delightful taste of these treats will have you wishing you had a premium cocktail shaker set on hand to whip up some celebratory drinks to accompany your creation!
Following these steps will lead you to delicious Chocolate Covered Cherry Brownie Bombs that are perfect for parties, gifts, or an indulgent night in.
Tips & Variations
Now that we’ve got those delightful brownie bombs chilled and ready to go, it’s time to chat about some tips and variations that can take your treat game to the next level.
First off, using a cookie scoop makes rolling out uniform balls a breeze—trust me, your friends will appreciate the aesthetics. Don’t overbake those brownies; we want that fudgy goodness, not crunchy chaos.
Keeping the bombs chilled while you dip them makes the chocolate coating so much smoother.
Want to mix it up? Try adding a splash of almond extract or even a hint of mint to the brownie mix. You could swap cherries for strawberries if you’re feeling adventurous.
It’s all about finding your flavor!
How to Serve?
Serving up your Chocolate Covered Cherry Brownie Bombs is like gifting little bites of happiness, and trust me, everyone will want in on this sweet action.
When it’s time to serve, I like to arrange them on a fancy platter or a fun cake stand. A sprinkle of powdered sugar or some drizzled chocolate on top gives them a “wow” factor—just makes them irresistible.
You could even add some fresh cherries for decorative flair, right? Trust me, the oozy cherry center is bound to get everyone talking.
Watching people’s eyes light up when they take a bite? Priceless.
Don’t forget, these gems are perfect for parties, or dare I say, just because you deserve a treat too. Who’s judging?
Storage & Reheating Guide
After you’ve dazzled your friends with those beautiful Chocolate Covered Cherry Brownie Bombs, the next thing on your mind might be, “How do I keep these delightful treats fresh?”
Storing them properly guarantees you can savor that gooey cherry goodness long after the party’s over.
I usually pop them in an airtight container and stash them in the fridge. They stay fresh for about a week—trust me, they won’t last that long.
If you want to keep them longer, toss them in the freezer; they can survive up to three months. Just let them thaw in the fridge before diving in.
For optimal freezing, it’s best to use soup freezer containers that can withstand low temperatures. Reheating isn’t necessary, but if you’re feeling fancy, a quick 10 seconds in the microwave will warm them up just right. Enjoy!
Final Thoughts
While I could go on about how these Chocolate Covered Cherry Brownie Bombs are a sweet tooth’s dream, I think it’s important to reflect on just how special they are.
They’re like little bites of happiness, aren’t they? The combo of chocolate and cherry is simply magical. Plus, they’re surprisingly easy to make—no fancy techniques required, just a bit of mixing, scooping, and dipping.
I love how these treats bring friends and family together; nothing sparks joy like sharing a delicious dessert.
And if a few bombs don’t make it out of the kitchen? Well, who’s counting?