
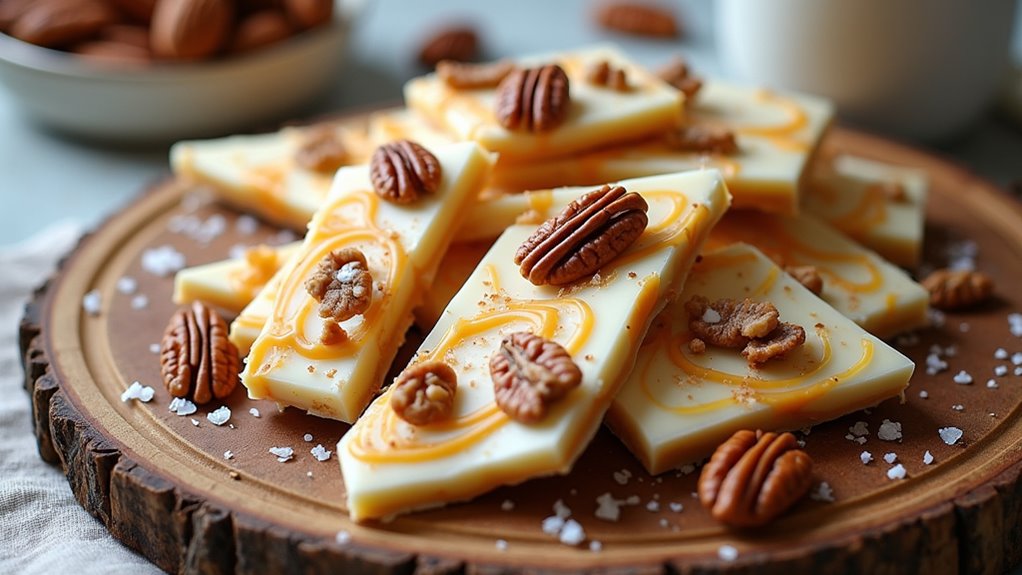
When I first tried making Sweet and Salty Butterscotch Vanilla Bark, I thought, “How hard can it be?” Spoiler alert: super easy, but oh, so delicious. It’s got that creamy vanilla almond bark and butterscotch combo, plus the crunch from pecans and toffee. Seriously, it’s like a treasure of flavors in every bite. Ever wondered how to make something that looks fancy but is a breeze? Let’s break it down step-by-step.
Why You’ll Love This Recipe
Have you ever wanted a sweet treat that’s just as fun to make as it’s to eat? I totally get that, and that’s why I adore sweet and salty vanilla butterscotch swirl bark.
It’s not just simple to whip up, but it also looks impressive. I mean, you’re swirling that golden butterscotch into white vanilla like a pro, and it honestly feels like magic.
Plus, the crunch from the pecans and toffee? It takes every bite to the next level. I can’t tell you how often I’ve indulged, only to realize I probably shouldn’t’ve eaten half the batch in one sitting.
But hey, life’s too short not to enjoy a little bark magic, right? You’re going to love this.
Equipment List
While you might be tempted to plunge into mixing up this delightful bark right away, let’s take a moment to chat about the equipment you’ll need to make the process smooth and enjoyable.
First, you’ll need a microwave-safe bowl – trust me, I’ve melted chocolate in plastic, and it didn’t end well. A baking sheet lined with wax paper is essential for spreading your melted goodness.
Grab a spatula for stirring and spreading, and let’s not forget a knife for that swirly magic with butterscotch. A measuring cup for the nuts and toffee keeps things precise.
Ultimately, you’ll want some serious patience. I mean, it can be tough to wait for the bark to cool, but it’s so worth it. Additionally, using premium cookware sets can elevate your cooking experience and make it even more enjoyable.
Our Ingredients
When it comes to whipping up a batch of this delightful Butterscotch Vanilla Bark, choosing the right ingredients is key. Fun fact: the combo of creamy vanilla and sweet butterscotch is like a match made in dessert heaven.
And don’t even get me started on the crunchy pecans and that little hit of salt—it’s basically the gold star of snacks. So, let’s plunge into what you’ll need to make this sweet and salty treat.
- 12 oz vanilla almond bark or vanilla chips
- 1 cup butterscotch chips
- ½ cup chopped pecans
- ½ cup chopped toffee pieces
- 1 tsp sea salt
Now, here’s something to think about—quality matters when it comes to your ingredients. You don’t have to splurge on the fanciest vanilla bark or butterscotch chips, but picking brands you enjoy really helps elevate the flavors.
Plus, if you’re feeling adventurous, mixing in different nuts like walnuts or using milk chocolate instead of butterscotch could give you a whole new dessert experience. I mean, who doesn’t love experimenting in the kitchen? Just don’t forget to taste as you go—you wouldn’t want to end up with a bark that’s, well, not bark-worthy.
Step-by-Step Instructions
Making your own Butterscotch Vanilla Bark is easier than you might think, and trust me, the end result is totally worth it. In just a few simple steps, you’ll have a deliciously sweet and salty treat that’s perfect for snacking or giving as a gift. Let’s explore the process!
- Melt the Vanilla Almond Bark: Grab your 12 oz of vanilla almond bark or vanilla chips. Place them in a microwave-safe bowl and melt them in the microwave in 30-second intervals. Keep stirring in between each interval until the mixture is smooth and creamy. (You don’t want rogue chunks of chocolate hanging around.)
- Spread the Mixture: Once your vanilla bark is all melted, pour it onto a waxed paper-lined baking sheet. Use a spatula to spread the melted bark out into an even layer, about a quarter-inch thick. Don’t worry if it’s not perfect—imperfections add charm, right?
- Melt the Butterscotch Chips: Now, it’s time to melt your butterscotch chips. Measure out 1 cup and pop them into another microwave-safe bowl. Again, heat them in the microwave in 30-second intervals, stirring until smooth. You know you’re there when it looks like liquid sunshine.
- Create the Swirl: Once your butterscotch is ready, dollop it by teaspoons onto the melted vanilla layer. Here’s where it gets fun. Take a knife (carefully, of course) and swirl it through the vanilla layer to create a lovely marbled pattern. Just a gentle swirl will do—no need to get overly aggressive here.
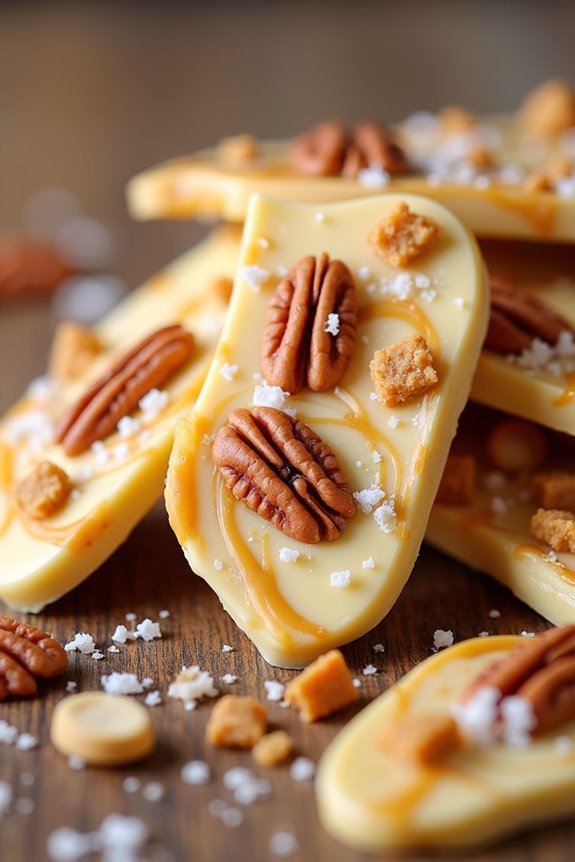
- Add the Crunchy Goodness: Sprinkle half a cup each of chopped pecans and chopped toffee pieces on top of the swirled mixture. Then, finish it off with a sprinkle of 1 tsp of sea salt. The contrast between sweet and salty is where the magic happens.
- Chill and Break: Pop the whole sheet into the fridge and chill it until firm. This usually takes about an hour. Once it’s solidified, pull it out, break it into pieces, and admire your homemade masterpiece. If you can resist snacking on it all right away, you’ve got some delicious treats ready for sharing (or not… no judgment here).
And there you have it—your very own Butterscotch Vanilla Bark! It’s an easy treat that combines flavors and textures in a way that’s irresistibly delicious. With some high-quality gourmet cooking equipment, you can take your baking skills to the next level. Now you’re one step closer to being the snack-time hero of your household—so enjoy!
Tips & Variations
To kick things off, let’s chat about tips and variations for your Butterscotch Vanilla Bark—it’s not just about following the recipe, but also about making it your own.
If you’re feeling adventurous, try swapping in different nuts like almonds or even sprinkles for a fun twist.
I once accidentally used dark chocolate chunks instead of butterscotch, and guess what? It was a hit.
You can also adjust the saltiness; a little sprinkle of sea salt can really enhance those sweet flavors.
Just remember, if you’re adding extra goodies, balance is key.
And don’t stress if it doesn’t look perfect; it’s bark, not a Picasso.
Store it well—an airtight container keeps it fresh for weeks.
Enjoy experimenting!
How to Serve?
Serving up Butterscotch Vanilla Bark is as easy as pie—only, you know, it doesn’t require turning on the oven. Just break the chilled bark into pieces, and you’re ready to go. I like to arrange the pieces on a colorful platter; it really makes the swirls pop.
You can even sprinkle a little extra sea salt on top for an eye-catching finish. When I serve it at gatherings, I usually pair it with coffee or tea—everyone loves that sweet and salty combo.
Oh, and don’t forget to have some napkins handy because things can get a little sticky. Trust me, it’ll be a hit, and you might even find yourself hiding a piece or two for later.
Storage & Reheating Guide
After you’ve enjoyed those delightful pieces of Butterscotch Vanilla Bark, you’ll want to think about how to keep them fresh for as long as possible.
I usually store mine in an airtight container at room temperature. Trust me, it’s perfect for up to two weeks, and you won’t need to hide them from the kids—well, not too much.
If you live somewhere warm and, let’s be honest, not a little bit like a sauna, consider the fridge; it keeps everything solid but can change the texture a bit.
Honestly, who wants to reheat this gourmet creation? Just dig in, but if you must, a few seconds in the microwave makes it ooey-gooey all over again. Also, using airtight food storage solutions can help maintain the quality of your treats even longer.
Final Thoughts
Since this Butterscotch Vanilla Bark is such a crowd-pleaser, it’s hard not to feel a little proud making it.
I mean, who doesn’t love that sweet and salty combo? It’s perfect for parties, movie nights, or just when you need a little treat.
I remember the first time I made it—I thought I’d messed it up by swirling too much, but folks loved it anyway.
It’s all about enjoying the process, right? Plus, it looks beautiful with those swirls and toppings.
If you’re ever in a pinch for a quick dessert, this bark’s your answer.
Just don’t blame me if it disappears fast. You might as well make double because it’s that good, trust me.
Happy snacking!