
When I first tried ube buchi, I thought, “How could something so simple be so divine?” It’s like biting into a crispy cloud filled with sweet, chewy goodness. The best part? It’s easier to whip up than it sounds, though I’ve had my share of oops moments in the kitchen. Trust me, they just add to the fun. Stick with me, and I’ll guide you through making this delightful treat that’ll surely impress friends and family alike.
Why You’ll Love This Recipe
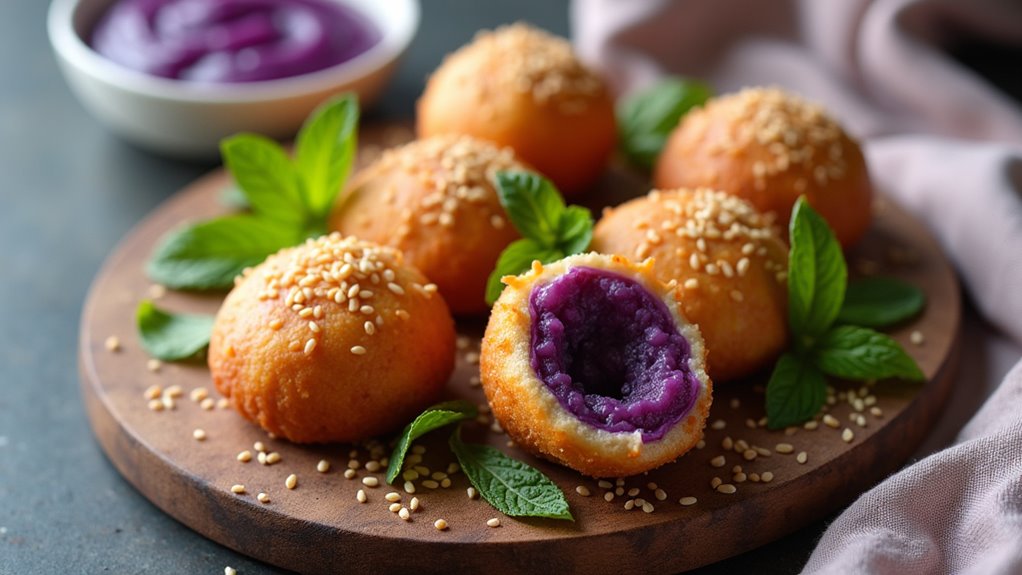
When you bite into a warm, crispy Ube Buchi, you’ll immediately understand why this treat is such a beloved Filipino snack.
Trust me, when you get that perfect crunch followed by the soft, sweet center of ube halaya, you can’t help but smile. It’s like a warm hug for your taste buds.
Plus, making the best ube buchi is surprisingly easy. I mean, if I can do it without creating a kitchen disaster, anyone can.
You simply mix some glutinous rice flour, sugar, and water, roll them into balls, and deep-fry until golden.
Seriously, what’s not to love about that? It’s a sweet Filipino delight that always gets compliments, and you’ll feel like a superstar in the kitchen.
Equipment List
You’ve probably got a good idea of how amazing Ube Buchi can be, but let’s talk about what you need to make this magic happen in your kitchen.
First up, you’ll need a mixing bowl—preferably one that can handle a bit of dough wrestling. A rolling pin is also essential, unless you want to flatten your dough with your hands, and let’s be real, that’ll get messy.
Don’t forget measuring cups and spoons; precision is key here. For frying, a deep pot or pan is a must, along with a thermometer to keep the oil at the right temperature, unless you enjoy surprise kitchen experiments.
Finally, grab some paper towels for that all-important oil drainage. Plus, having a good baking sheet set will ensure your Ube Buchi comes out perfectly golden and evenly cooked. You got this!
Our Ingredients
When you’re ready to whip up some delicious Ube Buchi, it all starts with the right ingredients. Trust me, these flavorful little bites, with their beautiful purple filling and crunchy sesame coating, are going to take you on a delightful adventure.
There’s something about that chewy texture combined with the sweet and earthy taste of ube that just warms the heart. Plus, they’re so fun to make, especially when you get to indulge in the deep-frying part. It’s like being a kid again, but with a much better snack waiting for you at the end.
Ready to gather your ingredients? Let’s plunge in.
Here’s what you’ll need:
- 2 cups glutinous rice flour
- 1/2 cup sugar
- 1 tsp baking powder
- 3/4 cup water (adjust as needed)
- 1 cup ube halaya (purple yam jam)
- Sesame seeds for coating
- Cooking oil for frying
Now, before you dash off to the store, let’s talk about a few things regarding these ingredients.
First, glutinous rice flour is pretty essential for that unique texture, so don’t try to swap it with regular flour—your buchi will just feel sad and confused.
And if you can’t find ube halaya right away, no worries; sometimes, you might need to get a little crafty and make your own, though that’s a whole other adventure.
Just make sure everything is fresh. Trust me, the quality of your ingredients shows up in the end result, and these little goodies deserve the best!
Step-by-Step Instructions
Making Ube Buchi is a fun and rewarding experience, and it’s easier than you might think. Just follow these simple steps, and you’ll be on your way to creating these delicious, crispy treats filled with sweet, earthy ube.
- Mix the dry ingredients: In a mixing bowl, combine 2 cups of glutinous rice flour, 1/2 cup of sugar, and 1 teaspoon of baking powder. Give it a good stir until everything is well mixed. (This is where the magic begins, so take your time!)
- Add water: Gradually pour in 3/4 cup of water while stirring the mixture. You want to form a pliable dough, so add a bit more water if it feels too dry. (You don’t want it sticking to your fingers like crazy, but don’t overdo it either.)
- Shape the dough: Now comes the fun part—divide the dough into small balls, about the size of a golf ball. Flatten each ball slightly and place about a teaspoon of the delicious ube halaya (1 cup in total) in the center. Then, carefully fold the dough over the ube filling to seal it completely. (Trust me, it’s a bit like wrapping a gift. You want it to look nice!)
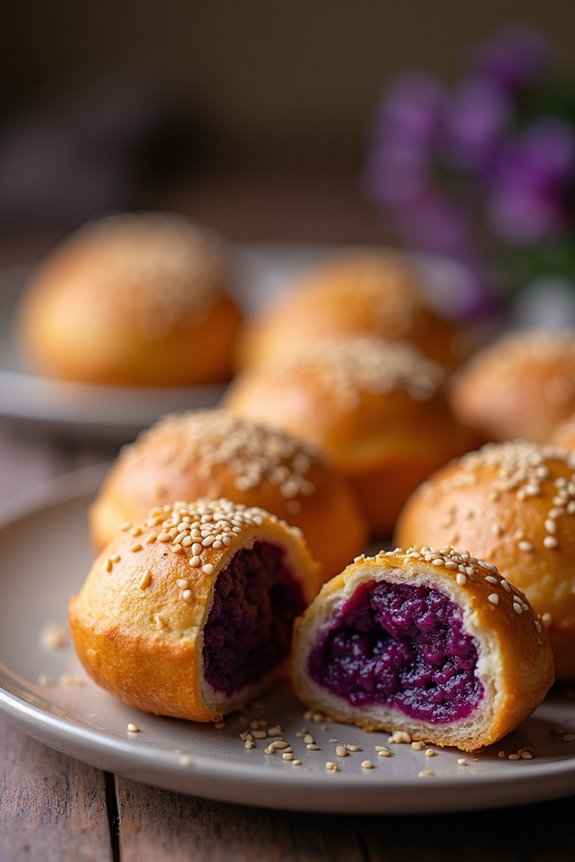
- Coat with sesame seeds: Once all your balls are shaped and sealed, roll each one in sesame seeds until they’re fully coated. This not only adds crunch but also makes them look adorable. (And let’s be honest, who doesn’t love a bit of crunch?)
- Heat the oil: In a deep pan or wok, heat your cooking oil to about 325°F (162°C). This temperature is key to frying without burning your buchi. (Remember, medium heat is your friend, so don’t crank it up too high unless you want them to explode like mini volcanoes.)
- Fry the buchi: Carefully add a few buchi to the hot oil. Fry them until they’re golden brown and crisp, which usually takes about 4-6 minutes. Be sure to turn them occasionally for even cooking. (Keep an eye on them; nobody likes a burnt buchi.)
- Drain and cool: Once they’re beautifully golden, remove the buchi from the oil and let them drain on paper towels. This will help soak up any extra oil. (Now take a moment to admire your handiwork, maybe even taste one—quality control is important, right?)
Now, that’s it! You’ve just made your very own Ube Buchi. Feel free to share with friends or indulge in a solo snack session—you’ve earned it. Additionally, having the right seafood cooking equipment can enhance your culinary skills as you explore different dishes.
The combination of gooey ube and crunchy texture is worth every bit of effort. So, what’re you waiting for? Go ahead and enjoy your creations—every bite is a celebration!
Tips & Variations
Whether you’re a seasoned chef or just dipping your toes into the world of cooking, experimenting with Ube Buchi can be such a fun adventure.
You can totally switch things up by adding a pinch of salt to the dough, which balances the sweetness. Not feeling ube? Try filling it with mango or chocolate for a twist.
If your dough cracks, don’t fret; just moisten it lightly. And remember, medium heat is key to prevent those little gems from bursting—trust me, I learned that the hard way. I once had a frying fiasco that looked like a scene from a food horror movie.
How to Serve?
Serving up Ube Buchi is where the magic really happens, and trust me, it’s as much about presentation as it’s about flavor.
I usually like to arrange these golden little balls on a nice platter—maybe add a few fresh flowers for color.
And don’t forget the sesame seeds; those tiny specks are what make it so delightful.
When I serve, I often pair it with a light soy or coconut dipping sauce. Fancy, right?
Just imagine that sweet ube filling bursting in your mouth. It’s like a celebration in every bite.
I love watching my friends’ eyes light up when they take a taste. It’s all about sharing those moments, right?
Storage & Reheating Guide
After you’ve made those delicious Ube Buchi and enjoyed every last bite, you might wonder what to do with any leftover treats.
First, let them cool completely, as the last thing you want is a soggy mess in your fridge. I usually store mine in an airtight container, layering them with parchment paper to keep the crunch intact.
They’ll stay fresh for about three days, but good luck resisting them that long.
When you’re ready to dig in again, I recommend reheating them in an air fryer or oven at 350°F (175°C). This brings back that delightful crunch. Professional baking tools can help you achieve the perfect texture and flavor in your treats with high-quality utensils and equipment.
Microwave? Well, maybe if you’re desperate, but trust me, they’ll lose their charm. Who wants sad Ube Buchi, right?
Final Thoughts
Even though I could easily eat a whole batch of Ube Buchi in one sitting, there’s something special about sharing them with friends and family.
Seriously, the joy on their faces is priceless. Just picture it: you take that first bite, and the crispy outside gives way to the sweet, creamy ube inside.
Heaven. You might risk a sugar coma, but hey, it’s worth it.