

Let’s talk about the Decadent Oreo Cheesecake Recipe, shall we? I mean, who doesn’t love a dessert that combines rich creaminess with those satisfying Oreo crunches? I remember the first time I made this cheesecake; I was convinced I could rival a bakery. Spoiler alert: my friends gobbled it up. Seriously, it’s that good. But, let me guide you through the process soon, as there are some tips you won’t want to miss.
Why You’ll Love This Recipe
You know, when it comes to desserts, nothing quite hits the spot like a rich and creamy Oreo cheesecake.
I mean, who doesn’t love that perfect balance of chocolatey crunch and velvety creaminess? It’s like a hug for your tastebuds.
This Oreo cheesecake is a decadent dessert delight that’ll impress your friends and family, and let’s be honest, it’s so easy to whip up.
You just mix, bake, and chill—no fancy techniques needed.
Plus, there’s something incredibly satisfying about smashing those Oreos for the crust. Trust me, you’ll feel like a kitchen rockstar.
And if you’re anything like me, the leftovers (if there are any) disappear faster than you can say “cheesecake.”
What’s not to love?
Equipment List
When it comes to whipping up that luscious Oreo cheesecake, having the right equipment can make all the difference. I mean, who wants to struggle with subpar tools?
For this recipe, you’ll need an 8-inch springform pan. Trust me, it makes releasing that gorgeous cheesecake a breeze. You’ll also want a mixing bowl, preferably a large one, for all that cream cheese goodness.
A hand mixer will save you from tiring arm workouts—thankfully. Don’t forget a rubber spatula for scraping every last bit of deliciousness. A food processor is a game-changer for crushing Oreos; those pesky crumbs won’t stand a chance.
Finally, you’ll need measuring cups and spoons to nail those ratios. When you’re baking, using quality tools, like an artisan bread maker, can elevate the entire process and result. Go ahead and gather your gear—you’ll thank yourself later.
Our Ingredients
When you’re gearing up to make an Oreo Cheesecake, it’s essential to gather your ingredients first. I mean, nothing’s worse than realizing you’re missing something crucial halfway through the process, right?
Picture it: you’re all ready to whip up that creamy filling, and suddenly—bam!—no cream cheese. Total buzzkill. So, to avoid any kitchen drama, let’s lay out exactly what you’ll need for this indulgent treat.
- 26 Oreos (for the crust)
- ¼ cup unsalted butter, melted
- 3 (8 oz) packages of cream cheese, at room temperature
- 1 cup sugar
- ½ teaspoon salt
- ½ cup sour cream
- 1 tablespoon vanilla extract
- 3 large eggs
- 1 large egg yolk
- 3 tablespoons flour
- 12 Oreos, crushed and chopped (for mixing into the filling)
Now, about those ingredients. Quality matters! You’ll want to use good cream cheese—none of that low-fat stuff unless you’re really on a health kick. Trust me, the full-fat cream cheese makes for a creamy and decadent cheesecake that simply can’t be beaten.
And when it comes to the Oreos, feel free to go for the classic ones, or get adventurous with a flavored variety if you’re feeling a little wild. Just don’t forget that melted butter; it acts as the glue that keeps your crust together, so make sure to mix it well with the crushed cookies.
You’re going to love diving into this creamy masterpiece, so get those ingredients ready and let’s move on to how we’re going to bring it all together!
Step-by-Step Instructions
Making an Oreo Cheesecake is a delightful adventure, and you’re just moments away from indulging in a creamy slice of heaven. Mixing the batter is quick and simple—just follow these easy steps, and before you know it, you’ll have a show-stopping dessert ready to chill.
- Preheat your oven to 325°F (about 163°C). This step is super important, as you want your cheesecake to bake evenly.
- Crush 26 Oreos in a food processor until they turn into fine crumbs. If you don’t have a food processor, feel free to put them in a bag and smash them with a rolling pin—it can be pretty fun, honestly.
- Mix the crushed Oreos with ¼ cup of melted unsalted butter in a bowl until it’s combined. The butter acts like the glue here, so make sure it’s all mixed together nicely.
- Press the Oreo mixture firmly into the bottom of an 8-inch springform pan to form your crust. Getting it nice and compact will give you a sturdy base. Then, pop it into the oven and bake for about 10 minutes. This helps to set the crust. Let it cool while you get to the filling!
- In a large mixing bowl, beat together 3 packages (8 oz each) of cream cheese, 1 cup of sugar, and ½ teaspoon of salt until the mixture is super smooth and creamy. Make sure your cream cheese is at room temperature to avoid lumps, which is a common rookie mistake.
- Add in ½ cup of sour cream and 1 tablespoon of vanilla extract to the cream cheese mixture, and beat until everything is well combined. This is where that fantastic cheesecake flavor starts to come together.
- Next, add the 3 large eggs and 1 egg yolk, one at a time. After each addition, mix just until incorporated (Don’t overmix! Overmixing can lead to cracks, and we all want a flawless cheesecake, right?)
- Gently fold in 3 tablespoons of flour and the 12 crushed and chopped Oreos. Be careful not to overwork the batter here. We’re going for a texture that’s smooth but still has those tasty Oreo bits throughout.
- Pour the cheesecake filling over your cooled crust in the springform pan. Spread it evenly with a spatula, and that batter looks irresistible, doesn’t it?
- Bake your cheesecake for approximately 55 minutes, or until the edges are set but the center still has a slight jiggle. You’ll know it’s close when it’s slightly puffed up and has that gorgeous golden edge.
- Once it’s done baking, turn off the oven and crack the door open. Let the cheesecake cool in the oven for about an hour. This way, you avoid those pesky cracks that can form from sudden temperature changes.
- After it’s cooled, loosely run a knife around the edges to help remove it from the sides of the pan. Then, chill your cheesecake in the fridge overnight (if you can resist)—trust me, it’s worth the wait.
And just like that, you’ve made an Oreo Cheesecake! It’s rich, creamy, and packed with Oreo goodness that will make your taste buds dance. Enjoy a slice and don’t forget to share—unless you want to keep this creamy masterpiece all to yourself. Happy baking! The use of premium baking equipment can significantly enhance your baking experience and yield even better results.
Tips & Variations
Baking a cheesecake isn’t just about following a recipe; it’s also about making it your own. For a twist, consider swapping out some Oreos for peanut butter cookies. Trust me, it sounds crazy, but it’s delicious.
If you want an extra creamy texture, toss in an additional egg or a splash of heavy cream. Don’t be shy about experimenting with flavors; I’ve tried lemon zest and even caramel drizzles, and they’ve always wowed my friends.
And here’s a tip you’ll really appreciate—loosen the edges with a knife after baking. I learned that the hard way, with a cracked cheesecake disaster. No one wants that.
Just think of all the variations waiting for you to explore, and have fun with it!
How to Serve?
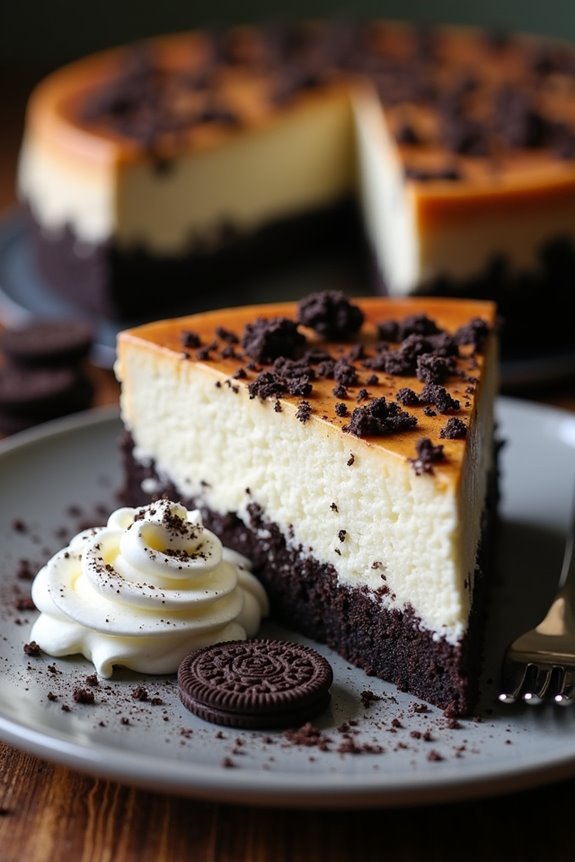
Serving up your Oreo cheesecake is almost as rewarding as making it, and trust me, your guests are going to love it.
Once it’s chilled, slice it into generous pieces—no one wants a tiny sliver of such goodness. I like to serve mine on a colorful plate to make it pop. A dollop of whipped cream on top? Yes, please.
And don’t skip the extra crushed Oreos for a sprinkle—it adds a nice touch, like a cherry on top but better. For a fun twist, serve it with a side of chocolate or caramel sauce. Just imagine the ooey-gooey goodness.
Storage & Reheating Guide
After enjoying a slice (or two) of your delicious Oreo cheesecake, it’s likely you’ll be pondering how to store those leftovers. I mean, who can resist that creamy goodness sitting in the fridge?
First, cover your cheesecake tightly with plastic wrap or aluminum foil. This helps keep it fresh and prevents any funky fridge odors from sneaking in. It’s best stored in the fridge for up to five days.
Now, if you want to put some of that rich delight in the freezer, go ahead! Just slice it up, place the pieces in airtight containers, and they’ll last for about three months. When you’re ready to indulge again, let the slices thaw in the fridge overnight. Trust me, it’s worth the wait.
Additionally, using premium cookware sets can make your cheesecake baking experience even more enjoyable, ensuring that you achieve the perfect texture every time.
Final Thoughts
While you might be tempted to gobble up the entire Oreo cheesecake in one sitting, trust me when I say that taking your time with it can be just as satisfying. Each creamy slice is like a mini celebration, so savor every bite—don’t just inhale it like it’s the last cookie in the jar.
I mean, who doesn’t rush dessert sometimes? Imagine that first bite of rich cheesecake, with chocolatey Oreos melting in your mouth. Seriously, it’s heavenly.
Plus, sharing it with friends or family makes it even better. So, gather around a table, take a moment, and enjoy this delicious creation. You’ll be glad you slowed down; it’s those little joys that make cooking—and eating—so rewarding.