
Let me tell you about syrniki, those fluffy little cottage cheese pancakes that have a way of making any breakfast feel like a treat. They’re not just pancakes; they’re a hug on a plate, and honestly, who doesn’t want that? I remember my first attempt—let’s just say, flour was everywhere. But with just a few simple ingredients, I found my stride, and now I can’t get enough. Want to join me on this delicious journey?
Why You’ll Love This Recipe
When you take that first bite of syrniki, it’s like a warm hug on a chilly day. Seriously, these little cottage cheese pancakes are incredible.
You’ll love this syrniki recipe because it’s so easy to make and yet tastes like a gourmet treat. The crispy outside gives way to a soft, fluffy center, making each mouthful a delight. Plus, you can dress them up however you like—sour cream, jam, or fresh strawberries, anyone?
I remember the first time I made them; I may have burned a batch or two, but the deliciousness was worth every sticky moment. Trust me, once you try these, you’ll want them for breakfast, dessert, or any time in between.
Equipment List
Making syrniki doesn’t require a ton of fancy equipment, but I still like to have a few key tools on hand.
First off, a good mixing bowl is essential—trust me, you don’t want cheese splatters all over your kitchen. A sturdy fork or potato masher works wonders for getting that cottage cheese nice and smooth.
Then, there’s the non-stick skillet; you’ll be so glad you opted for this when flipping those pancakes—you’ll avoid more mess than your kitchen already has. Finally, some measuring cups and spoons are a must.
Don’t forget your trusty spatula for flipping! With these simple tools, you’ll be ready to create the fluffiest syrniki without feeling overwhelmed. Who knew cooking could be this easy? Also, investing in an adjustable rolling pin can help you ensure your syrniki are an even thickness for perfect cooking.
Our Ingredients
When it comes to making syrniki, the joy is all in the ingredients. Picture a warm, inviting breakfast, or maybe a cozy dessert—who wouldn’t want that? Trust me, having the right ingredients is half the battle won.
Now, let’s explore what you’ll need to whip up these delightful Russian cottage cheese pancakes.
Ingredients:
- 425 g farmer’s cheese (or tvorog, if you’re feeling authentic)
- 1 egg
- 2 tbsp sugar (feel free to choose brown or white, whichever you prefer)
- 2 tsp vanilla sugar (totally optional, but oh-so-nice)
- ½ tsp salt
- 2–3 tbsp flour (plus a bit extra for dusting your hands)
- 2–3 tbsp vegetable oil (for frying up those golden beauties)
- Optional: strawberries, sour cream, or yogurt for serving (because, why not?)
Now, let’s talk about the ingredients. It’s all about quality and balance here.
If you can, go for fresh farmer’s cheese; its texture and taste make a world of difference.
And the egg? It’s your binding agent, giving those syrniki structure while they fry. Sugar and vanilla sugar are the secret little sparkles that elevate your pancakes from good to absolutely delicious.
Don’t rush through the flour part either—too much can turn these fluffy delights into dense little hockey pucks, and nobody wants that!
Also, as for the toppings, strawberries and sour cream just add that perfect touch of sweetness and creaminess. Think of it as the cherry on top, or rather, the strawberry on the side.
Get ready to make breakfast magic with these simple but essential ingredients.
Step-by-Step Instructions
Making syrniki is a delightful experience that fills your kitchen with the warm aroma of pancakes and brings a smile to your face. Mixing the batter is quick and simple—just follow these easy steps, and before you know it, you’ll be savoring these scrumptious Russian cottage cheese pancakes.
1. Mash the Cheese: Start with 425 g of farmer’s cheese. Use a fork or your hands to mash it in a mixing bowl until it’s smooth. If you’re using tvorog, the texture might be a bit different, but that’s okay—it’ll still turn out delicious.
2. Add the Egg and Sweetness: Crack 1 egg into the mashed cheese. Then, mix in 2 tablespoons of sugar (brown or white, pick your preference) and, if you’re feeling fancy, 2 teaspoons of vanilla sugar. Season this heavenly mixture with ½ teaspoon of salt. It’s the balance you need to take these pancakes from okay to oh-so-good.
3. Stir in the Flour: Grab 2 to 3 tablespoons of flour and gently stir it into your cheese mixture with a spatula until a thick, sticky batter forms. Don’t go crazy adding flour—just enough to hold things together.
Let it rest for about 15 minutes—trust me, this helps the flavors meld, and it makes your pancakes fluffier.
4. Preheat the Skillet: While your batter is resting, heat 2 to 3 tablespoons of vegetable oil in a non-stick skillet over medium heat. You want that oil hot enough that it sizzles when you drop the batter in, but not so hot that it burns. We’re making pancakes, not charcoal!
5. Shape the Pancakes: Dust your hands with flour to prevent sticking (your future self will thank you). Using your hands, take small portions of the batter and shape them into small, flattened pancakes, about 1 to 1.5 inches thick. It’s a bit like crafting miniature dish-shaped happiness.
6. Fry the Syrniki: Carefully place the shaped pancakes into your skillet. Fry them for about 3 minutes on one side, or until they turn a lovely golden brown.
Don’t forget to cover the pan towards the end—this will keep them soft and fluffy. Flip them over and cook for another 2-3 minutes. You want both sides to be equally delicious.
7. Drain and Serve: Once golden brown and fragrant, take the syrniki out of the skillet and set them on a paper towel to drain any excess oil. Just give them a moment to breathe—you’ve earned it.
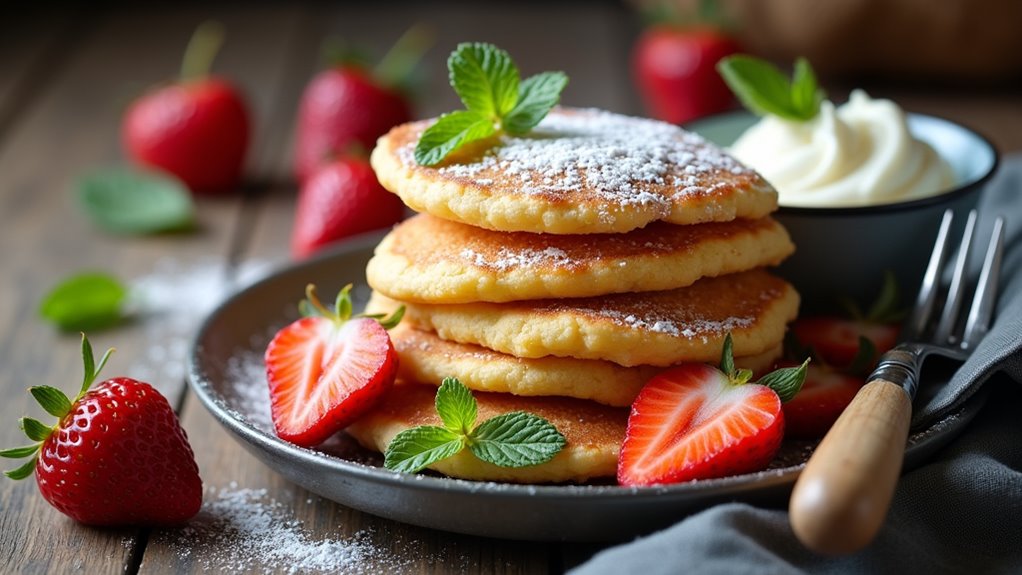
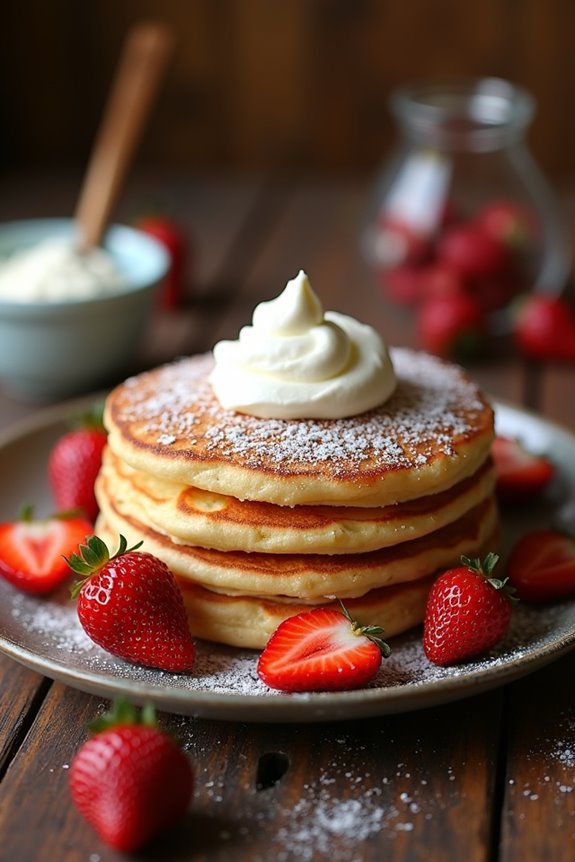
8. Enjoy: Serve your syrniki warm, topped with a dollop of sour cream, a sprinkle of sugar, or fresh strawberries. It’s a breakfast treat that feels fancy without requiring culinary school training. Enhancing your experience with premium cooking appliances can elevate your kitchen endeavors to a whole new level.
And there you have it, your own homemade syrniki—eager to be devoured. Don’t forget to share a few (or maybe keep them all to yourself—it’s up to you). Happy cooking!
Tips & Variations
Tips & Variations can really elevate your syrniki game, so don’t hesitate to experiment a little.
I’ve found that switching up the flour can make a massive difference—try using whole wheat or coconut flour for a twist. Bringing in flavors like lemon zest or cinnamon adds a delightful kick too.
Remember, my first batch was a disaster—too much flour, and I ended up with hockey pucks. So, trust your instinct on the batter’s consistency. If you’re feeling adventurous, toss in some chocolate chips or fresh blueberries. I promise, no one will complain about dessert for breakfast.
And hey, don’t forget to lightly toast that skillet. Trust me, it’s the secret to achieving those envy-inducing golden edges.
How to Serve?
Serving syrniki is almost as fun as making them, especially because they’re just so versatile.
I love to start with a dollop of sour cream on top, but hey, you do you. Drizzling some maple syrup or honey brings a sweet touch that’s hard to resist. Fresh strawberries or blueberries? Yes, please. They add a burst of flavor and color!
If I’m feeling fancy, I’ll sprinkle powdered sugar for that café vibe. But let’s be real—I’ve definitely had days where I just gobbled them up plain, and they were still delicious.
Storage & Reheating Guide
After enjoying those delicious syrniki topped with your favorite fixings, you might find yourself wondering how to keep the leftovers fresh for another round of yum.
First off, I recommend storing them in an airtight container in the fridge. They’ll usually stay good for about three days.
If you’re like me and often forget about leftovers, you might want to freeze them instead. Just layer them between sheets of parchment paper, pop them in a freezer bag, and they’ll be happy for up to three months.
When you’re ready to enjoy them again, simply reheat in a skillet over low heat until warmed through. You can also use the oven. Trust me, they’ll be just as fluffy and delicious as the first time! Additionally, consider storing them in canning jars for a practical and space-efficient option.
Final Thoughts
While I was flipping my last batch of syrniki, I couldn’t help but think about how these little pancakes are such a delightful treat, perfect for any time of day.
Honestly, they’re a game changer for breakfast, brunch, or even a late-night snack. The soft, fluffy texture combined with that hint of sweetness just hits the spot.
And let’s be real—if you manage to make a perfect golden batch, isn’t that basically chef-level talent? I’ve had my fair share of pancake fails, but syrniki turned out to be my culinary superhero.
Just remember, serve them hot, maybe with a dollop of sour cream or fresh fruit. Trust me, you’ll impress everyone, including yourself, with this tasty creation.