

I’ve gotta admit, making homemade Napa cabbage kimchi has become one of my favorite kitchen adventures. There’s something so satisfying about transforming a simple head of cabbage into a vibrant burst of flavors. The first time I tried this, I underestimated the amount of spicy goodness I’d be creating—and the joy it brought to my dinner table. So, if you’re curious about how to whip up this culinary gem and elevate your meals, stick around, because the magic is just beginning.
Why You’ll Love This Recipe
You might wonder why I’m so obsessed with this Napa cabbage kimchi recipe, and honestly, it’s not just because it’s delicious.
It’s the perfect blend of flavors and textures that just hooks me every time. The crispness of the napa cabbage mingling with the spicy kick of gochugaru makes my taste buds dance.
You’ve got that salty depth from the fish sauce, and oh, the garlic and ginger—they’re simply irresistible.
Plus, the best part? Making kimchi is therapeutic. I mean, who doesn’t love packing those cabbage leaves with spicy goodness?
And if you’re like me, the joy of sharing this homemade kimchi with friends is unbeatable. It’s a simple way to impress, and trust me, they’ll ask for the recipe.
Equipment List
When it comes to making delicious Napa cabbage kimchi, having the right equipment makes all the difference. Trust me, you don’t want to be scrambling halfway through the process.
First, grab a large mixing bowl—this is where the cabbage will swim in saltwater bliss. You’ll also need a sharp knife for cutting, and a cutting board, of course. A big jar or fermentation container‘s essential for the final product, and I prefer a glass one—I think it makes me feel fancy. Having high-quality premium kitchen cookware also elevates your cooking experience.
Don’t forget some measuring cups and spoons. Oh, and a spatula for mixing the spice paste! This gear might seem simple, but it really helps keep things organized and fun.
Happy fermenting!
Our Ingredients
When it comes to making Napa cabbage kimchi, the ingredients are really where the magic begins. Each component brings its own unique flavor to the dish, and trust me, you don’t want to skimp on any of them. Imagine the bright crunch of napa cabbage, the comforting warmth of garlic and ginger, and that distinct kick from the gochugaru—it’s a flavor symphony waiting to happen.
Let’s plunge into what you’ll need to create this deliciousness.
Here’s your ingredient list:
- 1 large napa cabbage
- 1 cup Korean coarse sea salt
- 1/3 cup Korean red pepper flakes (gochugaru)
- 1/4 cup fish sauce
- 3 tablespoons minced garlic
- 2 teaspoons minced ginger
- 1 tablespoon sugar
- 1 cup Korean radish (cut into matchsticks)
- 2 green onions (chopped)
- 1/4 cup Asian chives (optional)
Now, let’s chat about these ingredients a bit more. The napa cabbage, of course, is your main star—it’s got that satisfying crunch that can’t be beat.
The salt is crucial for drawing out moisture and starting the fermentation process—just don’t get too excited and accidentally dump in way too much, or you might end up with a salty disaster. The gochugaru is key for spiciness; if you’re like me and can’t handle too much heat, you might want to start with less and add more later.
And then there’s the fish sauce, which sounds a bit intimidating, but it adds that rich, umami depth that makes the kimchi irresistible. If you can, seek out fresh, quality ingredients for the best results—they truly make a difference.
Gathering everything can feel a bit overwhelming at first, but once you have your pantry stocked and your produce ready, it’s really just a matter of mixing, packing, and waiting for that delicious flavor to develop.
Take it one step at a time, and before you know it, you’ll have your very own homemade kimchi ready to enjoy!
Step-by-Step Instructions
Making your own delicious Napa cabbage kimchi is an adventurous culinary journey, and trust me, the end result will be worth the wait. The best part? It’s a simple process that anyone can follow, even if you’re new to fermentation. Ready? Let’s get started on turning those fresh ingredients into mouthwatering kimchi.
1. Prep the Cabbage: Start by cutting your 1 large napa cabbage into quarters. This makes it easier to soak. Now, let’s make that salt water. You’ll need around 1 cup of Korean coarse sea salt** dissolved in enough water to fully submerge the cabbage. Soak the cabbage quarters in this salt water for 2 to 6 hours—this step is vital for drawing out moisture and starting the fermentation magic**. Don’t forget to give it a little turn every hour or so. Take a moment to appreciate how this transformed the cabbage is going to be.
2. Rinse and Drain**: Once the soaking time is up and your leaves are bendy and soft (not snapping like a twig—no one wants that), rinse the cabbage thoroughly under cold water. You want to get rid of all that excess salt**. Then, let it drain well—just a few minutes should suffice.
3. Make the Paste: In a large bowl, mix together 1/3 cup of Korean red pepper flakes (gochugaru), 1/4 cup of fish sauce**, 3 tablespoons of **minced garlic**, 2 teaspoons of minced ginger, and 1 tablespoon of sugar**. Stir everything until it forms a nice, thick paste. This is where the magic happens.
If you’re like me and a bit clumsy, beware of splattering spicy paste on your shirt—it’s not a fun stain to explain.
4. Coat the Leaves: Now it’s time to get your hands a little dirty. Take the drained cabbage leaves and generously coat each one with your spicy paste, making sure to focus especially on the white parts. Don’t be shy—this is where all the flavor lives! You want a nice thick layer of that paste to guarantee each bite is bursting with flavor.
Tuck 1 cup of matchstick-cut Korean radish** and 2 chopped green onions** between the leaves during this step for that extra crunch and flavor dimension.
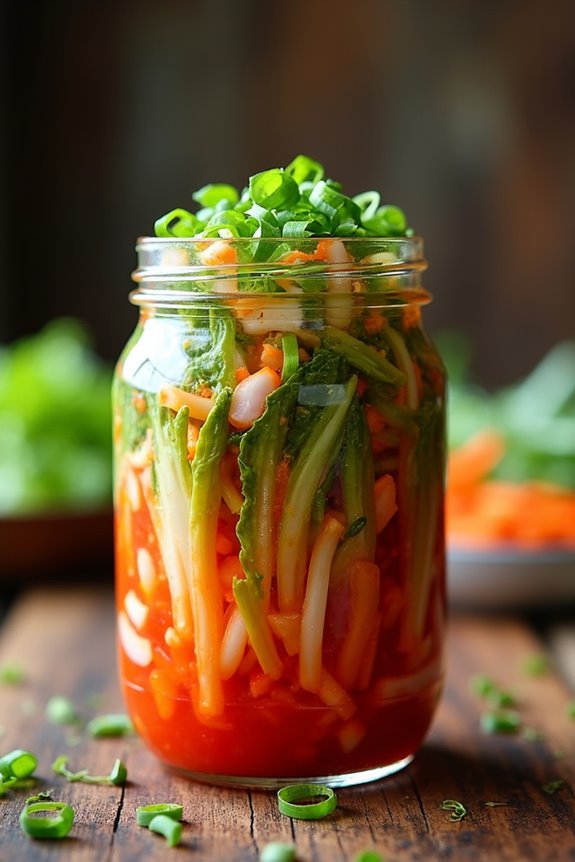
5. Pack It In: When all the leaves are coated, it’s time to fold them over and pack them tightly into a clean glass jar. Don’t just toss them in carelessly; press down as you go to remove any air bubbles. This is important—kimchi loves to be snug.
If you have 1/4 cup of Asian chives, you can add them in here for a bit of variety. Just think of how colorful and vibrant this jar will look on your shelf.
6. Fermentation Time: Once your jar is packed, cover it loosely with a lid or even a clean cloth. This will allow gases to escape while it ferments at room temperature for 1 to 2 days. Check it daily and give it a little press down to confirm it’s submerged in the brine.
Ahh, the anticipation of that tangy flavor developing is just delightful.
7. Refrigerate and Enjoy: After 1 to 2 days, taste your kimchi. If it’s to your liking, move it to the fridge. It’ll continue to ferment and develop flavor over the next week or two—if you can resist the urge to explore right away.
The longer you wait, the better it gets. Just remember to keep it covered with a cabbage leaf or plastic wrap to limit air exposure.
And just like that, you’ve crafted your very own Napa cabbage kimchi! It’s perfect as a side dish, in a rice bowl, or just by itself when you’re feeling peckish. Enjoy the process, and don’t worry if it’s not perfect—every batch has its personality. Happy kimchi-making!
Remember, having the right tools can greatly enhance your experience; essential gear for home cheese making can help in creating that perfect creamy texture if you decide to explore cheese making as well.
Tips & Variations
Packing all that delicious kimchi into jars is just the beginning of your flavor adventure.
Now, here comes the fun part. If you like it spicy, toss in an extra sprinkle of gochugaru. Not a fan of fish sauce? Try soy sauce for a vegetarian kick.
I once forgot the sugar, and the result? A tangy masterpiece! Make sure to cover your kimchi with a cabbage leaf or plastic wrap; it helps keep unwanted air away, which equals better flavor.
And don’t rush it—the magic happens as it sits. I’ve tasted mine after a week, and wow, it was a total game changer.
How to Serve?
Serving kimchi is one of the best parts of the whole process – it’s like the grand revelation of your creation.
The colors are vibrant, the aroma enticing. I love piling my kimchi on rice or enjoying it with Korean BBQ. If you ask me, it’s a flavor explosion that brings everything together. You could even toss it into a noodle bowl for a spicy kick!
Want something easy? Just serve it with fried eggs – trust me, you won’t regret it. And don’t forget, kimchi’s a great snack on its own or as a side dish at any meal.
I sometimes catch myself sneaking bites from the jar—who knew my culinary masterpiece would be so darn irresistible?
Storage & Reheating Guide
While kimchi is delicious fresh out of the jar, knowing how to store it properly can make all the difference when it comes to keeping those vibrant flavors alive.
I usually keep my kimchi in the fridge, tightly sealed to fend off air. It lasts for weeks—trust me, my fridge has seen its fair share of pickle-potent mystery jars.
If you want to slow down fermentation, try pressing a cabbage leaf on top before sealing.
When I’m ready to enjoy it again, I just scoop out what I need with a clean utensil. Forget microwaving; instead, I sauté it in a hot pan for a quick reheat—crispy and delightful.
Who doesn’t love a little extra crunch in their day? Additionally, using premium cookware sets can enhance the cooking experience, allowing for better heat distribution and food quality.
Final Thoughts
Even if you’re new to the world of fermentation, making Napa cabbage kimchi can be a truly rewarding experience.
You won’t just be whipping up a dish; you’ll be crafting a flavorful, tangy masterpiece. I remember my first attempt; the kitchen was a mess, and I think I might’ve overdone it on the garlic.
But hey, who doesn’t love a little extra flavor? As you plunge into this process, relish the simple joy of transforming simple ingredients into something extraordinary.
Don’t be afraid to tweak the spice levels to suit your taste. Trust me, it’s all about making it your own.