
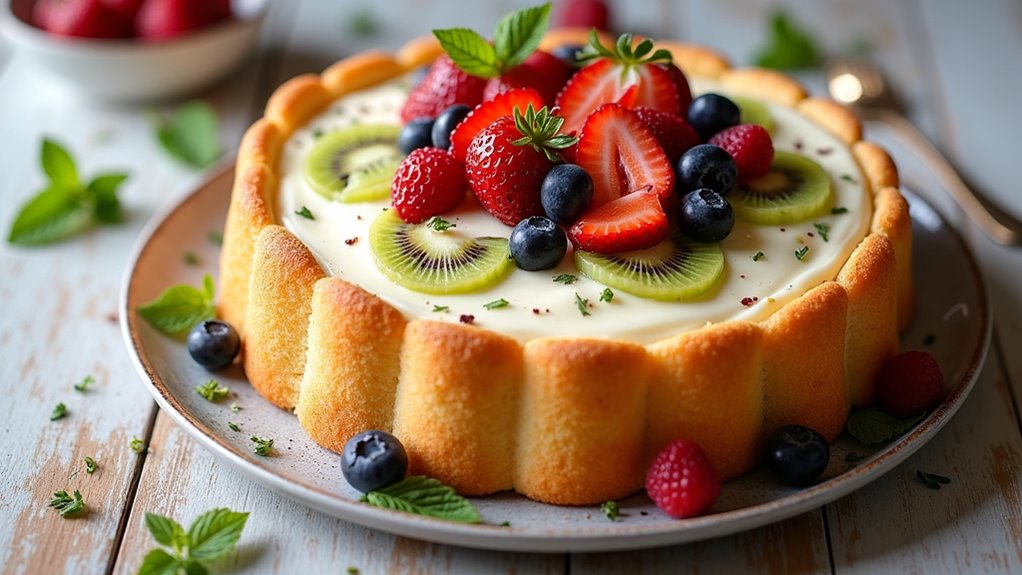
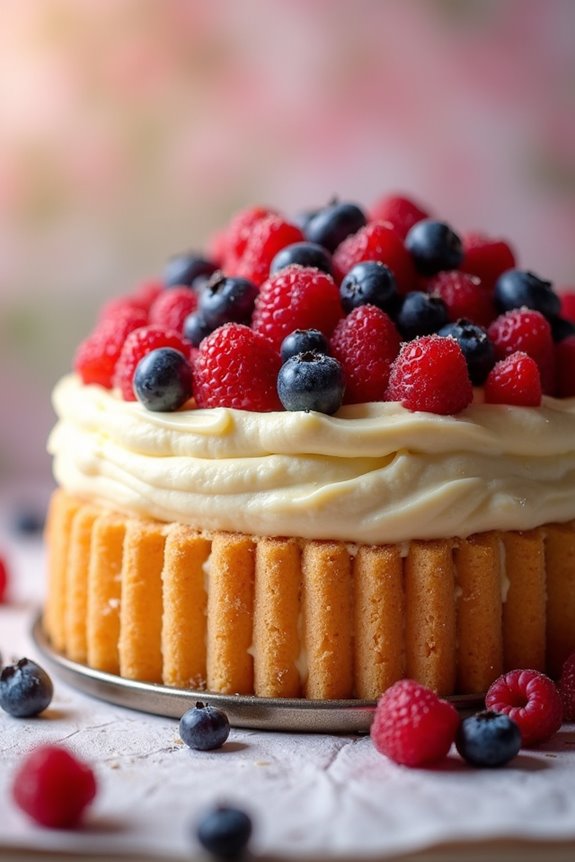
Have you ever found yourself in need of a dessert that looks impressive but doesn’t require culinary wizardry? The Charlotte Russe Cake might just be your answer. Imagine this: a delightful blend of ladyfingers cradling a luscious cream filling, topped with fresh fruit. It’s elegant, it’s eye-catching, and let’s be honest—it’s hard to resist. I’ll walk you through the steps, and I promise, if I can make it without burning anything (mostly), you can too. Ready to impress?
Why You’ll Love This Recipe
When you think about desserts, don’t you just want something that’s both delicious and impressive? That’s where the charlotte russe cake comes in. I mean, it’s like a showstopper in the dessert world, right?
Picture those ladyfingers elegantly lined up, cradling a creamy, dreamy filling that practically whispers, “Indulge me.” Plus, you can toss in some fresh fruits for a pop of color and flavor.
I still remember the first time I made it—let’s just say my kitchen looked like a whipped cream explosion. But the smile on my guests’ faces when they took a bite? Totally worth it.
If you want to impress without a culinary degree, this cake’s your golden ticket. Who knew elegance could taste so good?
Equipment List
Let’s talk about the essential tools you’ll need to whip up this delightful Charlotte Russe Cake. First, you’ll need a large mixing bowl for all those ingredients to come together.
A whisk is a must, too—unless you’ve got superpowers, but I don’t, so I always grab my trusty whisk.
A springform pan is perfect for showcasing that beautiful cake, as the right springform pan can help you achieve a clean and easy release. Don’t forget a rubber spatula; it’s essential for folding in those whipped eggs and cream without creating a kitchen disaster.
You might also want a sauce pan to melt the gelatin in warm milk. Finally, if you’re like me and enjoy a bit of decoration, having a sharp knife handy for chopping your fruit is key.
Happy baking!
Our Ingredients
When it comes to making a Charlotte Russe Cake, you really want to gather the right ingredients beforehand to guarantee a smooth and enjoyable baking experience. Trust me, there’s nothing worse than realizing halfway through that you’re missing something essential.
So, let’s plunge into what you’ll need for this delightful treat that’s sure to impress your friends and family (and, let’s be honest, possibly make you the star of the dessert table).
Here’s what you’ll need:
- 30-35 ladyfingers
- ¾ cup granulated sugar (for that perfect sweetness)
- ¾ cup water
- 1 tsp vanilla extract (the magic ingredient)
- 2¼ cups heavy cream
- 2½ envelopes gelatin
- 4 tbsp cold water
- 1 cup sugar (yup, another cup, but it’s worth it)
- 5 large eggs
- 1 cup whole milk
- ½ cup candied or fresh chopped fruit (strawberries, raspberries, or whatever tickles your fancy)
- Optional: fresh fruit for decoration (because we eat with our eyes first, right?)
Now, as you gather these ingredients, think about what type of fruit you’d like to add.
Fresh seasonal fruit not only makes your Charlotte Russe Cake look fabulous, but it also enhances the flavor and texture of the dessert. You could go for some vibrant strawberries or perhaps some luscious raspberries—whatever catches your eye!
And one more thing, don’t forget to check your pantry for the essentials like sugar and gelatin. They’re sneaky little items that often hide at the back of the cupboard. So, double-check before you begin your masterpiece!
Step-by-Step Instructions
Making a Charlotte Russe Cake is like creating a little slice of heaven that you can share with friends and family. Don’t worry if it sounds a bit overwhelming; we’ll go through each step together, and soon enough, you’ll impress everyone with your culinary skills. Ready to plunge into this delicious adventure? Let’s get started!
Step-by-Step Instructions
- Soften the Gelatin: In a small bowl, combine 2½ envelopes of gelatin with 4 tablespoons of cold water. Let it sit for about 5 minutes until it becomes soft—this is key for a luscious texture!
- Dissolve Gelatin in Milk: While the gelatin is softening, warm up 1 cup of whole milk in a saucepan over low heat. Once warmed, add the softened gelatin, stirring until it’s dissolved completely. Set this aside to cool a bit (don’t rush it, or you might end up with lumps).
- Whisk Egg Yolks and Sugar: In a separate bowl, whisk together 5 large egg yolks and ¾ cup of granulated sugar. You want this mixture to turn pale and creamy, which takes about 3–5 minutes of whisking—think of it as a mini workout.
- Combine Yolks with Milk and Vanilla: Gradually add your gelatin-milk mixture into the egg yolk-sugar blend. Toss in 1 teaspoon of vanilla extract for that magical aroma we all love. Mix it all together until well combined.
- Beat Egg Whites: In another clean bowl, beat the remaining egg whites until stiff peaks form. This is where your elbow grease comes in—if you can hold the bowl upside down and nothing falls out, you’ve nailed it.
- Whip the Cream: In yet another bowl (yes, more dishes), whip 2¼ cups of heavy cream until it holds soft peaks. It should be light, fluffy, and oh-so-deliciously tempting.
- Fold Mixtures Together: Carefully fold the egg yolk mixture into the beaten egg whites. Then, gently fold in the whipped cream. This is the moment where you blend everything body and soul—don’t overmix. We want the lightness to remain!
- Prepare the Ladyfingers: In a shallow dish, mix ¾ cup of granulated sugar with ¾ cup of water. Quickly dip each of the 30-35 ladyfingers into this syrup—just a quick dip will do! You want them moist but not soggy, like a cozy hug without the wet socks!
- Line the Mold: Begin lining your chosen mold (a springform pan works beautifully) with the dipped ladyfingers. Arrange them vertically around the edges and cover the bottom to create a lovely crust.
- Pour the Cream Mixture: Once all the ladyfingers are in place, pour your creamy mixture into the center of the mold. Give it a gentle shake or tap on the counter to level it out.
- Chill Until Set: Cover your masterpiece with plastic wrap and pop it in the refrigerator. Chill for at least 4 hours, or ideally overnight. Patience is key here—great things come to those who wait!
- Decorate and Serve: When you’re ready to serve, gently remove the cake from the mold and garnish it with ½ cup of candied or fresh chopped fruit on top. Fresh seasonal fruit is a great choice—it adds color and taste, turning your dessert into a showstopper.
And there you have it! Your Charlotte Russe Cake is ready to shine at any gathering. Enjoy each satisfying slice—and maybe save a piece for yourself, because you definitely deserve it after all that hard work! Remember, having the right premium baking equipment can enhance your baking experience and make the process easier and more enjoyable.
Tips & Variations
Even though I adore the classic Charlotte Russe Cake, experimenting with tips and variations can turn this delightful dessert into something truly unique.
For starters, why not swap out the vanilla extract for almond or lemon? It adds a fresh twist.
I’ve also had fun with adding a layer of chocolate ganache for those chocolate cravings.
If you’re feeling adventurous, try incorporating layers of fresh fruit or even a splash of liqueur into the cream mixture. Just be careful not to overdo it; nobody wants a cake that’s too soggy.
And hey, if you’re short on time, store-bought ladyfingers work just as well. Trust me, I’ve done it—no shame in the shortcut game!
How to Serve?
Serving a Charlotte Russe Cake can feel like a grand affair, but it’s surprisingly simple and oh-so-fun.
First, slice the cake with a sharp knife—be careful, those ladyfingers can be tricky, like a rogue noodle in a spaghetti fight.
I often place the cake on a pretty serving platter; it really elevates the look.
When you’re ready to partake, grab a spatula and serve generous slices—we all deserve a big piece, right?
Don’t forget to top each slice with a sprinkle of fresh fruit for that pop of color and burst of flavor.
And trust me, everyone will be raving about your culinary masterpiece.
It’s an impressive dessert, but just between you and me, it’s way easier than it appears.
Storage & Reheating Guide
When you’ve whipped up a stunning Charlotte Russe Cake and want to savor it over a few days, there are smart ways to store it that’ll keep it delicious.
First, cover the cake with plastic wrap or foil to keep it from drying out. If you can, store it in the fridge; the cool temp helps maintain its texture.
I usually try to finish it within three days because, let’s be honest, who could resist that creamy goodness for long?
As for reheating, though it’s typically served cold, if you prefer a slightly warmer treat, pop a slice in the microwave for about 10 seconds.
Just don’t blame me if it disappears too quickly. And remember, using high end cookware sets can enhance your baking experience, thanks to their superior heat distribution and durability.
Final Thoughts
After chatting about how to store and reheat that delightful Charlotte Russe Cake, I can’t help but reflect on what a treat it’s to whip up. Honestly, it’s like culinary therapy.
The aroma of vanilla wafting through my kitchen takes me back to my childhood—nothing says comfort like that. I love how simple ingredients transform into something spectacular, don’t you?
And let’s be real, who doesn’t want to impress friends at a party or family gathering? Just imagine their faces when they see your stunning cake, lined with ladyfingers and topped with fresh fruit. It feels good, doesn’t it?