
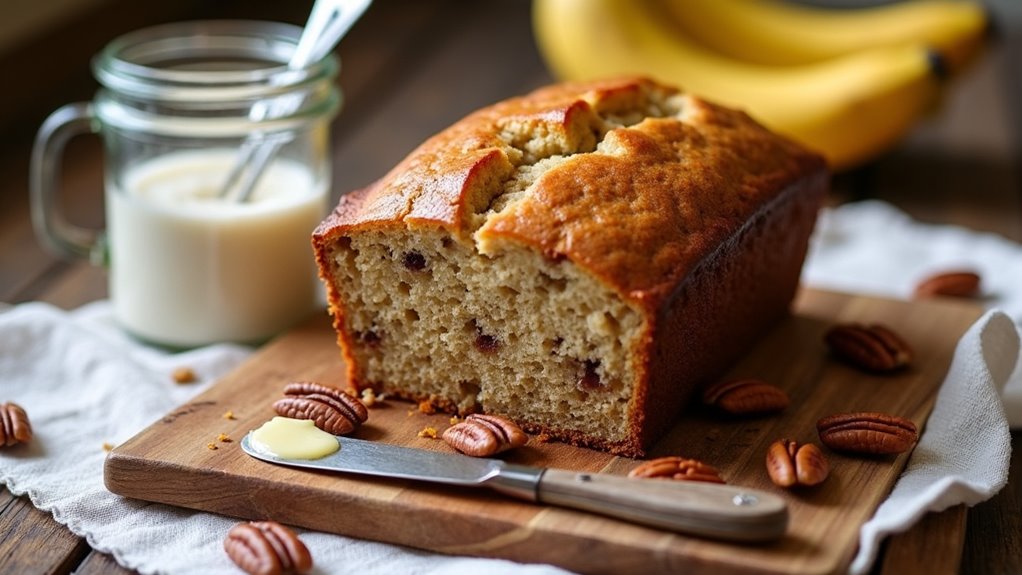
I’ve got to say, there’s just something about the smell of banana nut bread that makes me feel all warm and fuzzy inside. Maybe it’s the way the ripe bananas meld with those crunchy pecans, or perhaps it’s the cozy memories of baking with my family. Have you ever had that moment when you realize you’ve accidentally used too many bananas? Yeah, me too. But hey, that’s how the best recipes often come about. So, let’s jump into how to make this perfect loaf.
Why You’ll Love This Recipe
When I whip up this Banana Nut Bread, I can’t help but feel like a baking wizard—because honestly, who doesn’t love the smell of warm bread wafting through the house?
You’ll adore this recipe for its simplicity. With just a handful of ingredients, it’s like magic happening in your kitchen. Plus, the combination of overripe bananas and crunchy pecans is pure comfort food.
I mean, who knew something so delicious could come from those brown bananas sitting on your counter? Trust me, every slice is a little piece of heaven.
And if you have a hard time waiting for it to cool, I get it. Just remember, maybe try not to burn your tongue, okay? Enjoy the baking adventure.
Equipment List
Before diving into the delicious world of banana nut bread, it’s essential to gather your gear. You’ll need a sturdy mixing bowl, a spacious measuring cup, and a set of measuring spoons because, let’s face it, measuring isn’t my strong suit. A whisk or fork will help you mash those bananas—just don’t get too ambitious and send them flying. You’ll also want a rubber spatula for scraping every bit of goodness from the bowl. It’s also a good idea to have a set of quality baking tools that can enhance the precision of your measurements. And don’t forget your trusty 9×5-inch loaf pan; it’s like a cozy home for your bread while it bakes. Oh, and a cooling rack can save your countertop from a buttery mess. If you want to ensure success, consider investing in professional baking equipment that can elevate your baking experience. Ready to make magic happen in the kitchen? Let’s do this.
Our Ingredients
Alright, let’s talk about the ingredients needed to whip up the most amazing banana nut bread you’ve ever tasted.
Seriously, if there were awards for banana bread, this one would take home the gold. We’re talking sweet, moist, and packed with those delightful pecans that add the perfect crunch. So, roll up your sleeves, and let’s make sure you have everything you need before jumping in.
Here’s what you’ll need to gather:
- 2 cups all-purpose flour
- 1 ½ teaspoons baking soda
- ½ teaspoon salt
- 4 overripe bananas (the more spots, the better)
- 1 cup sugar
- ¾ cup unsalted butter, melted and cooled
- 2 large eggs
- 1 teaspoon vanilla extract
- ½ cup chopped pecans (or walnuts if you’re feeling adventurous)
Now, before you dash to the store, let me share a bit of wisdom about picking the right ingredients.
First off, make sure those bananas are overripe—those brown spots mean maximum sweetness, and that’s what we want. And about the pecans? If you happen to be a pecan lover, consider tossing in a few extra; I won’t tell anyone.
Oh, and don’t skip on the vanilla extract; it adds a lovely, aromatic depth that’ll make your kitchen smell like a sweet hug.
Make sure your butter is unsalted; even though it’s not a huge deal, too much salt can overpower the bread’s sweet flavor.
Once you have all that lined up, you’ll be well on your way to creating the ultimate comfort food in loaf form.
Happy baking!
Step-by-Step Instructions
Making banana nut bread is a breeze—just follow these easy steps to whip up a loaf that’s bound to impress family and friends. You’ll mix the batter in no time, and before you know it, your kitchen will be filled with that delightful aroma of warm, sweet goodness. Ready to bake? Let’s get started!
1. Preheat the Oven: Kick things off by preheating your oven to 350°F (that’s about 175°C for any metric folks). While that heats up, go ahead and grab your 9×5-inch loaf pan and give it a good greasing, so your beautiful loaf slides right out after baking. Using professional kitchen appliances can make this process smoother and more efficient.
2. Mash the Bananas: You’ll want to throw 2 of those 4 overripe bananas into a bowl and mash them up until they’re smooth. You can use a fork or a potato masher—whatever floats your boat! Just aim for that beautifully mushy consistency. Set aside the remaining 2 bananas for later.
3. Mix the Bananas and Sugar: Now, take those mashed bananas and mix them with 1 cup of sugar until the mixture is fluffy—about 2 minutes should do the trick. This step adds that subtle sweetness we all crave.
4. Add the Wet Ingredients: Pour in ¾ cup of melted and cooled unsalted butter, 2 large eggs, and 1 teaspoon of vanilla extract. Keep mixing until everything blends together nicely. Then, fold in your mashed bananas (remember those?) and mix well. A little hand mixing works wonders here.
5. Combine Dry Ingredients: In a separate bowl, whisk together 2 cups of all-purpose flour, 1 ½ teaspoons of baking soda, and ½ teaspoon of salt.
Then, gently add this dry mixture to your wet ingredients. Be careful not to overmix—the goal is a slightly lumpy batter, which keeps your bread tender and moist (and let’s be honest, we all want that).
6. Fold in the Pecans: Got your ½ cup of chopped pecans ready? Fold them gently into the batter. If you’re feeling adventurous, toss in a few extra pecans for good measure. They’ll give your bread that satisfying crunch we all love!
7. Pour the Batter: Transfer your batter into the prepared loaf pan, smoothing the top with a spatula as you go. If you really want to impress, sprinkle some additional pecans on top. Trust me; it’ll look fancy without too much effort.
8. Bake Away: Pop your loaf into the oven and let it bake for 50 to 60 minutes. You’ll know it’s ready when a toothpick inserted into the center comes out clean. Keep an eye on it, as baking times can vary. We want that lovely golden brown top, not a burnt offering to the baking gods.
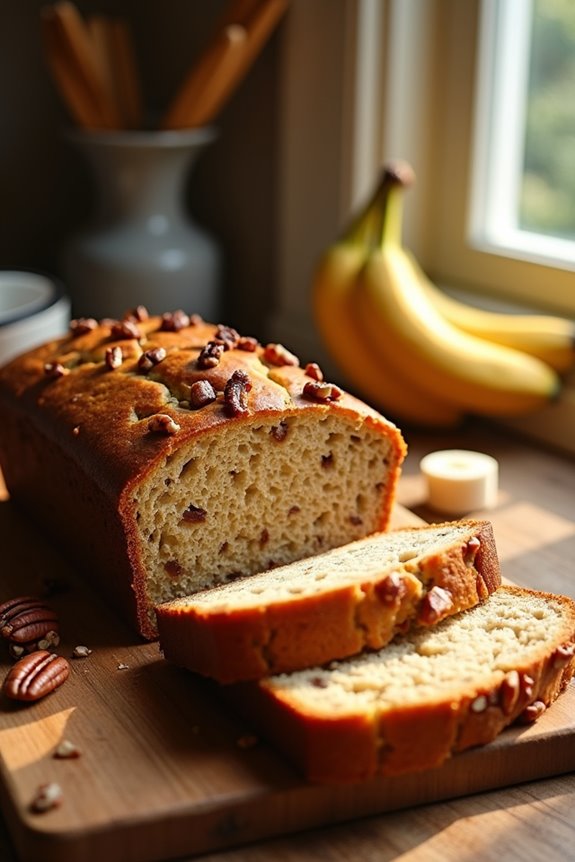
9. Cool and Slice: Once done, pull your bread out of the oven and let it cool for about 10 minutes in the pan.
Then, carefully transfer it to a wire rack to finish cooling. Slicing into it while it’s still warm is tempting, but let it cool a bit longer for easier slicing.
And there you have it—a delightful banana nut bread that’s perfect for breakfast, a snack, or a delicious dessert! Embrace the baking process, and don’t forget to share (or keep it all for yourself—no judgment here). Happy baking! Not to mention, using essential kitchen appliances can make your breakfast cooking experience even more enjoyable!
Tips & Variations
Baking banana nut bread is like a warm hug on a chilly day, but there’s always room for a little creativity in the kitchen. If the pecans aren’t your style, try walnuts or even chocolate chips—yes, chocolate makes everything better.
One time, I accidentally added a pinch of cinnamon, and wow, it changed everything. Don’t overmix your batter; I learned that the hard way when I ended up with a dense loaf that could double as a doorstop.
Also, if you’re feeling adventurous, toss in a splash of maple syrup or some shredded coconut. Remember, baking’s about experimenting, so don’t sweat the small stuff.
After all, what’s the worst that could happen? A delicious disaster, I say.
How to Serve?
When it comes to serving banana nut bread, there are a few delightful ways to elevate this already scrumptious treat.
First off, I love slicing it warm and spreading a pat of butter right on top. It just melts in—pure bliss.
You could also drizzle some honey or maple syrup for a sweet twist. Feeling fancy? A dollop of whipped cream sparkles on the side, making each bite feel special.
Don’t forget about pairing it with coffee or tea; it’s the perfect cozy match.
And let me tell you, serving it at brunch makes you the hero of the day, even if you barely baked it.
Storage & Reheating Guide
Even after the last slice of that delicious banana nut bread disappears, I often find myself wondering how to keep the leftover goodies fresh and ready for a snack later.
I usually wrap the bread tightly in plastic wrap or foil, then tuck it into an airtight container. This way, it can sit happily on my counter for up to four days.
If I’ve got more than I can handle, I slice the bread and freeze it in a freezer bag. When I need a quick fix, I pull out a slice and pop it in the toaster or microwave for a few seconds.
It’s just like magic, bringing back that fresh-baked aroma and taste. Using a high-end rice cooker can enhance your overall cooking experience, making meal preparation even more efficient with premium kitchen appliances.
Final Thoughts
While I may not have a whole lot of baking expertise, I always find it hard to resist the comforting pull of homemade banana nut bread.
There’s something magical about the smell wafting through the house, isn’t there? It wraps around you like a warm hug.
I love how simple ingredients can transform into something so delicious. Trust me, baking this is an adventure anyone can undertake, even if your last cake was a “science experiment.”
Just think about it—soft, moist bread with crunchy pecans in every bite. What more could you want?
So why wait? Grab those overripe bananas and let’s create some culinary joy.
Your kitchen deserves a little love, and it doesn’t hurt to treat yourself too.