
I’ve got to tell you, there’s something incredibly comforting about a Rich Banana Pudding Cheesecake. Imagine sinking your fork into creamy layers of banana goodness and smooth cheesecake, all sitting on a crunchy vanilla wafer crust. I remember the first time I tried to make this; the kitchen was a total mess, but the result? Pure bliss. If you think it sounds delicious so far, wait until you hear about the step-by-step process I’m about to share.
Why You’ll Love This Recipe
If you’ve ever craved that comforting, creamy goodness of banana pudding but wished it had that rich, decadent vibe of cheesecake, then let me introduce you to your new favorite dessert.
This banana pudding cheesecake is like a sweet hug for your taste buds. Imagine sinking your fork into a creamy layer of banana goodness, all nestled in a crunchy vanilla wafer crust.
And let’s be real, who doesn’t love a dessert that combines two classics? It’s smooth, it’s luscious, and it’s got just the right amount of sweet.
Plus, it looks impressive enough to share at a party—or keep all to yourself. Trust me, you won’t want to share once you’ve tasted it.
Equipment List
Creating this delicious banana pudding cheesecake is a fun journey, but let’s talk about the equipment you’ll need to whip up this masterpiece.
First, grab a 9-inch springform pan; it’s a must for that creamy filling. Then, you’ll need a mixing bowl or two—you know, for all that lovely cream cheese action. An electric mixer will make your life easier; trust me, my arm’s still sore from whisking last time.
Don’t forget a rubber spatula for folding in those sweet layers. A measuring cup is essential, and if you have a whisk, it’ll work wonders too. Silicone spatulas can be particularly helpful as their heat resistance allows for versatile cooking and baking tasks. Finally, an oven thermometer helps guarantee my oven isn’t out to sabotage my baking. Also, having essential tools like pastry bags and silicone mats can elevate your baking game.
Ready to gear up? Let’s do this.
Our Ingredients
When it comes to making banana pudding cheesecake, it’s all about the ingredients. You want the right balance of flavors and textures to achieve that creamy, dreamy slice of heaven. This is where we gather the goodies that will come together to create the ultimate dessert. So, let’s plunge into what you’ll need for this delightful recipe.
Here’s your shopping list:
- 2 cups vanilla wafer crumbs
- ¼ cup melted unsalted butter
- 24 oz cream cheese, softened (trust me, this is what makes it creamy)
- 1 cup sugar
- 2 ripe bananas, mashed (the riper, the better for flavor)
- 3.4 oz instant banana cream pudding mix (dry, that is)
- 4 large eggs, lightly beaten
- 1 tsp vanilla extract
- 1 cup heavy whipping cream
Okay, let’s talk a bit about these ingredients. You might be wondering, why vanilla wafers? Well, they give that classic crunch and sweetness to the crust.
And when it comes to bananas, don’t skimp on ripeness; the sweeter the bananas, the better your cheesecake will taste. Now, cream cheese is the star here, so make sure it’s softened, otherwise you’ll be working harder than you need to.
Whipping cream adds that heavenly touch that brings everything together, while the pudding mix gives you that unmistakable banana flavor, leaving your friends and family guessing how you made it so good.
It’s a splendid blend, trust me. Just remind yourself not to eat all the ingredients before they make it into the bowl; I know it’s tempting.
Step-by-Step Instructions
Making banana pudding cheesecake is simpler than it seems, and trust me, it’s all worth it when you take that first creamy bite. Let’s roll up our sleeves and immerse ourselves in these easy step-by-step instructions that will guide you in crafting this heavenly dessert.
- Preheat the Oven: Start by preheating your oven to 325°F (163°C). This sets the stage for your cheesecake to bake perfectly.
- Prepare the Crust: Grab 2 cups of vanilla wafer crumbs and mix them with ¼ cup of melted unsalted butter (this is where the buttery goodness begins). Once combined, press this mixture into the bottom of a 9-inch springform pan. Bake for 10 minutes until it’s set and slightly golden. (You want a crust that holds together but isn’t overly hard—think of it as the amazing base that your cheesecake will thrive on.) A well-made crust often depends on using the right premium baking equipment.
- Make the Filling: In a large mixing bowl, beat 24 oz of softened cream cheese until it’s smooth and creamy. This is where the magic starts! Add in 2 mashed ripe bananas, 1 cup of sugar, 3.4 oz of dry instant banana cream pudding mix, and 1 tsp of vanilla extract. Mix it all up until there are no lumps—unless you want a few banana chunks hanging around for texture.
- Add the Eggs: Next, gently stir in 4 large eggs that have been lightly beaten. Remember, don’t overbeat this mixture; just combine until everything is blended nicely. You don’t want cracks in your cheesecake, right?
- Incorporate Whipped Cream: Take 1 cup of heavy whipping cream and fold it into your creamy filling. This step adds a delightful lightness to your cheesecake. (You’ll want it fluffy but not deflated—think of folding in love, not aggression.)
- Pour and Bake: Carefully pour the cheesecake filling into your pre-baked crust. Bake it in the oven for 55-60 minutes or until it’s set in the middle and has a slight jiggle (if it’s overly jiggly, well… you might want to bake it a tad longer).
- Cool Down: Once baked, allow your cheesecake to cool completely at room temperature. Now’s the time to resist the urge to taste it—it’s tough, I know. Cover it and place it in the fridge for several hours (or even better, overnight) to let those flavors meld and the texture set.
And there you have it! Follow these steps along, and you’ll create a banana pudding cheesecake that’s sure to impress. A delicate blend of creamy and fruity, this dessert is the perfect crowd-pleaser.
Just remember, the longer you resist the urge to eat it, the better it gets. Additionally, having the right essential tools for every kitchen can enhance your baking experience and make these steps even easier!
Tips & Variations
Tips and tricks are a baker’s best friend, especially when you’re venturing into the world of banana pudding cheesecake.
First off, don’t overbeat those eggs; cracks in your cheesecake aren’t a great look and make it feel less fancy. You want a smooth surface, right?
And chilling is essential—trust me, waiting’s tough but worth it for that creamy texture.
Feeling adventurous? Swap the vanilla wafers for graham crackers for a twist; or throw in some chopped nuts for a delightful crunch.
Want extra banana flavor? Add a few banana slices on top before baking. I’ve done it, and it turns out divine.
How to Serve?
Serving banana pudding cheesecake is almost as enjoyable as making it, and I mean that sincerely.
Once it’s chilled, I love to slice it into generous pieces—you want your guests to feel that rich, creamy goodness in every bite.
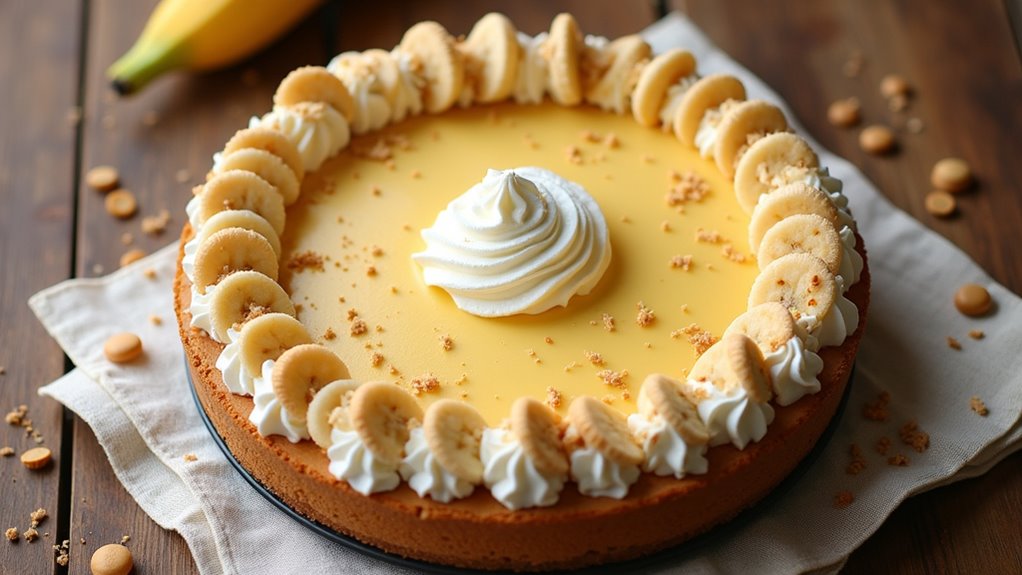
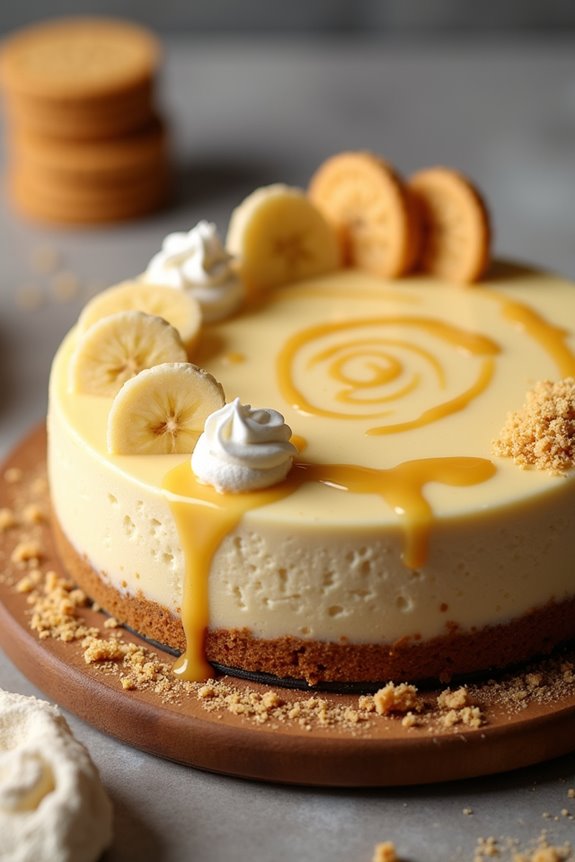
I usually top each slice with a dollop of whipped cream, some crumbled vanilla wafers, and a sprinkle of banana slices for that extra flair. It looks so inviting, don’t you think?
If you’re feeling fancy, consider drizzling caramel sauce over the top.
I sometimes forget to save some for myself, but it’s always worth it when I see everyone enjoying it!
Just remember, serve up smiles along with each slice—it makes all the effort feel so rewarding.
Storage & Reheating Guide
Even though I love devouring banana pudding cheesecake right after it’s made, knowing how to store and reheat it can make all the difference when there are leftovers (if you can believe that).
First, pop that cheesecake in the fridge, covered tightly with plastic wrap or foil. It’ll stay fresh for up to five days—if it lasts that long.
For reheating, I usually slice off a piece and nuke it for about 10-15 seconds in the microwave. Just enough to warm it up a bit, without turning it into a gooey mess.
Trust me, no one wants a drippy cheesecake disaster, right? If you want it cold, just dig into those creamy layers straight from the fridge.
Also, consider using soup freezer containers if you ever want to store individual portions of cheesecake for longer periods.
Final Thoughts
While making banana pudding cheesecake is a fun adventure in the kitchen, the real joy comes when savoring each creamy bite with friends or family.
Honestly, the smiles and sounds of delight you hear make all the effort worth it. I mean, who doesn’t love that combo of creamy cheesecake and comforting banana pudding?
Just imagine the scene—everyone gathered around, forks in hand, enthusiastically waiting for a slice.
And hey, if I can manage to get through this recipe without a flour explosion, you can too.
Don’t worry if it doesn’t come out perfect; it’s about enjoying the process.