

I’ve found that few desserts hit the spot like a rich s’mores cheesecake. It combines that creamy goodness of cheesecake with nostalgic campfire flavors. I mean, who doesn’t crave a bite of creamy, chocolatey heaven topped with toasted marshmallows? Trust me, this recipe is a game changer. It’s easier than you might think, and I’ll walk you through every step. But stick around; there’s a twist to this classic that you won’t want to miss.
Why You’ll Love This Recipe
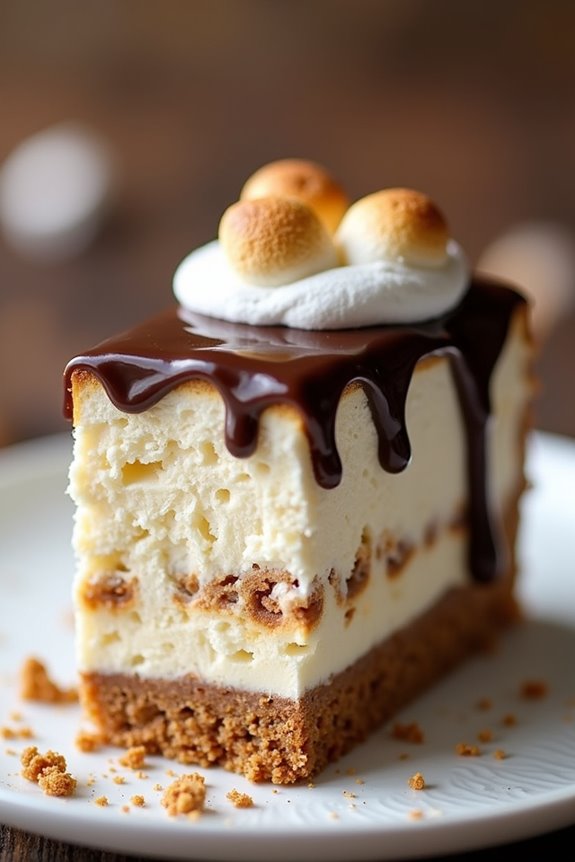
When it comes to dessert, who can resist the charm of s’mores? This decadent s’mores cheesecake is a sweet twist on a timeless favorite that takes all those campfire feels and packs them into one heavenly slice.
I mean, who doesn’t want a creamy, dreamy cheesecake topped with gooey marshmallows and rich chocolate ganache? Every bite is like a warm hug, reminding me of summer nights with friends.
Plus, it’s surprisingly easy to make. Trust me—I’ve had my share of baking disasters, but not with this recipe. It delivers delight every time.
You’ll find yourself craving it again and again, practically licking the plate. Your taste buds will thank you, and you’ll look like a dessert hero.
Equipment List
Gathering the right equipment is key to making this s’mores cheesecake a success.
First off, you’ll need a 9″ springform pan. Trust me, it’s a game-changer when it comes to cheesecake. A mixing bowl and electric mixer will help you whip that cream cheese into dreamy fluff. Investing in high-end cookware sets can make your baking processes more efficient and enjoyable.
Don’t forget a spatula for folding in those mini marshmallows—you’ll thank me later.
I also recommend a water bath setup; it may sound fancy, but it’s just a baking dish with water. A whisk is a must for your ganache.
Oh, and please, for the love of chocolate, grab a measuring cup. I once guessed, and well, let’s just say it didn’t end well. Investing in gourmet kitchen gear can elevate your baking experience significantly.
Happy baking, friends!
Our Ingredients
Okay, friends, let’s plunge into the delicious world of our s’mores cheesecake! Dreamy cream cheese blended with sweet marshmallows and a touch of chocolate will have you floating in dessert heaven.
Imagine this: a crispy graham cracker crust giving way to a luxuriously creamy filling, finished with smooth ganache and toasted marshmallows on top. Yes, this dessert is the ultimate crowd-pleaser, and it’s so good you mightn’t want to share—just saying.
Now, let’s gather our cast of ingredients for this fantastic sweet treat.
Here’s what you’ll need to whip up this s’mores cheesecake:
- 2 cups graham cracker crumbs
- 6 tbsp unsalted butter, melted
- 3 tbsp sugar (for the crust)
- 48 oz cream cheese (room temp)
- 1 cup sugar (for the filling)
- 10 oz mini marshmallows
- 4 eggs (room temp)
- 1/2 cup sour cream (room temp)
- 1/4 cup heavy cream (room temp)
- 2 1/2 tsp vanilla extract
- 2 1/2 tbsp cornstarch
- 4 oz semi-sweet chocolate
- 1/2 cup heavy cream (for ganache)
Now, before you rush off to snag these ingredients, let’s chat a bit about a few of them. You want your cream cheese at room temperature for that sumptuous texture—no one wants chunks of cold cream cheese ruining their cheesecake dreams.
Similarly, those eggs better be warm, too; they mix in way better this way. And if you can find them, grab some toasted mini marshmallows for that extra layer of flavor.
Oh, and trust me on the chocolate—use high-quality semi-sweet chocolate for your ganache. The richness really elevates the whole dessert.
If you have a sweet tooth, you might even want to keep a little chocolate on hand for snacking. Just a suggestion; no judgment here. Happy baking, everyone!
Step-by-Step Instructions
Making a s’mores cheesecake is surprisingly easy—let’s jump into this delectable process together. You’re going to mix up a beautiful crust, a creamy filling, and top it off with luscious ganache and toasted marshmallows. Sounds like a dessert dream come true, doesn’t it? Here’s how to bring this sweet fantasy to life step by step!
- Preheat that Oven: Start by preheating your oven to 325°F (160°C). This will get your cooking environment ready while you prepare the crust.
- Prepare the Crust: In a mixing bowl, combine 2 cups of graham cracker crumbs, 6 tablespoons of melted unsalted butter, and 3 tablespoons of sugar for the crust. Stir until everything is well blended and resembles wet sand. Then, press this mixture firmly into the bottom of a 9-inch springform pan. Bake it in your preheated oven for about 10 minutes until it’s lightly golden. This base is the perfect crunchy foundation for your cheesecake, similar to how a breakfast sandwich maker professional efficiently creates the ideal sandwich base.
- Make the Filling: Now, let’s whip up that creamy filling. In a large bowl, use a mixer to beat 48 ounces of cream cheese along with 1 cup of sugar until it’s beautifully fluffy and smooth. This part is essential—don’t rush it; you want a nice, airy texture.
- Add the Eggs: One at a time, add in 4 room temperature eggs while mixing. Make sure each egg is fully incorporated before adding the next. This gradual addition makes sure your cheesecake is light and smooth—no one wants a dense dessert here.
- Mix in the Good Stuff: Next, add 1/2 cup of sour cream, 1/4 cup of heavy cream, 2 1/2 teaspoons of vanilla extract, and 2 1/2 tablespoons of cornstarch into the mixture. Blend until everything is well mixed (but don’t overmix it; a few lumps are okay).
- Fold in the Marshmallows: Gently fold in 10 ounces of toasted mini marshmallows. This is where the magic happens—those fluffy bits will add a delightful texture to your filling. Just go slow so they don’t all disappear!
- Bake It: Pour the cheesecake filling over your baked crust, smoothing the top evenly. Now it’s baking time! Place the springform pan in a larger baking dish filled with hot water, creating a water bath. This helps prevent cracks while it bakes. Bake this beauty for 60 to 70 minutes, until the center is slightly jiggly but set around the edges.
- Cool It Down: Once done, turn off the oven and leave the cheesecake inside for about 1 hour as it cools. Then, let it chill at room temperature before transferring it to the fridge to chill overnight. Patience is a virtue here, but trust me, it’ll be worth the wait.
- Make the Ganache: The next day, it’s time to make the ganache. Heat 1/2 cup of heavy cream in a small saucepan until it’s just simmering, then pour it over 4 ounces of chopped semi-sweet chocolate. Let it sit for a few minutes, then stir until it’s smooth and glossy. This luscious layer is going to be heavenly.
- Top It Off: When you’re ready to serve, pour the lovely ganache over your cheesecake, letting it cascade down the sides. Then, top it with additional toasted marshmallows for that authentic s’mores feel.
And voilà! You’ve created a stunning s’mores cheesecake that’s sure to impress everyone. Slice, serve, and watch as smiles light up the room. Just be prepared to fight off any fork battles—this dessert is that good. Enjoy, and happy baking!
Furthermore, you can elevate your dessert experience by using a high-end waffle maker to create delicious waffle crusts for various cheesecake variations.
Tips & Variations
After you’ve whisked up that creamy filling and baked it to perfection, it’s time to make this s’mores cheesecake truly yours with some fun tips and variations.
First, don’t be shy about swapping in different chocolates—milk or dark can change the vibe entirely. Feeling adventurous? Add a splash of espresso to the filling for a mocha-infused twist.
And those mini marshmallows? Sure, they’re adorable, but toasting them almost to a flame gives a beautiful caramel taste that elevates your cheesecake game.
Oh, and remember, a water bath isn’t just a fancy trick; it really helps prevent those pesky cracks. Trust me, every layer counts.
Let’s just say I learned that lesson the hard way during my first attempt.
How to Serve?
Serving a S’mores cheesecake is like throwing a mini celebration at your table. I love to slice it into generous pieces—you know, bigger is better—then I drizzle that luscious chocolate ganache right over the top.
A sprinkle of extra toasted mini marshmallows gives it a delightful flair. When I present it, I make sure to have plates and forks ready because trust me, you don’t want anyone missing out on this treat.
I also set out some fresh fruit or whipped cream on the side; it adds a nice touch.
And here’s a little secret: pairing it with a glass of milk or coffee elevates the experience. Watch everyone’s face light up—it’s simply priceless.
Storage & Reheating Guide
After letting it cool completely, I wrap each slice tightly in plastic wrap or foil. This keeps the deliciousness locked in!
I usually pop it in the fridge for up to five days, but I’ve been known to freeze it too. Frozen slices can last up to three months—just don’t judge me if I eat it straight from the freezer.
When you’re ready to enjoy, thaw in the fridge overnight or sit at room temp for a bit. Trust me, it’s just as dreamy as the first bite, maybe even better. Plus, storing homemade treats, like gourmet cheese making kits, can elevate your dessert game even further!
Final Thoughts
Even though making S’mores cheesecake might seem a bit challenging at first glance, I promise it’s truly a rewarding experience that’s worth every whisk and bake.
Trust me, when you take that first bite, you’ll realize all the effort was totally worth it. You might even find yourself daydreaming about it later. Imagine the creamy filling, the crunchy crust, and those gooey marshmallows.
If you mess up, don’t worry; I’ve burned enough marshmallows to fuel a bonfire. Just have fun and remember: baking’s about experimenting and enjoying every moment.