
I’ve got to say, making okonomiyaki feels like a culinary adventure every time. Imagine this: a crispy, savory pancake packed with your favorite goodies, all coming together in one pan. It’s super easy, really—anyone can do it. I can’t tell you how many times I’ve thrown random ingredients in just to see what happens. And trust me, it’s never a flop. Ready to uncover the secrets of crafting this comforting dish? Let’s get started.
Why You’ll Love This Recipe
When it comes to comfort food, okonomiyaki brings a certain joy that’s hard to beat. I mean, who wouldn’t want a savory pancake bursting with flavors?
This easy okonomiyaki recipe is like a warm hug from the inside. It’s simple enough that even I can make it without burning down the kitchen, which says a lot. You’ve got flour, dashi, and whatever toppings you crave—pork belly, tenkasu, or just veggies.
The frying part? A little patience and you’ll get that golden-brown crust. I love pouring on the okonomiyaki sauce and mayo, it’s like the final flourish to a masterpiece.
Trust me, once you try this, you’ll be hooked on your new favorite comfort food.
Equipment List
To whip up some delicious okonomiyaki, you don’t need a ton of fancy gadgets—just a few essentials that you probably already have hanging out in your kitchen.
First, grab a large mixing bowl; you’ll need it to combine that batter. A good non-stick skillet or griddle is a must for frying. I’ve ruined more pancakes than I can count, so trust me on this.
A spatula, preferably one that’s wide, helps when flipping your savory masterpiece, and measuring cups make portioning easy and less messy.
Oh, and don’t forget a whisk—your best friend when mixing everything up. A countertop or portable burner works wonders if you want to tackle this outside, too. Investing in artisan kitchen appliances can enhance your cooking experience and make preparing dishes like okonomiyaki even more enjoyable.
Our Ingredients
When it comes to making a fantastic okonomiyaki, gathering the right ingredients is key. This savory Japanese pancake isn’t only delicious but also a blank canvas for you to express your culinary creativity.
Imagine the crunch of fresh cabbage, the richness of eggs, and the umami of dashi coming together in one glorious concoction. You can customize it with your favorite toppings too, so the possibilities are endless. Ready to make your taste buds dance? Here’s what you’ll need to get started.
- 1 cup all-purpose flour
- ¾ cup dashi (or chicken/vegetable stock)
- 2–3 large eggs
- ¼ head cabbage, finely shredded
- 2–3 green onions, sliced
- ½ lb sliced pork belly or bacon (optional)
- ½ cup tenkasu (tempura scraps, optional)
- Oil for frying
- Okonomiyaki sauce
- Mayonnaise
- Bonito flakes
- Aonori (dried seaweed)
- Pickled ginger for topping
Now, before you rush off to the store, there are a couple of things to take into account.
First, while dashi is traditional for this recipe, if you don’t have it, chicken or vegetable stock works just fine, though it may change the flavor slightly.
Keep in mind the optional ingredients—like pork belly or tenkasu—can really add a depth of flavor but feel free to skip them or substitute with your favorites if you’re not a meat eater, or just want to keep it veggie.
Also, don’t forget that okonomiyaki toppings are where the fun begins. You can go wild with sauces, or even throw on some leftover veggies, cheese, or whatever else you fancy.
It’s all about making it your own, and trust me, no matter how you spin it, it will taste amazing.
Step-by-Step Instructions
Making okonomiyaki is a delightful journey into the world of Japanese comfort food. The beauty of this savory pancake is that it’s not only delicious but incredibly customizable. Let’s explore how you can whip up this tasty creation in just a few straightforward steps. Mixing the batter is quick and simple—just follow these easy instructions!
- Prepare the Batter: In a large mixing bowl, combine 1 cup of all-purpose flour with ¾ cup of dashi (or chicken/vegetable stock) and 2–3 large eggs. Mix everything together until you have a smooth batter (don’t worry if it’s slightly lumpier than a pancake mix!).
- Add the Good Stuff: Fold in ¼ head of finely shredded cabbage, 2–3 sliced green onions, and if you’re feeling adventurous, ½ lb of sliced pork belly or bacon. You can also toss in ½ cup of tenkasu, those lovely tempura scraps that add crunch and surprise.
- Heat the Pan: Grab a non-stick frying pan and drizzle in some oil for frying. Heat it over medium heat until the oil shimmers (you’ll know it’s ready when you see tiny ripples).
- Cook the Pancake: Pour in a generous amount of the batter—about a cup or so—and spread it into a thick pancake shape. Cook it for about 4–5 minutes until the bottom is golden brown and it holds together nicely. Patience is key here.
- Time to Flip: Now here comes the tricky part—flipping! Slide a spatula under the pancake and carefully turn it over. Cook the other side for another 4–5 minutes until it’s beautifully browned and cooked through (you can cover it with a lid if you like for an extra boost of heat).
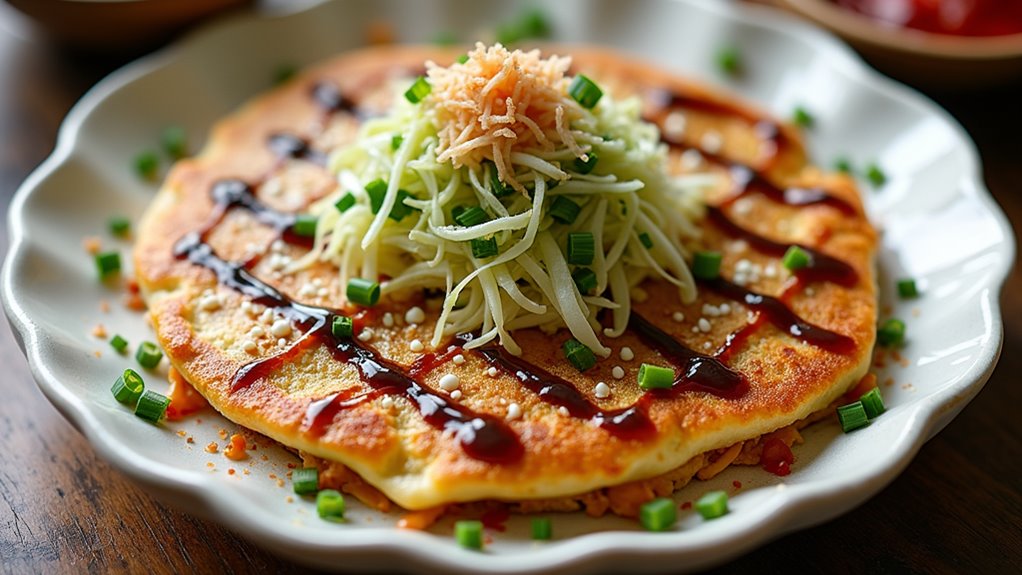
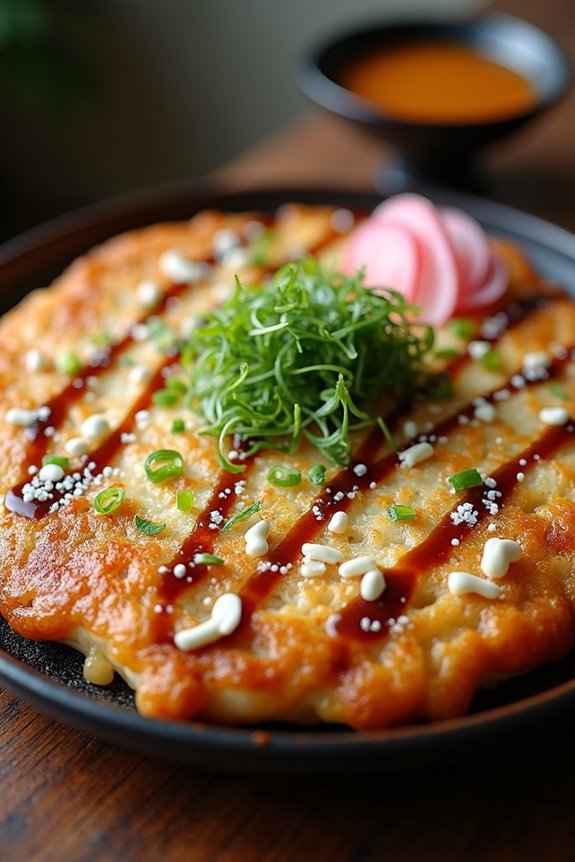
- Dress it Up: Once it’s cooked, it’s time for the fun part—toppings! Drizzle some okonomiyaki sauce and mayonnaise on top, then sprinkle bonito flakes, aonori (the dried seaweed), and a few pieces of pickled ginger for that extra zing. Don’t forget that having the right kitchen appliances is essential for achieving the perfect okonomiyaki texture and consistency.
And there you have it—a beautiful, savory okonomiyaki ready to be devoured. Don’t be shy about experimenting with different ingredients and toppings because that’s what makes this dish truly special. Enjoy!
Tips & Variations
After whipping up that tasty okonomiyaki, I can’t help but think about how much fun it’s to get creative in the kitchen. I mean, who says you can’t toss in leftovers? Got some cooked shrimp or mushrooms sitting around? Go for it!
And don’t stress about the batter; letting it rest for about ten minutes really amps up the texture. If you’re aiming for that crispy outside but fluffy inside, you can adjust the batter thickness, too. I often throw a lid on for part of the cooking to help everything cook through.
Oh, and when it comes to toppings, let your imagination run wild. You could even sneak in some spicy mayo for a kick. Isn’t cooking fun?
How to Serve?
Serving up okonomiyaki feels like an art form. You’ve got this beautiful, golden pancake, and now it’s time to jazz it up.
First, slice it into wedges—like a pizza but way more delicious. Then, I drizzle okonomiyaki sauce and mayo in zigzag patterns, pretending I’m an artist.
Sprinkle bonito flakes and aonori on top, watching them dance with the steam. It’s mesmerizing.
For a little extra kick, I add pickled ginger on the side, because why not?
When I’m feeling fancy, I even serve it on rad plates to impress my friends. Sometimes, I jokingly call it my “chef masterpiece,” but let’s be real—it’s just too tasty to care about the looks.
Serve warm, dig in, and enjoy every bite.
Storage & Reheating Guide
Once you’ve whipped up that delicious okonomiyaki, you might wonder how to keep the leftovers as tasty as possible. I get it—everyone hates sad, soggy leftovers.
First, let the okonomiyaki cool down a bit, then wrap each piece tightly in plastic wrap or foil. If you’re feeling fancy, stick ’em in an airtight container. They’ll last about three days in the fridge.
When you’re ready to eat, I recommend reheating them in a skillet over medium heat. This way, they crisp up nicely, bringing back that glorious texture.
Microwaving is quick but tends to turn them mushy, which nobody wants. Trust me, a little extra effort goes a long way in keeping that savory goodness alive. Additionally, using airtight food storage solutions helps ensure optimal freshness, making your leftovers even more enjoyable when you heat them up.
Final Thoughts
Keeping those leftovers tasty and crisp is just part of the okonomiyaki experience, isn’t it? I’ve found that there’s nothing quite like cracking open the fridge for a delightful treat the next day.
Just remember, a quick reheat on a skillet can transform that cold pancake into a crispy masterpiece. Honestly, I’ve had my share of mishaps—burnt edges here and soggy bits there.
But hey, even those less-than-perfect moments can taste amazing when you top them right with sauce and bonito flakes. So, don’t stress too much. Cook, taste, and adjust.
It’s all about enjoying the journey. I can’t wait for you to share your own okonomiyaki adventures—trust me, it’s a fun ride every time.