
I’ve always had a soft spot for holiday baking, especially when it involves making delightful treats like reindeer cupcakes. They’re not just cupcakes; they’re a whimsical way to spread cheer. Honestly, who can resist those cute little edible antlers and a bright red nose? It’s like turning a regular kitchen day into a festive party. And trust me, they’re surprisingly easy to whip up. So, are you ready to join me in creating some holiday magic?
Why You’ll Love This Recipe
When it comes to holiday baking, nothing brings joy quite like a batch of Reindeer Cupcakes. Honestly, these easy reindeer cupcakes aren’t just adorable; they’re ridiculously fun to make. I mean, who doesn’t love turning a simple chocolate cupcake into a cute little reindeer?
From the moment you pop those Nilla Wafers on as muzzles to the delightful crunch of pretzel antlers, it’s a blast. Plus, they’re a hit with my family—if you don’t believe me, just ask my son’s friends who claimed they were “the best cupcakes ever.”
And let’s be real, they’re not just festive; they’re tasty too. So, why not whip up a batch and bring some cheer to your holiday gatherings?
Equipment List
Gathering the right tools is just as important as having the perfect recipe for these delightful Reindeer Cupcakes. First, you’ll need a cupcake pan, preferably with 12 cups—trust me, no one wants to run out of cupcakes halfway through a batch.
Don’t forget cupcake liners; they save you from a sticky situation. A mixing bowl and a whisk? Essential for blending those cake ingredients until smooth. You might also want an electric mixer for the frosting—it’s a game changer. Professional baking equipment can enhance your results and make the process much more enjoyable.
A spatula comes in handy for both mixing and frosting. And let’s not overlook a piping bag, perfect for adding those adorable little details. Additionally, having a reliable kitchen appliance can elevate your baking to new heights by ensuring precision and consistency.
With the right equipment, your baking experience will feel like a walk in the park, right?
Our Ingredients
When it comes to whipping up a batch of these adorable Reindeer Cupcakes, having the right ingredients at your fingertips is key to making them not only look good but taste heavenly. Trust me, your friends and family will be raving about them and might even beg for the recipe.
The good news? You probably already have most of these ingredients hanging out in your pantry or fridge. So grab your shopping list, and let’s make sure we’ve got everything we need to make our festive baking adventure a success.
Ingredients:
- 1 box devil’s food cake mix
- 3 eggs
- 1/2 cup oil
- 2 tsp vanilla extract
- 1 cup milk or buttermilk
- 1/2 cup sour cream
- For frosting:
- 1 cup butter
- 1/3 cup cocoa powder
- 2-3 cups powdered sugar
- 2 tbsp milk
- Pretzels (for antlers)
- Nilla Wafers (for muzzles)
- Brown or red M&M’s (for noses)
- White Mint M&M’s (for eyes)
Before you plunge into baking, it’s worth considering a few things about these ingredients. First off, using high-quality cocoa powder can really elevate the flavor of your frosting, making your cupcakes a little more extraordinary.
And if you’re feeling adventurous, you can switch up the cake mix flavor; imagine vanilla or even a spice cake for a fun twist.
Don’t forget about those fun decorations. While traditional M&Ms are delightful, feel free to explore other candies to suit your tastes or dietary needs.
It’s all about getting creative, so don’t hesitate to make this recipe your own. Happy baking!
Step-by-Step Instructions
Making Reindeer Cupcakes is an exciting way to kick off your holiday baking! These adorable treats not only taste delicious but also bring festive cheer to any gathering. Mixing the batter is quick and simple—just follow these easy steps to create your own batch of holiday cheer.
- Preheat the oven to 350°F and line your cupcake pan with cupcake liners. This step is crucial; no one wants sticky cupcakes glued to the pan, right?
- In a large mixing bowl, mix together 3 eggs, 1/2 cup of oil, 2 teaspoons of vanilla extract, 1 cup of milk or buttermilk, and 1/2 cup of sour cream. Whisk these ingredients together until they’re well combined. It’s like a happy reunion in a bowl!
- Next, stir in 1 box of devil’s food cake mix. Make sure to combine everything until just blended—don’t overmix it. A few lumps are perfectly fine; we want fluffy cupcakes, not a rubbery cake.
- Once you’ve got your batter ready, fill the cupcake liners about 3/4 full with the mixture. This helps guarantee they’ve enough room to rise without overflowing like a volcano!
- Bake in the oven for 16-20 minutes. They’re done when they spring back lightly when touched and a toothpick inserted in the center comes out clean. Let them cool completely in the pan before transferring to a wire rack. Think of this as giving them a well-deserved break after their hot yoga session in the oven.
- In the meantime, let’s whip up that dreamy frosting. In a mixing bowl, beat 1 cup of butter (softened) with 1/3 cup of cocoa powder. Add in 2-3 cups of powdered sugar gradually, mixing until it reaches your desired thickness. Add 2 tablespoons of milk to achieve a smooth consistency. Just a heads up—watch your frosting; you might want to eat it straight from the bowl (but let’s save some for the cupcakes).
- When the cupcakes are completely cool, frost each cupcake generously with the chocolate frosting. It’s okay to be a little generous here—who doesn’t love extra frosting?
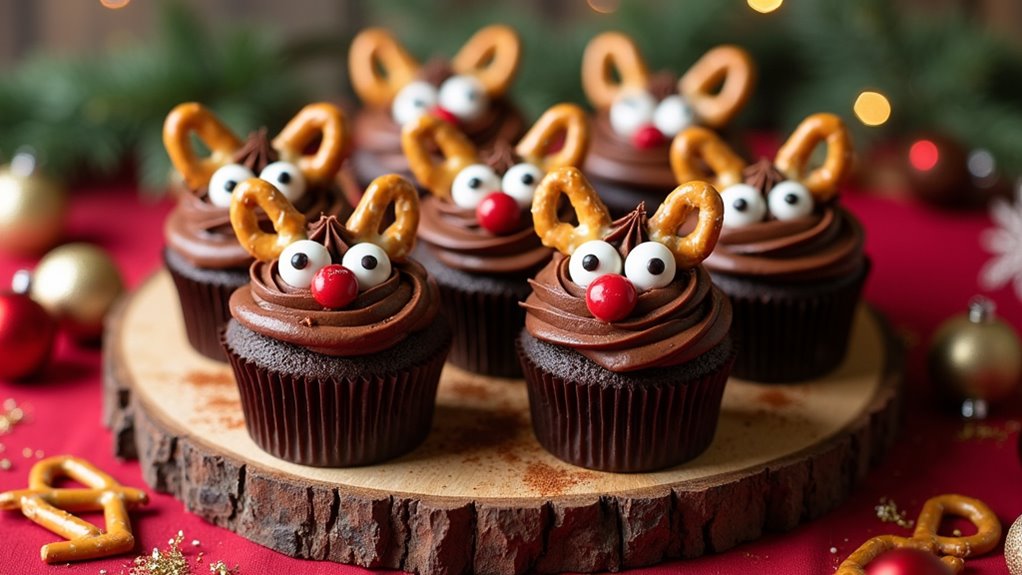
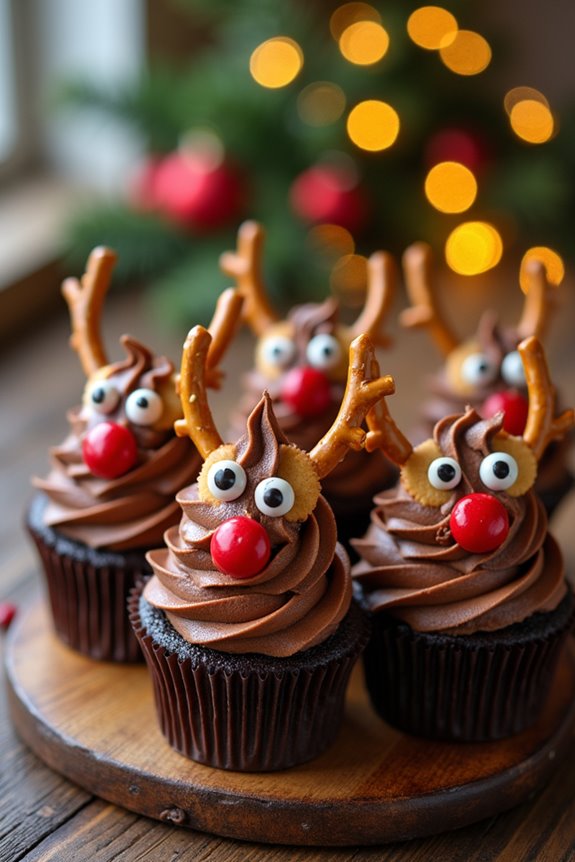
- To decorate, attach a Nilla Wafer to the top of each cupcake using a bit of frosting. This serves as the muzzle of our adorable reindeer. Then, place a brown or red M&M as the nose and two white Mint M&Ms as the eyes. Feel free to let your inner artist shine; make them expressive!
- For the finishing touch, insert pretzels into the frosting on either side of the Nilla Wafer to create the antlers. Just position them gently; they can be a bit delicate. Using the best kitchen appliances can help streamline the frosting and decoration process, making it easier to achieve that perfect look.
And there you have it—your adorable Reindeer Cupcakes are ready to spread holiday cheer. Just try to resist devouring them all at once; they’re too cute to eat immediately! Indulging in luxury French pastry tools can elevate your baking experience to new heights.
Now, let’s move on to some tips and variations to make these delights even more special. Happy baking!
Tips & Variations
While I love sticking to the classic reindeer cupcake recipe, there are so many fun tips and variations you can play around with to make these little guys your own.
For a festive twist, try adding some cinnamon or nutmeg to the batter—it’s like a holiday hug in cupcake form. If I’m feeling extra creative, I sometimes swap the chocolate cake for a spice cake, giving them a whole new personality.
Want to jazz up the frosting? A splash of peppermint extract can add a delightful holiday flair.
And let’s be real: it’s totally okay if some of your cupcakes look more comical than cute. That just adds to their charm, right? Embrace the quirks.
How to Serve?
Serving up your reindeer cupcakes is almost as fun as making them. Once they’re frosted and decorated, I like to arrange them on a festive platter, maybe with some holiday-themed napkins underneath. It adds a nice touch, don’t you think? You can even sprinkle powdered sugar on top for a “snowy” finish.
When it’s time to dig in, I suggest letting everyone grab their favorite one—Rudolph with his bright red nose is always a hit!
For extra fun, I often share a little backstory about my cupcake reindeer mishaps; trust me, the laughter is half the party. Watching faces light up as they bite into these treats, it’s pure joy. Seriously, who wouldn’t want a cupcake that’s also a fun little friend?
Storage & Reheating Guide
Storing leftover reindeer cupcakes can be a bit of a challenge, especially when they’re so fun to look at that you want to keep them forever.
I usually pop them into an airtight container right after they cool—nobody wants stale cupcakes. It’s best to use parchment paper between layers to avoid any mishaps with those adorable decorations.
If you’re thinking about freezing them, just place the cupcakes in the container without frosting; frost them later. When it’s time to enjoy them again, let them thaw at room temperature.
And if you want to give them a warm hug, just zap them in the microwave for about 10 seconds. Trust me, nobody will complain about a little extra gooey goodness. Also, consider using a bamboo steamer for gently reheating them, as it can help retain moisture and flavor.
Final Thoughts
As I wrap up this delightful journey of baking Reindeer Cupcakes, I can’t help but smile at the thought of how much joy they can bring, not just to your taste buds but also to your holiday gatherings.
Trust me, watching everyone’s faces light up when they see these cute little treats is priceless. You might even catch a few adults trying to sneak a nibble when they think no one’s watching.
Baking can be a bit messy—and let’s be honest, I’ve had my fair share of kitchen disasters—but that’s all part of the fun, right?
So grab your ingredients, gather your loved ones, and let’s make some holiday magic together with these charming cupcakes.
Happy baking!