
I’ve got to say, there’s something utterly satisfying about biting into a piece of fried goat cheese. The crunch, the creaminess—it’s like a little bite of heaven. I remember the first time I tried it; I wasn’t sure if I should be fancy or just dig in. But trust me, once you have a slice drizzled with honey, you’ll be hooked. Ready to learn how to whip it up in your kitchen? Let’s get into the details.
Why You’ll Love This Recipe
If you’ve ever tasted fried goat cheese, you know it brings a little magic to the table. Seriously, it’s like a hug for your taste buds.
When I first tried frying goat cheese, I felt like a culinary genius. The crispy coating gives way to creamy, tangy goodness inside. How do you not love that?
Plus, it’s super easy. You can whip up these fried goat cheese medallions in no time. Just imagine munching on them warm, maybe drizzled with honey or topped with fresh herbs.
They’re fancy enough for guests but simple enough for a weeknight snack. Trust me, once you’ve tasted the joy of fried goat cheese, you’ll want to serve it at every meal.
Equipment List
I’ve got to say, cooking can sometimes feel like a scavenger hunt for the right tools, especially when you’re about to make something as delightful as fried goat cheese.
First up, you’ll need a good skillet—preferably non-stick for easy frying and clean-up. A sharp knife is essential for slicing that goat cheese log; trust me, a dull one just won’t do. You’ll also want three medium bowls for the flour, egg, and breadcrumbs—no juggling act needed here.
And don’t forget some paper towels for draining those crunchy bites once they’re golden. Honestly, it feels like a mini workout—gathering everything—but I’m always rewarded with that delicious flavor at the end. Having the appropriate kitchen appliances can elevate your breakfast game, too!
Our Ingredients
When it comes to whipping up some fried goat cheese, having the right ingredients is key to achieving that melt-in-your-mouth goodness. Trust me, when you take that first bite of crispy, creamy cheese, you’ll feel like a culinary rockstar.
Plus, you won’t need a degree from a fancy cooking school to get it right. Let’s break down what you’ll need to gather before diving into this cheesy adventure.
Here’s your ingredient checklist:
- 8 oz goat cheese log, sliced into rounds
- 1/4 cup all-purpose flour
- 1 large egg, beaten with a splash of water
- 1/3 cup Italian or panko bread crumbs
- 2 tbsp olive or avocado oil
- Salt and pepper to taste
Before you head off to the kitchen, here’s something to keep in mind: the quality of your ingredients makes a difference.
For example, the goat cheese is the star here, so if you can, go for a creamy, fresh variety. Organic might be your friend, or if you have a local cheese shop, even better.
And those breadcrumbs? Panko gives you an extra crunch that’s totally worth it. A sprinkle of sea salt can elevate your dish to new heights too.
It doesn’t hurt to have some honey or fresh herbs on hand either. Trust me, a drizzle or a sprinkle can take your fried goat cheese from tasty to out-of-this-world fabulous! So, gather those goodies and get ready to fry some deliciousness.
Step-by-Step Instructions
Making Fried Goat Cheese Medallions is an absolute delight. Not only are they crispy on the outside and creamy on the inside, but they also add a touch of restaurant-quality flair to any meal. So, roll up your sleeves, and let’s immerse ourselves in the satisfying world of frying cheese with these easy-to-follow steps.
- Chill Your Cheese: Start with 8 oz of goat cheese. Slice it into rounds and pop those slices into the freezer for about 20 minutes. This little trick helps the cheese firm up, making it easier to bread and fry—trust me, you’ll thank yourself later when things don’t get too melty in the oil.
- Set Up Your Stations: While the cheese is chilling, prepare your breading setup. Grab three bowls: one for 1/4 cup of all-purpose flour seasoned with salt and pepper, another for 1 large beaten egg (don’t forget that splash of water to help it blend), and a third bowl for 1/3 cup of Italian or panko breadcrumbs. This is your assembly line, so it’s time to get organized.
- Coat Your Cheese Rounds: Once your cheese is nice and firm from the freezer, take each round and coat it in the flour. Shake off any excess, then dip it into the egg mixture, and finally, cover it with breadcrumbs. Make sure all sides get a good coat—the more even, the better your crunch will be.
- Heat Up the Oil: Pour 2 tablespoons of olive or avocado oil into a skillet and heat it over medium. You want it hot enough that when you drop in your cheese rounds, they sizzle joyfully. Kind of like music to your ears, right?
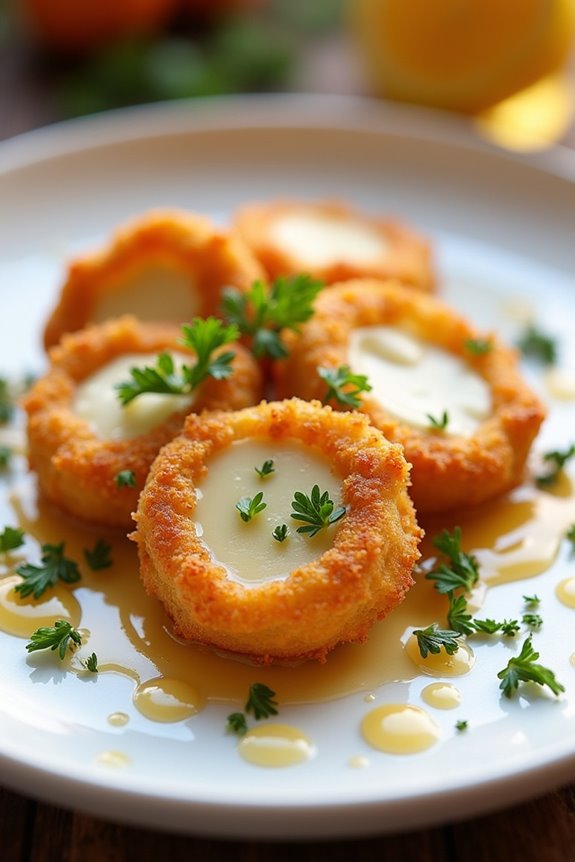
- Fry That Cheese: Carefully place your coated cheese rounds in the hot oil. Fry them for about 2 minutes on each side, or until they turn golden brown and crispy. Keep an eye on them to avoid burning—after all, nobody wants a sad, charred cheese medallion.
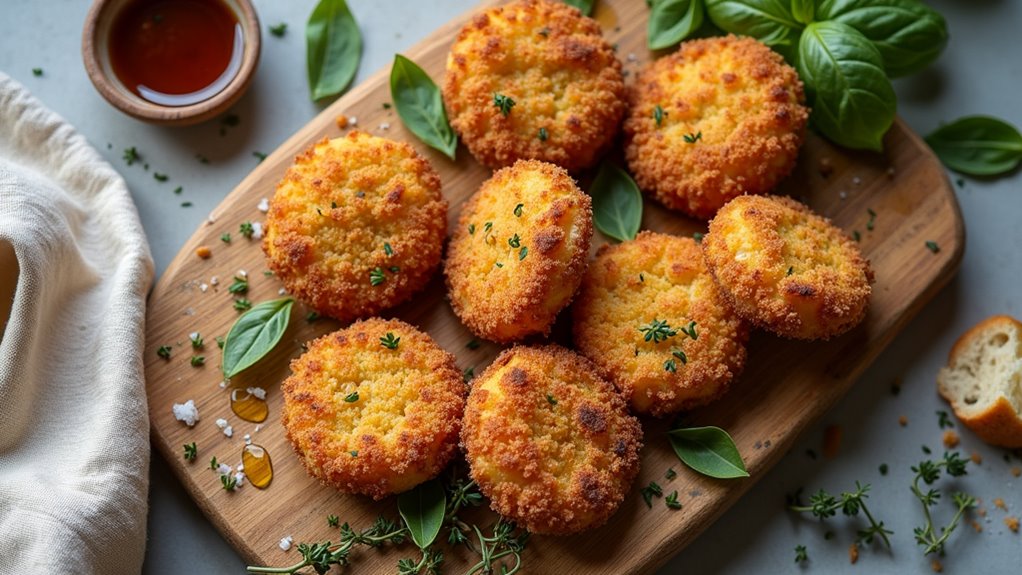
- Drain and Serve: Once they’re beautifully golden, remove the fried rounds from the skillet and set them down on a plate lined with paper towels. This will soak up any extra oil and keep your bites nice and crisp.
Now that you’ve mastered the frying part, go ahead and serve these little nuggets of joy warm. Drizzle some honey over the top or sprinkle with fresh herbs for a complete experience. You can even elevate your cooking with a premium slow cooker that helps in crafting perfectly balanced dishes to accompany your fried delights.
Maybe not so humble, but you’ll truly feel like a culinary rockstar after treating your taste buds to this mouthwatering delight. That’s it—easy peasy, cheesy breezy!
Tips & Variations
Have you ever thought about how you can take fried goat cheese medallions to the next level? Well, I’ve got a few fun ideas. First, try adding some herbs like thyme or rosemary to the breadcrumbs for extra flavor.
Or, why not spice things up by sprinkling cayenne pepper into the flour? If you’re feeling bold, try drizzling warm honey on top right before serving—trust me, it’s a game changer.
I often freeze the medallions before frying; it makes breading easier and keeps them from melting too fast in the pan.
And if you’ve got leftover cheese? Toss it in a salad with some roasted veggies, and you’ve got a meal that’ll make you feel fancy, even if you’re still in your sweatpants.
How to Serve?
Fried goat cheese medallions are one of those delightful bites that can seriously elevate any dish, don’t you think?
When I serve these, I love to plate them warm, drizzled with honey. It adds that perfect touch of sweetness that contrasts wonderfully with the tangy cheese. For a pop of color, I sprinkle fresh herbs like thyme or parsley on top. You could also toss them on a salad for an extra crunchy element.
Personally, I often serve them as an appetizer, paired with crackers or a nice baguette. Just picture it—friends gathering around, dipping their fries into something other than ketchup. That’s gourmet, right?
Storage & Reheating Guide
While it mightn’t seem like it at first glance, properly storing and reheating your fried goat cheese medallions can make all the difference in keeping their deliciousness intact.
After making a batch, I always pop leftovers into an airtight container, separating layers with parchment paper to avoid them sticking together. Refrigerate for up to three days; trust me, they taste better than you’d think after a day or two.
When it’s time to reheat, sauté them in a pan with a tiny drizzle of oil over medium-low heat. It revives their crispy coating. You could microwave them, but let’s be real: nobody wants soggy goat cheese. So, stick to the skillet—it’s worth it for that delightful crunch. Investing in premium kitchen cookware can truly elevate your reheating game for dishes like this.
Final Thoughts
As you wrap up your fried goat cheese adventure, I’ve got to say, there’s something truly delightful about that creamy interior and crunchy exterior. Honestly, how can you resist?
I can still remember the first time I made these; I thought I’d end up with a gooey mess. Spoiler alert: I didn’t. Getting that perfect crust? It’s a game changer.
Now, imagine this—you sit down, plate in front of you, and take that first bite. Heaven, right? These little bites of joy are fantastic with a drizzle of honey or some fresh herbs.
Trust me, you’ll want to impress your friends with this simple, yet decadent treat. So go ahead, indulge—life’s too short to skip the cheese!