
When I first tried making these Sweet and Savory Honey Mustard Cheese Pretzel Sliders, I was honestly skeptical. I thought, really? Pretzel buns and honey mustard? But once that melty cheese and savory ham met the sweet tanginess, I was hooked. They’re so simple to whip up, yet they have a flair that makes you feel like a culinary genius. Wanna know how to make these fabulous bites that disappear instantly at parties? Let’s jump in.
Why You’ll Love This Recipe
If you’ve ever found yourself daydreaming about the perfect snack, let me tell you, these Honey Mustard Cheese Pretzel Sliders might just be your new obsession.
Imagine sinking your teeth into warm, soft pretzel buns loaded with deli ham and gooey cheese—sounds heavenly, right? The blend of honey and Dijon mustard gives it that sweet and tangy kick, elevating your taste buds to cloud nine.
Plus, these sliders are a hit at parties; everyone loves a good bite-sized treat. Trust me, I’ve made them multiple times, and there’s never a crumb left. Seriously, they vanish faster than my willpower at a dessert table.
Equipment List
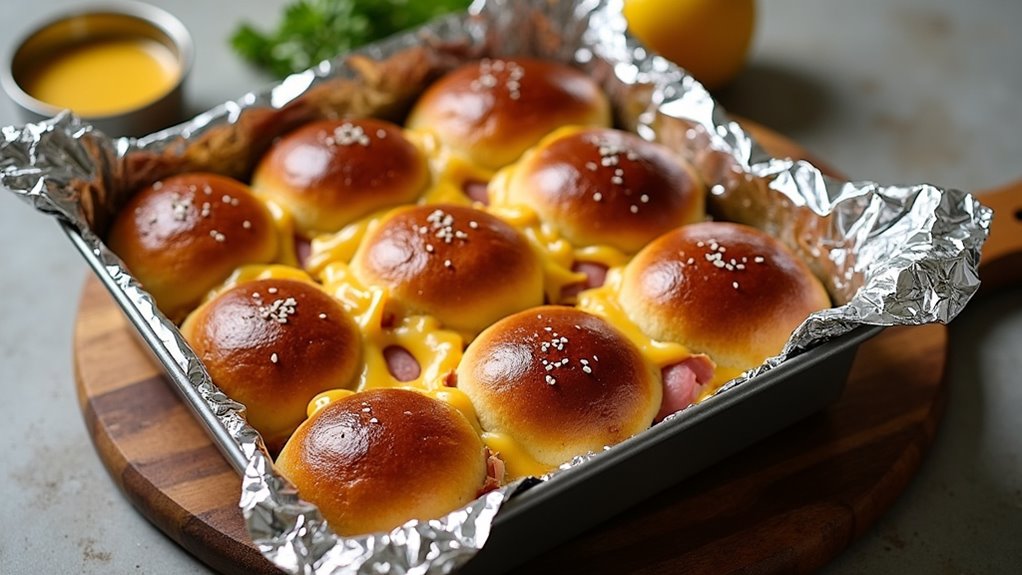
Gathering your kitchen tools and baking essentials is key to whipping up these delightful sliders. You’ll need a good baking pan—preferably a 9×9 foil-lined one. I’ve found this really helps with cleanup later.
Grab a sharp knife to slice those pretzel buns, and don’t forget a sturdy spatula for layering ham and cheese. A mixing bowl is essential, too, for that honey and Dijon concoction.
I like to use a pastry brush for the melted butter; it makes everything look fancy, even if it’s just sliders. Finally, an oven is obviously a must-have, but I’m pretty sure you figured that out, right?
For best results, consider investing in a quality baking sheet set, as having the right tools makes a significant difference in your baking experience.
Let’s get cooking, because these sliders won’t make themselves!
Our Ingredients
When it comes to whipping up those delicious Honey Mustard Ham & Cheese Pretzel Sliders, having the right ingredients is essential. You know what they say: good food starts with good ingredients.
It’s really all about that balance of savory ham, gooey cheese, and the sweet and tangy honey mustard. Trust me, once you get everything together, you’ll see why this recipe is a crowd-pleaser.
Plus, it’s super simple, so let’s dive right into it.
Here’s what you’ll need:
- 9 pretzel Hawaiian slider buns
- 9 oz deli ham
- 4 large slices marble jack or cheddar cheese
- 1 tbsp Dijon mustard
- 2 tsp honey
- 1.5 tbsp butter
Now, let’s talk about those ingredients a bit more. When picking out your pretzel buns, go for quality. Some of the store-bought ones can be a little sad and stale.
I mean, who wants to sink their teeth into a slider with a dry bun? Not me, that’s for sure. And for the cheese, you can’t go wrong with marble jack or cheddar—go bold! They both melt beautifully, creating that ooey-gooey vibe we’re all after.
Oh, and feel free to tweak the Dijon and honey ratios if you want it a bit sweeter or spicier. Cooking is all about experimenting, right?
Just be prepared for a delicious mess of flavors to dance on your taste buds. And remember, these sliders are best served warm, preferably while gathering your friends around to share the joy of culinary magic.
Step-by-Step Instructions

Making Honey Mustard Ham & Cheese Pretzel Sliders is a breeze—just follow these easy steps to create a sweet and savory delight that everyone will love.
You’ll be layering, spreading, and baking your way to a warm, gooey treat that’s perfect for gatherings or a cozy night in. Let’s get started!
1. Preheat your oven to 350°F. This step is essential if you want those sliders to bake evenly and come out perfectly warm. I mean, who likes cold sliders? Nobody, that’s who.
2. Slice 9 pretzel Hawaiian slider buns in half. Place the bottom halves in a foil-lined 9×9 pan. Feel free to be fancy here with your knife skills, but it’s totally okay if they look a bit rustic.
3. Layer 9 oz of deli ham evenly over the bottom buns. You want to make sure each slider gets its fair share—nobody likes being left out of the ham party.
Next, add 4 large slices of marble jack or cheddar cheese**** on top of the ham. The more cheese, the better, right? Who can resist that melty goodness?
4. In a small bowl, mix 1 tbsp of Dijon mustard and 2 tsp of honey together until well combined. You’re creating the sweet and tangy magic here. Spread this mixture on the tops of the buns generously.
This is where the sliders really start to shine!
5. Melt 1.5 tbsp of butter in the microwave or on the stove—your call. Once melted, brush it over the pretzel tops like you’re giving them a nice little spa treatment. They’ll appreciate it, trust me.
6. Next, cover your baking pan with foil and pop it into the preheated oven. Bake for 10 minutes to let everything heat up nicely.
After that, remove the foil and bake for an additional 10 minutes. This is where you want to keep an eye out for that delightful golden brown color on the tops of the buns.
7. Once you’ve done that, take them out of the oven and let them cool for just a couple of minutes. I know it’s tempting to dive right in, but a moment of patience will make for a much more enjoyable slider experience.
8. Finally, serve these warm beauties and watch everyone devour them. Seriously, they’ll disappear faster than you can say “Honey Mustard Ham & Cheese Sliders.”
Also, having the right essential kitchen appliances can help you whip up these sliders with even more ease and efficiency.
Tips & Variations
If you’re like me and love personalizing your dishes, this recipe gives you plenty of room for creativity. Try swapping deli ham for turkey or roast beef—trust me, it’s a game changer.
I’ve also experimented with different cheeses; a pepper jack adds a fun kick. Want more texture? Toss some crispy bacon bits into the mix.
And don’t forget the toppings. I’ve drizzled extra honey mustard on top before serving, and it’s like giving your pretzel hugs. If you’re feeling adventurous, sprinkle on some everything bagel seasoning—it’s surprisingly delightful!
Just remember, use quality pretzel buns. They really make a difference. Great flavor comes from fresh ingredients, and we want every bite to be delicious, right?
How to Serve?
Serving these honey mustard cheese pretzel sliders is all about creating that perfect moment for you and your guests. I love piling them on a big platter, letting everyone help themselves.
Trust me, there’s nothing quite like the look on their faces when they take that first bite; it’s pure joy. I like to pair them with a simple side, like crunchy veggie sticks or a fresh salad, to balance out the richness.
Don’t forget to have some extra honey mustard dip on the side. Everyone loves a little more flavor, right? I’ve even caught a few sneaking seconds—okay, maybe thirds.
Just embrace it; you’re not alone in loving these sliders. They’re a hit every time, guaranteed.
Storage & Reheating Guide
Once you’ve savored those delicious honey mustard cheese pretzel sliders, you might wonder how to keep the leftovers fresh for another day. I usually pop them in an airtight container, and they’ll stay good in the fridge for about three days.
If you’re feeling overwhelmed, trust me, I’ve been there too—just put your worries aside; I’ve got you.
When you want to reheat them, preheat your oven to 350°F. Place your sliders on a baking sheet and cover them with foil to keep them moist—no one wants a dry pretzel. A cutting board set makes it easy to slice and serve your sliders after reheating.
Heat for about 10-15 minutes, and voilà! Perfectly warmed sliders, ready to enjoy. Just don’t blame me if you end up eating them all again.
Final Thoughts
After enjoying those scrumptious honey mustard cheese pretzel sliders, it’s hard not to think about how they’d steal the show at any gathering.
Seriously, these sliders are the perfect combination of sweet and savory, and trust me, they’ll leave your guests raving. I made them for a recent get-together, and let’s just say leftovers were nonexistent. It’s that good.
Plus, they’re so easy to whip up—what’s not to love? If you’re looking for a crowd-pleaser that doesn’t require hours in the kitchen, you’ve found it.
Just remember to serve them warm, and you’ll be in for some happy taste buds. So, gather your ingredients, roll up your sleeves, and plunge into this delightful recipe!