
I’ve gotta tell you, these Lemon Raspberry Bars are a total game changer. They’re sweet, tangy, and the texture is just delightful. I remember the first time I made them—I almost messed up the crust, but somehow, it turned out perfectly crumbly. Isn’t baking a little unpredictable? Anyway, if you’re looking to impress friends or just sweeten up a rainy afternoon, stick around. You’ll want to whip these up in no time.
Why You’ll Love This Recipe
If you’re on the hunt for a dessert that’ll make your taste buds sing, then let me introduce you to these delightful Lemon Raspberry Bars.
Trust me, you’ll fall in love at first bite. The tangy lemon combined with sweet, juicy raspberries creates a flavor explosion that’s just magical. Plus, the creamy filling rests on a crumbly crust—I mean, who doesn’t love a bit of texture?
They’re like sunshine on a plate, perfect for a family gathering or when you need a little pick-me-up. Honestly, making lemon raspberry bars is a breeze, even if you think you’re a kitchen disaster (I’ve been there).
Equipment List
When you plunge into making these Lemon Raspberry Bars, having the right equipment on hand makes all the difference.
First up, you’ll need a trusty 9×13-inch baking pan. Trust me, I’ve tried using various sizes, and it just doesn’t work. Investing in premium baking equipment can truly elevate your baking game.
You’ll also want a good mixing bowl, preferably one that’s not so worn out it might collapse under the pressure. A whisk will come in handy for beating those eggs until they’re creamy, while a measuring cup helps avoid culinary chaos.
Don’t forget a spatula for scraping every last bit out of your bowl—because let’s face it, we want all that deliciousness in our bars.
And yes, a zester makes zesting that lemon way easier. Also, consider adding a garlic press to your kitchen tools for effortless flavor enhancement in other recipes.
Happy baking!
Our Ingredients
When it comes to baking Lemon Raspberry Bars, having the right ingredients is key to whipping up something delicious. You want to create that perfect balance of tart lemon and sweet raspberries nestled in a buttery crust. Trust me, you’re going to want to gather all the goodies beforehand to keep your baking flow smooth—who wants to run to the store mid-bake?
Plus, we all know how chaotic finding an ingredient can be when you’re knee-deep in flour.
Here’s what you’ll need to make these delightful treats:
- 1 cup cold unsalted butter (2 sticks)
- 2 cups all-purpose flour
- 1/2 cup granulated sugar (for the crust)
- Zest of 1 lemon
- 1/2 tsp salt
- 4 large eggs
- 1 1/2 cups granulated sugar (for the filling)
- 1/4 cup flour (for the filling)
- 1/2 cup fresh lemon juice
- 1 1/2 cups fresh raspberries
Now, let’s talk about the freshness of your ingredients. Using fresh raspberries is a game-changer—there’s nothing like the burst of flavor they add to the bars.
And the lemon juice? Freshly squeezed is the way to go. You can practically taste the sunshine in each bite. I’ve made the mistake of using bottled lemon juice before, and let me just say, the result was less than inspiring.
Also, with eggs, go for large ones; anything less should probably stay in the fridge. So, gather your ingredients, channel your inner baker, and let’s get started on creating these tantalizing bars!
Step-by-Step Instructions
Making Lemon Raspberry Bars is a breeze, and the results are nothing short of heavenly. Mixing the batter is quick and simple—just follow these easy steps, and you’ll be on your way to a tangy, sweet delight that will have everyone asking for seconds.
- Preheat Your Oven: Start by preheating your oven to 350°F. While the oven warms up, take a moment to grease your 9×13-inch pan. You want those bars to slide right out when they’re done, believe me, scraping is never fun.
- Make the Crust: In a large mixing bowl, combine 2 cups of all-purpose flour, 1/2 cup of granulated sugar, the zest of 1 lemon, and 1/2 teaspoon of salt. Got it all? Great! Next, add in 1 cup of cold unsalted butter (that’s 2 sticks, cut into small chunks). Use a pastry cutter or your fingers to cut the butter into the dry ingredients until the mixture resembles coarse crumbs. It should look a bit like sandy beach terrain—yes, I know, now I want to be on the beach too.
- Bake the Crust: Once you’ve got that crumbly goodness, press it firmly into the bottom of your greased pan. Bake it in the preheated oven for about 18-22 minutes, or until it turns a lovely golden brown. The heavenly scent wafting through your kitchen might just inspire a dance party.
- Prepare the Filling: While the crust is baking, grab a separate bowl and beat 4 large eggs together with 1 1/2 cups of granulated sugar until creamy and well-combined. This is where the magic starts to happen. Add in 1/4 cup of flour and 1/2 cup of fresh lemon juice—make sure it’s freshly squeezed. There’s just something about fresh lemon juice; it brings life to this filling. Whisk it all together until smooth and delightful. Using gourmet kitchen gear can elevate the consistency of your batter, helping you achieve a perfectly blended filling.
- Add the Raspberries: Once your crust is out of the oven and slightly cooled (it should still be warm), sprinkle 1 1/2 cups of fresh raspberries evenly over the crust. Don’t be shy here; these little gems of sweetness are what make the bars sing.
- Pour the Filling: Now, gently pour your lemon filling over the raspberries, making sure to cover them evenly. It’s like the filling is giving the raspberries a cozy blanket. Pop that back into the oven and bake for another 18-20 minutes, or until the filling is set. You’ll know it’s done when it doesn’t jiggle like Jell-O.
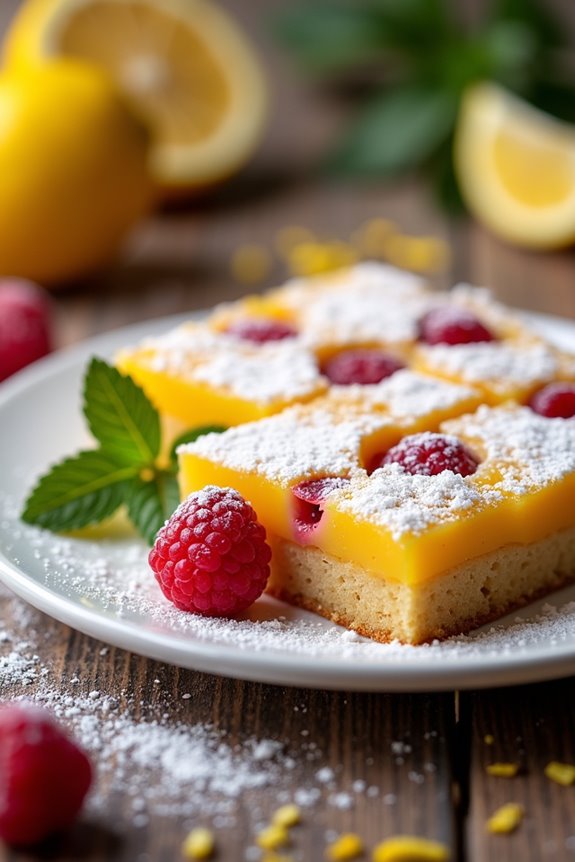
- Cool and Serve: After baking, let the bars cool on the counter for a bit, then pop them in the fridge for 1-2 hours. This step is essential; chilling will help them set perfectly. When you’re ready to serve, dust with powdered sugar for that extra touch of elegance.
And there you have it! You’ve just created the most delightful Lemon Raspberry Bars that will be the talk of the town (or at least your household). Enjoy every tangy, sweet, raspberry-filled bite. Quite the accomplishment, wouldn’t you say? For a gourmet touch, consider using gourmet cooking appliances to enhance your baking experience!
Tips & Variations
While these Lemon Raspberry Bars are already delicious as they are, experimenting with tips and variations can take them to another level of yum.
For instance, try swapping out half the raspberries for blueberries or blackberries—trust me, it’s a berry good idea. If you want an extra zing, add a splash of vanilla extract to the filling.
Want some crunch? Toss in some chopped nuts like almonds or pistachios on top right before baking; you’ll thank me later.
And if you’re feeling adventurous, drizzle a bit of white chocolate over the cooled bars. They’ll look fancy, and I promise, you’ll impress your friends.
Just don’t eat them all yourself; it’s way too easy to!
How to Serve?
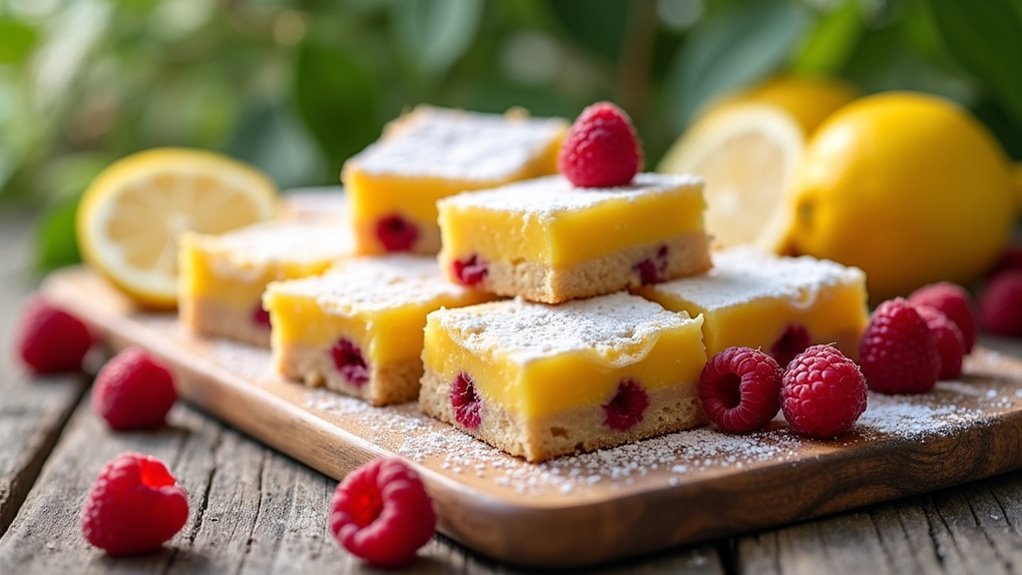
There’s something special about sharing a delicious treat like Lemon Raspberry Bars with friends and family. When I serve these beauties, I slice them into squares that are just the right size—big enough for a satisfying bite but small enough to avoid that dreaded sugar coma.
I love placing them on a colorful plate, maybe with some fresh raspberries sprinkled around for a pop of color. A light dusting of powdered sugar on top? Total game changer.
I usually grab a fork, but let’s be honest, who doesn’t enjoy picking up a square and diving right in? It’s all about the experience—pairing them with warm tea or coffee makes it feel luxurious, doesn’t it?
Storage & Reheating Guide
Storing Lemon Raspberry Bars properly guarantees their deliciousness lasts longer, and I’d hate for you to miss out on that sweet-tart goodness.
Once they’re cool, cover your bars with plastic wrap or foil. Keep them in the fridge for about a week—if they last that long. I mean, who can resist a zesty bite?
If you want to freeze them, just slice them first, layer them between parchment paper in an airtight container, and freeze for up to three months.
When you’re ready to indulge again, thaw them in the fridge overnight.
For a warm treat, zap them in the microwave for about 10-15 seconds. Trust me, there’s little that beats a warm Lemon Raspberry Bar. Additionally, using an adjustable rolling pin can help you achieve the perfect thickness for your dough when preparing your bars.
Final Thoughts
As I sit here dreaming about those zesty Lemon Raspberry Bars, I can’t help but think how they’re the perfect blend of sweet and tart, just like summer on a plate.
They’re easy to whip up, too, even if baking isn’t your strong suit. Who knew I could create something this delicious without setting off the smoke alarm?
Seriously, trust me—the moment you cut into those bars and see the vibrant layer of raspberries peeking through, you’ll know all your efforts were worth it.
Plus, sharing them with friends guarantees you’ll be the life of the picnic.
So, grab those ingredients and let’s bake a batch. You won’t regret it, and neither will your taste buds.
Happy baking!