
So, I recently stumbled upon this matcha cheesecake recipe with an Oreo crust, and let me tell you, it’s a game-changer. I mean, who would have thought that the earthy flavor of matcha could transform a classic dessert? I felt like a total chef whipping it up, even if I did accidentally spill a bit of matcha on my shirt—oops. Trust me, it’s easier than it sounds, and the results? Well, they’re pretty impressive. Want to know how to make it?
Why You’ll Love This Recipe
If you’ve ever wondered how to elevate a classic cheesecake, let me tell you about my love affair with this matcha cheesecake, and oh, the Oreo crust makes it even better.
Seriously, this dessert is a game-changer. The rich, creamy matcha cheesecake pairs so beautifully with the sweet, crunchy Oreo crust. I mean, who doesn’t love that chocolatey contrast? Plus, matcha brings this earthy flavor that’s just delightful.
You’ll find yourself going back for seconds—maybe even thirds. It’s a crowd-pleaser, too; I made it for a family gathering once, and it vanished faster than I could slice it.
Trust me, once you try this matcha cheesecake with Oreo crust, you’ll never look at plain cheesecake the same way again.
Equipment List
When it comes to whipping up this delicious matcha cheesecake with an Oreo crust, having the right equipment makes all the difference.
First off, you’ll need a 9-inch springform pan—trust me, it’s a game changer for effortless removal later. A mixing bowl and an electric mixer are essential for combining that creamy goodness.
Don’t forget a spatula for folding in the whipped cream; it’s like a chef’s best friend. You’ll also want a whisk for that matcha powder, ensuring no clumps hide in your batter.
And if you’re anything like me, a food processor makes quick work of crushing those Oreos. Additionally, a quality springform pan is crucial for achieving a perfect cheesecake texture.
Our Ingredients
When it comes to our delightful Matcha Cheesecake with an Oreo crust, the ingredient lineup is the star of the show. Whether you’re a matcha aficionado or just testing the waters in the world of this vibrant green tea powder, trust me, you’ll want these components to create a dessert that’s creamy, dreamy, and utterly delicious.
And let’s be real, the crunch of the Oreo crust plays magically with the smooth filling, making it an unforgettable treat. Alright, let’s explore what you’ll need.
Here’s your ingredient list:
- 150-180 g Oreo cookies (crushed, cream removed)
- 2 ½ tbsp melted unsalted butter
- 250 g cream cheese, softened
- 1 ½ tbsp matcha powder, sifted
- 100 g powdered sugar
- 150 ml whipping cream
Now, before you rush out to gather these goodies, a few little notes to reflect on.
Using quality ingredients can make a world of difference. For that creamy filling, don’t skimp on the cream cheese; go for the full-fat variety. You’ll thank yourself later when you taste that luscious texture.
And as for the matcha, if you can find culinary-grade matcha, it’s usually smoother and more vibrant, giving you a richer flavor.
Oh, and the whipping cream? The fresher, the better—nothing beats that fluffy finish when you fold it in!
Step-by-Step Instructions

Making a Matcha Cheesecake with an Oreo crust isn’t just a treat; it’s a delightful experience that combines rich flavors and tempting textures. And the best part? Mixing the batter is quick and simple—just follow these easy steps, and you’ll impress everyone around you with this heavenly dessert!
Step-by-Step Instructions
1. Crush those Oreos: Start with 150-180 g of Oreo cookies—remove the cream (you can snack on it later). Place the cookies in a plastic bag and crush them using a rolling pin or a food processor until you have fine crumbs. The crunchiness will be your crust’s best friend.
2. Combine with butter: In a bowl, mix the crushed Oreos with 2 ½ tbsp of melted unsalted butter. Stir until the crumbs are moistened and can hold together when pressed.
3. Form the crust: Grab a springform pan (this is essential for easy cheesecake release) and press the Oreo mixture firmly into the bottom to create an even crust. Use the back of a measuring cup or a flat surface to pack it down well.
Once it’s evenly pressed, toss it in the fridge to chill while you prepare the filling.
4. Cream cheese time: In a mixing bowl, beat 250 g of softened cream cheese and 100 g of powdered sugar together until the mixture is smooth and creamy. You want it to be like a fluffy cloud—no lumps here!
5. Add the matcha: Sift 1 ½ tbsp of matcha powder into your cream cheese mixture. This step is key for avoiding clumps since nobody wants a grainy cheesecake.
Mix well until the matcha is completely incorporated and the color turns a lovely green.
6. Whip the cream: In a separate bowl, whip 150 ml of whipping cream until you reach soft peaks. This is where the cheesecake gets its airy texture, so don’t skip this step! (Remember, don’t over-whip; you want it airy, not butter.)
7. Fold and combine: Gently fold the whipped cream into the cream cheese mixture. Use a spatula and employ a light hand to combine them—it should be smooth but still fluffy.
Think of it as a gentle embrace, not a wrestling match.
8. Spread the filling: Take your chilled crust out of the fridge, and pour the matcha filling over the Oreo base. Spread it out evenly so you have a nice, smooth surface on top.
It’s already looking dreamy!
9. Chill it out: Now, this is the hard part—refrigerate the cheesecake for at least 3 hours (or longer if you can resist). It needs time to set and develop those delicious flavors.
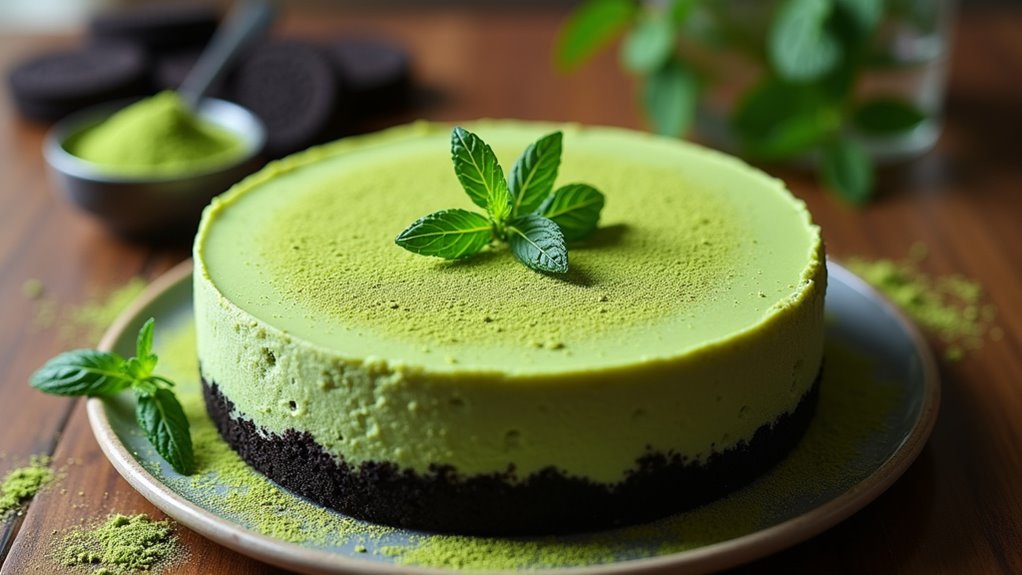
10. Final touch: Before serving, you can dust the top with a little matcha powder for an elegant finish. It’s all about that Insta-worthy moment, isn’t it?
And there you have it—your decadent Matcha Cheesecake with an Oreo crust is ready to enjoy! Just remember to slice it carefully and savor each bite.
Who knew something so beautiful could also be so easy to make? Happy baking, and may your friends be impressed by your newfound baking prowess. Additionally, using professional kitchen appliances can elevate your baking experience even further by providing reliable and efficient tools.
Tips & Variations
After chilling that luscious cheesecake to perfection, you might find yourself daydreaming about how to switch things up a bit or add a personal twist.
Wanna make it richer? Try swirling in some melted chocolate, or maybe even a berry compote for a fruity zing. Not a matcha fan? You can swap it out for a flavored extract.
I’ve even tossed in cookie crumbs into the batter—talk about a tasty surprise. Feel free to change up the crust too; crushed graham crackers or even chocolate chip cookies would work well.
And if you’re feeling adventurous, sprinkle some sea salt on top before serving. There’s no wrong way to enjoy this cheesecake, right? Let your creativity run wild.
How to Serve?
Serving my matcha cheesecake is one of my favorite moments—it’s like unwrapping a little gift of indulgence.
After letting it chill in the fridge, I usually take a moment to admire its beautiful green hue.
When it’s time to serve, I grab a sharp knife and cut clean slices. A tip? Dip the knife in hot water between slices for that photogenic edge—trust me, it makes a difference.
I love to sprinkle a dusting of matcha powder on top for a pop of color. Sometimes, I add a dollop of whipped cream and some fresh fruit on the side because, why not?
It’s definitely a showstopper that impresses my guests—no one needs to know how easy it was.
Storage & Reheating Guide
While it’s easy to get lost in the delightful flavors of matcha cheesecake, knowing how to store it properly is just as important.
I usually pop it in the fridge, covered tightly with plastic wrap for up to five days. That way, every slice stays fresh and oh-so-creamy!
If you find yourself with leftovers (which is rare in my house), definitely avoid freezing it—nobody wants a grainy cheesecake, right?
When you’re ready to indulge again, just pull it out, let it sit for a few minutes, then slice.
If you want that fresh whipped cream taste, maybe whip a little extra to serve on top. Trust me, it’s worth it, and your taste buds will thank you. Additionally, using freezer storage bags can help prevent other foods from getting freezer burn if you do need to freeze items in your kitchen.
Final Thoughts
If you’re anything like me, you probably find yourself daydreaming about desserts, especially ones as dreamy as matcha cheesecake.
This combination of creamy goodness and that crunchy Oreo crust? It’s pure magic. I mean, it’s so easy to whip together, yet it feels fancy enough for a dinner party.
Just picture your friends’ faces when you serve it; they’ll think you’re a gourmet chef, and you’ll know it just took a bit of mixing and chilling.
Plus, how can you resist that beautiful green hue?
I’ve lovingly destroyed countless Oreos in the process, but hey, someone’s gotta do it.
So go ahead, treat yourself—you deserve a slice of this delightful dessert adventure.
Your taste buds will thank you.