

I’ve been experimenting with mini salad cakes lately, and I can’t help but share how fun they are to make and eat. Imagine this: a crunchy base, layers of colorful veggies, all held together with a creamy dressing. They look fancy but are surprisingly simple to whip up. Honestly, if I can do it, so can you. Trust me, your friends will be impressed. Want to know how to create these delightful bites? Let’s get started.
Why You’ll Love This Recipe
You’re gonna love these mini salad cakes because they’re not just adorable; they’re a fun way to make your veggies shine. I mean, who doesn’t want to impress their friends with a colorful plate that looks like a little tower of joy?
These little creations are perfect for any occasion. Plus, they’re super adaptable. Got leftover veggies? Toss ’em in. They’re really forgiving, kinda like that friend who still loves you when you burn dinner.
And let’s not forget, they’re perfect for those of us who struggle to eat our greens. If I can make them look cute, anyone can!
Trust me, once you whip these up, you’ll find yourself grinning from ear to ear, and so will everyone else.
Equipment List
Creating those adorable mini salad cakes is easier when you’ve got the right tools at your fingertips. You’ll want a ring mold for shaping; trust me, it helps create those beautiful layers.
A sharp knife makes chopping veggies a breeze, and don’t forget a mixing bowl to combine all that colorful goodness. I’ve struggled with flimsy spoons in the past, so I recommend using a sturdy spoon for mixing – it’s worth it.
You’ll also need a pot for blanching the cabbage; boiling water can be tricky, but we’ve all been there. Finally, a good cutting board comes in handy. A cutting board set is a great investment for various chopping tasks and enhances your kitchen experience.
Just think, with these tools, you’ll be a mini salad cake pro before you know it, and that’s something to be proud of.
Our Ingredients
You’re about to whip up some delightful mini salad cakes that not only brighten your plate but also make you feel like a culinary superhero. The ingredients are colorful and fresh, so let’s gather everything we need to create these tasty little towers of vegetables.
Trust me, you’ll want to take a moment to admire your shopping basket before heading home. Just picture it: brilliant greens, sunny yellows, and a pop of red! Who wouldn’t feel excited to cook with this bounty?
Here’s what you’ll need:
- 2 cabbage leaves
- 1/4 bell pepper, chopped (any color you fancy)
- 1/3 cup corn (fresh or frozen will work like a charm)
- 1 small red onion, minced
- Fresh cilantro, chopped (because we’ve got to have some green magic)
- 2 or 3 bocconcini or mozzarella balls (cheesy goodness)
- ½ cup plain nonfat yogurt (creamy, tangy base)
- 1 tbsp lime juice (for that zesty kick)
- 1 tsp honey (sweetness, with just a hint of sass)
- ½ tsp paprika (for a little warmth)
- ¼ tsp cumin (earthy spice for depth)
Now, about these ingredients—some of them can be super versatile. If you don’t have corn on hand, don’t sweat it. You can swap it for diced cucumber or even some chopped avocado if you’re feeling adventurous.
And hey, if cilantro isn’t your jam, fresh parsley works just fine. It’s all about using what you enjoy and experimenting a little. Cooking is an art, after all, and who says you can’t get a little creative in the kitchen?
Plus, don’t we all love a good “what’s in my fridge” recipe moment? Keep your flavors balanced, and you’ll be golden.
Step-by-Step Instructions
Making mini salad cakes isn’t only rewarding, but it’s a fantastic way to get those colorful veggies on your plate. Mixing the ingredients is quick and simple—just follow these easy steps, and soon you’ll be presenting these charming little towers that everyone will adore.
1. Start by preparing the 2 cabbage leaves. Blanch them in a pot of boiling water for just 1 minute. This will soften them so they’re pliable enough to mold into shape. Feel free to keep the water bubbling while you get the leafy greens in and out; it should be like a quick dip on a hot day!
2. Next, in a mixing bowl, toss together the 1/4 cup of chopped bell pepper, 1/3 cup of corn, chopped fresh cilantro (a handful will do), and the 1 small red onion, minced. Grab your trusty spoon and mix well. Now, here’s where the magic happens: add in 1 to 2 tablespoons of the dressing made from the ½ cup plain nonfat yogurt, 1 tablespoon lime juice, 1 teaspoon honey, ½ teaspoon paprika, and ¼ teaspoon cumin.
Stir until everything is well-coated (it should look colorful and inviting).
3. Now it’s time to shape the salad cakes. Take a ring mold (if you don’t have one, a clean, open can or a muffin tin could work in a pinch). Line the inside with the blanched cabbage leaves, making sure they overlap a bit so none of your delicious filling escapes. It’s kind of like crafting a cozy blanket for your filling.
4. Fill the lined mold with your veggie mixture, then press down gently to compact everything. Channel your inner construction worker; we want these to hold their shape. Once it’s filled, carefully lift off the mold. You should have a neat little salad cake standing proud!
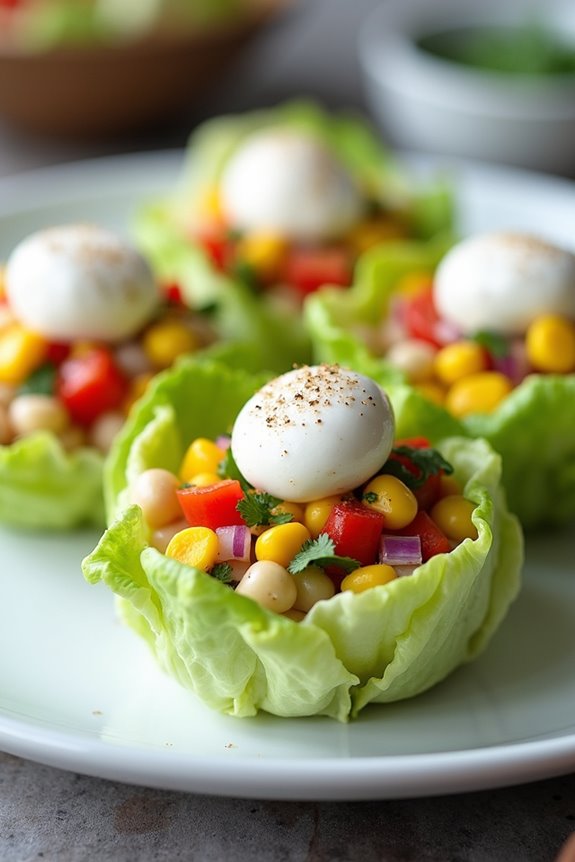
5. To finish it off, slice the 2 or 3 bocconcini or mozzarella balls in half and place them on top of each salad cake. Sprinkle some more fresh cilantro over it for that pop of green. Finally, for a little added flair, crack some fresh black pepper on top. It’ll not only look beautiful but also taste amazing.
6. Serve them up chilled. These little beauties are best enjoyed cold, so pop them in the fridge to let all those flavors marry while you tidy up your kitchen.
And there you have it! You’ve just made mini salad cakes that are as delightful to look at as they’re to eat. A little bit of work, sure, but totally worth every minute when you taste that fresh crunch. So, are you ready to plunge in and impress everyone at the dinner table? Not only do these mini salad cakes highlight fresh ingredients, but they can also be beautifully presented using high-end cookware sets.
Tips & Variations
While it might seem that a recipe is set in stone, there’s actually plenty of room to play around with mini salad cakes. You can swap the veggies based on what you have—carrots and radishes work great too.
Don’t forget to experiment with the dressing. I once tried adding a splash of balsamic, and wow, it was a game changer. If you want to go bold, try some spicy jalapeño for a kick.
I’ve even seen folks toss in diced avocado for creaminess. Just make sure to press everything down well; otherwise, you might end up with a veggie avalanche when plating—believe me, I’ve been there.
Adding toppings like nuts or seeds could give a nice crunch too.
How to Serve?
There’s something undeniably delightful about serving mini salad cakes; they’re like little towers of fresh goodness just waiting to impress.
I love to plate them on colorful serving dishes, which makes everything feel fancier. Don’t forget to sprinkle a little extra cilantro on top, just for that vibrant pop.
When I’m feeling extra fancy, I drape a drizzle of that creamy yogurt dressing around the plate. It’s a total crowd-pleaser.
These cute bites are also great conversation starters—everyone’s curious about what’s in them. So, feel free to chat while your guests snack!
Just remember, they look best when chilled, so keep them in the fridge until it’s time to serve. Trust me, they’ll disappear fast.
Storage & Reheating Guide
If you want to keep those delightful mini salad cakes fresh and tasty for as long as possible, you’ll need to know a thing or two about storage.
First off, I usually store them in an airtight container in the fridge. This keeps them cool and prevents them from getting soggy—nobody likes a mushy salad cake, right?
Typically, they last about 2-3 days, but trust me, they disappear faster than that. It’s also a good idea to consider using soup freezer containers if you plan on storing larger batches for later enjoyment.
If you’ve got leftovers that need reheating, I’d recommend using the oven instead of the microwave. Just a few minutes at low heat to warm them up while keeping that fabulous texture intact works wonders.
Final Thoughts
After covering how to store those mini salad cakes so they stay fresh, it’s time to wrap things up and reflect on why they’ve become a favorite in my kitchen.
Honestly, they’re just so versatile. Got a potluck? They steal the show. Quick lunch? They’re ready in a flash.
I’ve even played around with different veggies, and let me tell you, the options are endless.
Now, I may not be a Michelin-star chef, but these little delights make me feel like one.
And the best part? You can feel good eating them—light, fresh, and no guilt involved.
So, why not give it a try? You might find they become your new go-to recipe too.
Happy cooking!