
I’ve got to tell you about this Orange Creamsicle Cake I whipped up the other day. It’s a slice of summer heaven, packed with that zesty orange flavor we all crave. I mean, who doesn’t want a cake that tastes like ice cream on a hot day? I can almost hear you asking, how do you get that perfect balance of fluffiness and zing? Stick around, because the secret lies in just a few simple steps I can’t wait to share.
Why You’ll Love This Recipe
You might just fall in love with this Orange Creamsicle Cake as soon as you take your first bite. Seriously, it’s like enjoying a sunny day in dessert form. The flavors are a delightful mix of orange zest and creamy goodness.
Plus, it’s just so easy to whip up. I remember the first time I made it; I barely had time to take a photo before my family gobbled it up.
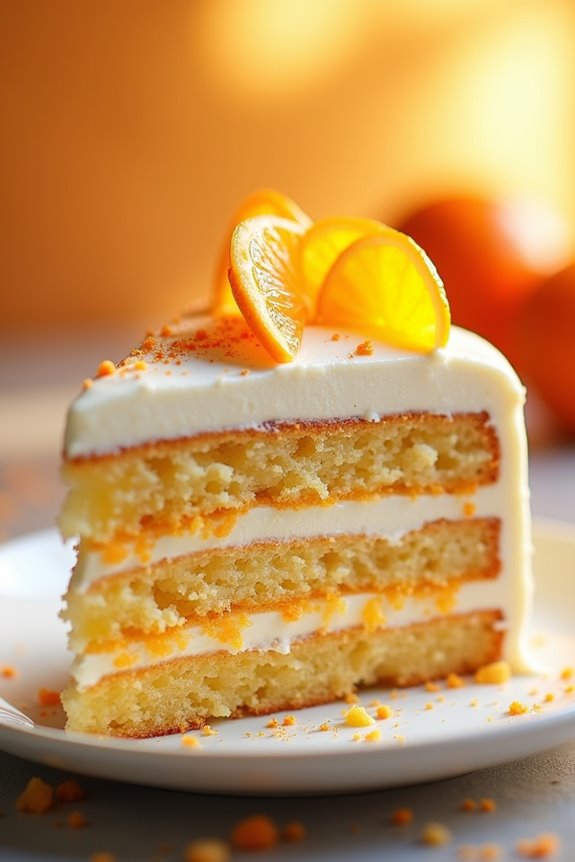
With layers of orange gelatin soaked into a fluffy white cake, then topped with dreamy whipped topping, it’s a treat that keeps on giving.
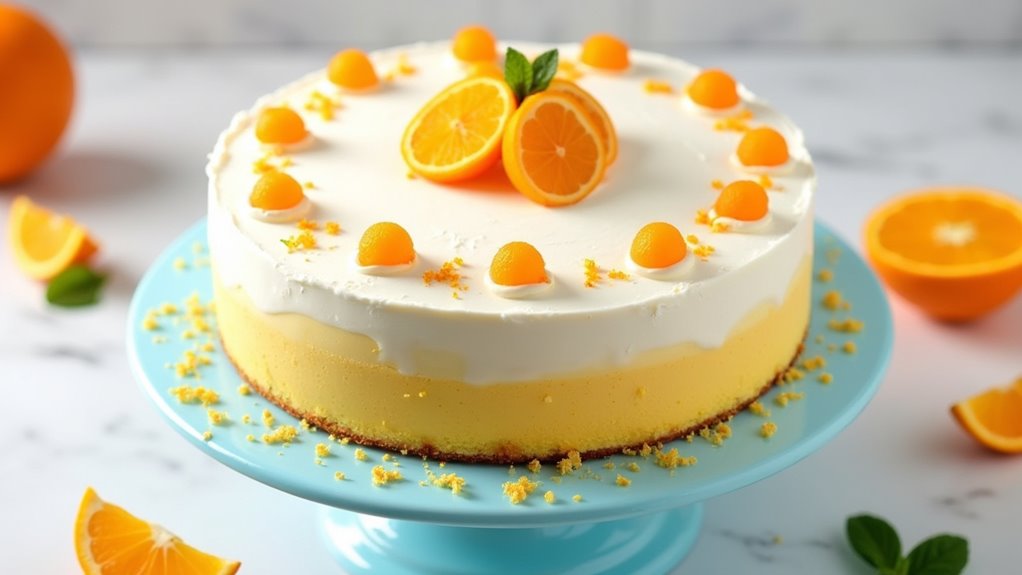
And don’t get me started on how good it looks with those shiny mandarin oranges on top. Who wouldn’t share this beauty?
Equipment List
When it comes to making the Orange Creamsicle Cake, having the right equipment makes all the difference. You’ll want a 9×13-inch baking pan for that perfect cake shape.
A mixing bowl is essential for whisking together your ingredients, plus a whisk to get everything all frothy and delightful. Don’t forget a spoon or straw for poking those cake holes—trust me, it’s surprisingly satisfying. Using high end cookware sets can elevate your baking experience and ensure even heat distribution.
A measuring cup will help with water and milk, and a rubber spatula is perfect for folding in that whipped topping. If you have a microwave-safe bowl for melting sherbet, even better.
And, of course, a refrigerator is a must for the chilling step. Can you even imagine skipping that? Yikes. Investing in premium cookware sets can enhance your baking results and lead to more delicious creations.
Our Ingredients
When it comes to whipping up the deliciousness of an Orange Creamsicle Cake, the ingredients you need are super easy to find and come together in a way that’s just downright magical. This cake is like a nostalgic trip back to summer days, full of orange sweetness and creamy, dreamy goodness. Plus, gathering these ingredients is part of the fun. Who doesn’t love a little shopping adventure to score the key players for a dessert that’s sure to impress?
Here’s the rundown of what you’ll need for this delightful cake:
- 1 box of white cake mix (plus the eggs, oil, and water it calls for)
- 1 (3 oz) box of orange gelatin
- 1 cup of boiling water
- 2 cups of orange sherbet, divided (because who can ever have too much sherbet?)
- 1 (3.4 oz) box of instant vanilla pudding mix
- 1/4 cup of milk
- 1 (8 oz) tub of whipped topping
- Mandarin oranges (optional, for garnishing—you know, just to be fancy)
Now, let’s get a little chatty about these ingredients. The beauty of this cake is that it doesn’t require any fancy-schmancy ingredients that you might need to search high and low for. You’ll find most of these items in your local grocery store, and if you’re like me, you probably already have a couple of them hidden away in your pantry.
That orange gelatin gives it that signature creamsicle color while the sherbet and whipped topping create that luscious, creamy layer that’ll have your taste buds doing a happy dance. And if you’re feeling extra fancy, the mandarin oranges not only make for pretty little toppings, they bring a burst of flavor.
Step-by-Step Instructions
Making an Orange Creamsicle Cake is like inviting sunshine into your kitchen. It’s a delightful treat that brings back sweet summertime memories, and the best part? It’s surprisingly easy to whip up. Mixing the batter is quick and simple—just follow these easy steps, and you’ll be well on your way to creating a delicious dessert that’s bound to impress.
- Preheat your oven to the temperature indicated on your box of white cake mix. Grab that *1 box of white cake mix* and prepare it according to the package instructions, adding in the required *eggs, oil, and water*. Mix it all together until just combined—don’t overmix; we want that cake to be light and fluffy. Using premium kitchen tools can help ensure even mixing for that perfect texture.
- Pour the batter into a greased 9×13″ cake pan, smoothing the top with a spatula. Pop it in the oven and bake for 25–30 minutes, or until a toothpick inserted in the center comes out clean. This is the moment you might find yourself doing a little dance in the kitchen, thinking about how wonderful this cake is going to be.
- Once the cake is out of the oven, let it cool for a few minutes before grabbing a spoon or a straw—whatever’s handy, really. Use it to poke holes all over the cake. This step is essential since it allows that yummy gelatin mixture to seep into the cake and create moisture and flavor. It should look like a beautiful Swiss cheese vibe; fanciness embraced.
- Dissolve that *1 (3 oz) box of orange gelatin* in *1 cup of boiling water*. Stir it well until completely dissolved. Now here’s the fun part: Stir in *1 cup of orange sherbet* until it’s completely melted and incorporated. You’ll see that bright, cheerful color emerge—it’s like sunshine in a bowl.
- Pour the gelatin mixture evenly over the poked cake, making sure it fills those lovely holes. Then, place your cake in the refrigerator for at least 4 hours. Think of it as giving the cake a little beauty sleep.
- Now for the topping: in a bowl, melt the remaining *1 cup of orange sherbet*. Once it’s nice and smooth, whisk in the *1 (3.4 oz) box of instant vanilla pudding mix* and *1/4 cup of milk*. Mix until it thickens up a bit—this is where the creamy magic really starts happening.
- Fold in the *1 (8 oz) tub of whipped topping* gently. You want to keep that light, airy texture intact. Once it’s all combined and looking fluffy, spread it evenly over the cake. You’re almost there, and it’s already looking pretty fantastic, right?
- If you’re feeling extra fancy, garnish the top with mandarin oranges. They add a pop of color and a lovely hint of tangy sweetness that complements the cake perfectly. You know what they say: “Presentation is everything!”
- Refrigerate the finished cake until you’re ready to serve. Just a little longer to let those flavors meld together—it’ll be worth the wait.
And there you have it! A luscious Orange Creamsicle Cake that’s ready to be devoured. What’s not to love about this cake? It’s sweet, creamy, and incredibly invigorating, making it perfect for any occasion. In addition, using premium kitchen appliances can streamline your preparation process and transform your baking experience into something truly delightful.
Tips & Variations
Although it’s hard to believe this delightful Orange Creamsicle Cake could get any better, there are plenty of ways to enhance it or give it a unique twist.
For a burst of flavor, try adding fresh orange zest to the batter—trust me, your taste buds will thank you. I’ve even swapped out some of the cake mix for a lemon-flavored one for an unexpected zing.
If you’re feeling adventurous, mix in some coconut flakes for a tropical vibe. And let’s not forget about the toppings: crushed graham crackers add a crunchy texture that contrasts beautifully with the creamy frosting.
How to Serve?
Serving up this Orange Creamsicle Cake is half the fun, and let’s be honest, it’s one of those desserts that might just steal the show at your next gathering. When it’s time to slice, I like to grab a sharp knife and cut it into generous squares—don’t be stingy, okay? Some people might prefer a smaller piece, but I say go big or go home.
As you serve, I recommend a dollop of extra whipped topping on each slice—it’s like the cherry on top of an ice cream sundae. You can even throw on some mandarin oranges for a little flair. Trust me, your guests will be raving about this cake long after they’ve had their fill, and you might even earn the title of dessert hero.
Storage & Reheating Guide
When it comes to storing your leftover Orange Creamsicle Cake—if there’s any left, that is—I’ve found that keeping it fresh and tasty is a breeze.
First, make sure it’s covered well. I like using plastic wrap or an airtight container, which works wonders.
Pop it in the fridge, and it’ll stay delicious for up to five days.
But if you’re feeling adventurous, you can freeze it! Cut it into slices, wrap each piece tightly, and freeze for up to three months.
When you’re ready to enjoy it again, just thaw it in the fridge overnight. Trust me, it’s worth the wait.
Don’t forget to savor each bite—after all, it’s like a little taste of summer. Additionally, using premium baking equipment can enhance your baking experience and ensure your cake turns out perfect every time.
Final Thoughts
As you wrap up your baking adventure with this delightful Orange Creamsicle Cake, you might find yourself smiling at how easy and fun it was to make.
Honestly, I can’t believe how simple the steps are. Were you worried it would be too complicated? I promise it’s not. You just mix, poke, and pour. That’s it.
Plus, who wouldn’t love that orange sherbet goodness? Your friends and family will rave about it, and you’ll feel like a baking superstar.
Just don’t forget to let it chill before serving; nobody likes a hasty cake. So, grab a slice, kick back, and enjoy. It’s a delicious way to treat yourself, and trust me, you’ll want to make this again.