
I’ve got to tell you, the Oreo mousse recipe is one of those desserts that feels like a warm hug on a rainy day. It’s creamy, dreamy, and surprisingly simple to whip up, even if your cooking skills are more ‘just add water’ than gourmet chef. Seriously, who doesn’t love the crunchy goodness of Oreos mixed with silky whipped cream? I’ve made it countless times, and every time it disappears faster than you can say “more, please.” Curious about how to make this light yet indulgent treat?
Why You’ll Love This Recipe
You might wonder why you’d fall in love with this Oreo mousse recipe, and let me tell you, it’s not just because it’s chocolatey.
It’s that perfect balance of creamy and crunchy that gets me every time.
I mean, who wouldn’t melt at the thought of light, airy mousse studded with real crushed Oreos?
The whipped cream adds this dreamy texture, while the cookie bits give a satisfying crunch.
Honestly, it brings me back to childhood—remember when dessert was just about being fun and delicious?
This recipe keeps that spirit alive.
It’s quick enough for any night, yet fancy enough to impress guests.
Plus, leftovers? They just might disappear like magic.
Who can resist?
Equipment List
When it comes to whipping up this delightful Oreo mousse, having the right tools on hand can make all the difference. First off, you’ll need a reliable mixing bowl—something that doesn’t wobble around when you’re whisking like a mad scientist.
A hand mixer is a must, too; my arm isn’t exactly in peak shape for whipping cream manually. I can tell you from experience, that’s a workout best avoided.
Don’t forget a spatula for folding in those crushed Oreos and a microwave-safe bowl for that creamy filling.
Finally, grab some measuring cups—precision matters here. Trust me, I once winged it, and the result was less mousse, more cookie soup. If you’re looking to make breakfast or other meals in large batches, consider investing in a large capacity electric griddle; it’s incredibly versatile!
Let’s keep the dessert heavenly, okay?
Our Ingredients
When you start making Oreo mousse, you’ll want to make sure you have all the right ingredients ready to go. Believe me, there’s nothing worse than getting all fired up to create a delicious dessert, only to realize you’re missing something essential.
So, grab your shopping list and let’s gather these goodies—there are only a few ingredients, but they sure pack a punch regarding flavor. Once you have everything in place, the magic of mousse can begin. Are you even ready for how dreamy this will be?
Here’s what you’ll need for your Oreo mousse:
- 8 Oreo cookies
- 1½ cups heavy whipping cream
- ½ cup powdered sugar
Now, let’s chat a little about the ingredients. First off, those Oreos are going to be the star of the show—not just for their crunchy chocolate goodness but for that creamy filling that makes everything taste heavenly.
When it comes to the heavy whipping cream, do yourself a favor and use cold cream; it whips up like a dream. No half-hearted whipping in my kitchen.
The powdered sugar is the secret to making it sweet and creamy without any gritty texture. If you can’t find powdered sugar, regular sugar can work, but you might end up working a bit harder to dissolve it into the cream.
Step-by-Step Instructions
Making Oreo mousse is a fantastic way to treat yourself or impress your friends without spending hours in the kitchen. Trust me, mixing this decadent, creamy delight is quick and simple—just follow these easy steps, and you’ll be on your way to dessert nirvana.
Step-by-Step Instructions
- Separate the Oreo Cookies: Start with 8 Oreo cookies. Carefully twist the cookies apart to separate the cream filling from the cookie halves. Set the cookie cream aside for later, and don’t worry about any crumbles—those will add character to your mousse.
- Crush the Cookies: In a sealed plastic bag, crush the remaining cookie halves into fine crumbs. Use a rolling pin for a workout or your hands for a more therapeutic approach. Just make sure they’re nice and small; nobody wants big chunks in their smooth mousse.
- Microwave the Cream Filling: Take that cream filling you set aside and pop it in the microwave. Heat it for 90 seconds, just enough to loosen it up and make it easy to mix. Admittedly, this part might feel a bit like dessert wizardry, but trust me, it’s worth it.
- Whip the Cream: In a large bowl, combine 1½ cups of cold heavy whipping cream with ½ cup of powdered sugar. Using an electric mixer, whip the mixture on medium speed until stiff peaks form. You’re looking for a fluffy cloud-like texture—don’t overmix; it should be light and airy, not butter.
- Mix in the Cookie Cream: Gently fold the warmed cookie cream from the microwave into your whipped cream. This step is essential because you want to maintain that lovely airy texture we just created. Use a spatula and be gentle—think of it as a delicate dance.
- Fold in the Crushed Cookies: Now, it’s time to introduce those finely crushed Oreo cookie crumbs to the mix. Carefully fold them into the mousse, ensuring they’re evenly distributed without deflating the cream. Again, think gentle—it’s like you’re cradling a tiny, sweet baby mousse.
- Chill Before Serving: Once everything is mixed together, transfer your mousse into serving cups or a bowl. Cover it with plastic wrap or a lid and pop it in the refrigerator for at least 30 minutes. This step is crucial. It allows the flavors to meld and the mousse to set up nice and wonderfully. If you’re feeling adventurous, you might even consider making it with a gourmet cheese making kit for a unique twist on dessert.
And just like that, your beautiful Oreo mousse is ready to be devoured.
Just be sure to keep it hidden—nobody needs to know how fast it disappears. Enjoy every rich, chocolaty, creamy spoonful; you’ve earned it.
Tips & Variations
While I love the classic Oreo mousse recipe, there’s always room to add a little twist or two to keep things exciting in the kitchen.
Try swapping out some cookies for those delicious Mint Oreos for a invigorating mint chocolate vibe. Don’t have whipped cream on hand? You can use whipped topping, though it’s never quite the same.
Feeling adventurous? Add a splash of coffee or a sprinkle of instant espresso for a mocha kick. And if you want to feel like a pro, try garnishing with chocolate shavings or more crushed Oreos on top.
Just remember, no matter how you tweak it, this mousse will still be a crowd-pleaser. Trust me—it’ll disappear faster than my holiday cookies do.
How to Serve?
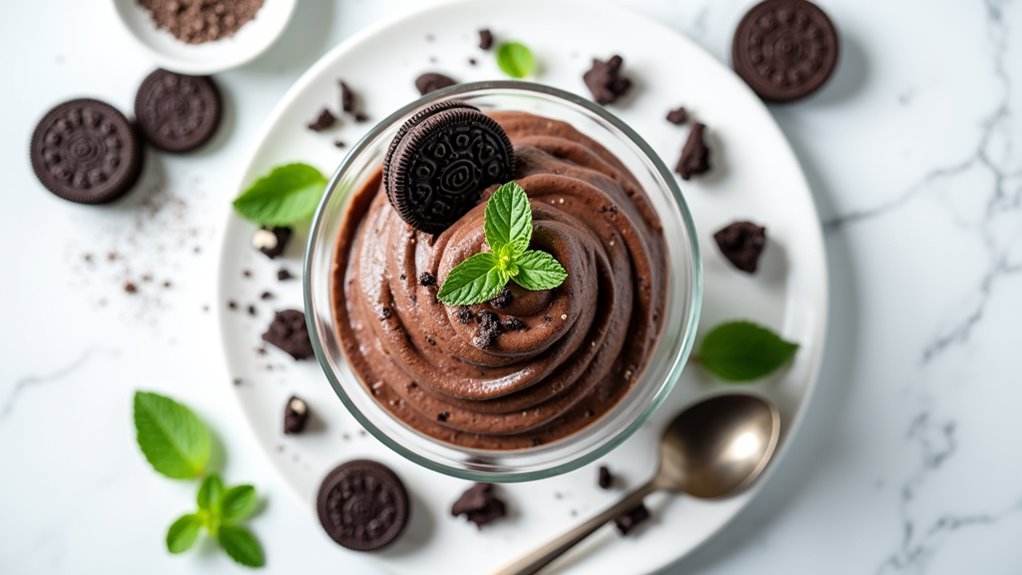
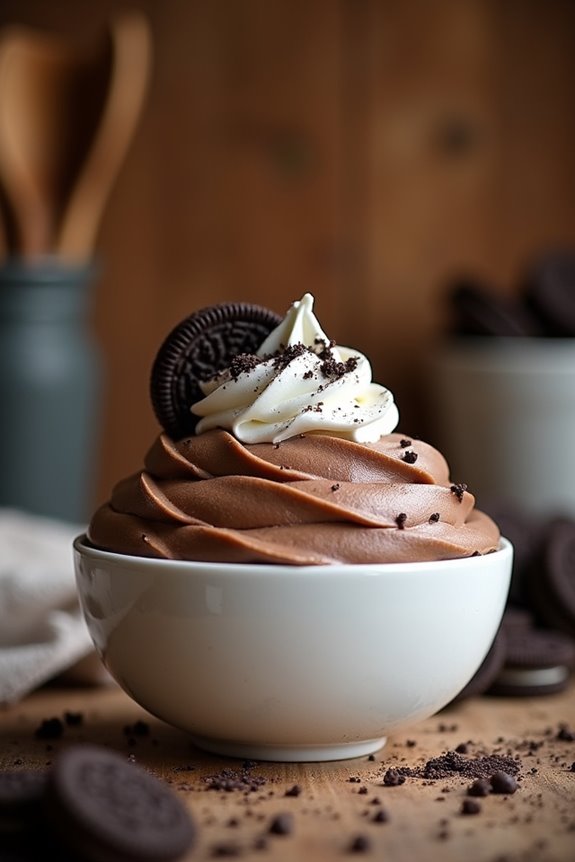
Serving Oreo mousse is where the fun really begins, and trust me, presentation can make all the difference. I love to scoop the mousse into clear dessert cups or mason jars; it shows off those gorgeous layers.
Top each with a sprinkle of crushed Oreos and a dollop of whipped cream. It’s like a tiny, edible work of art. Just imagine your guests’ faces! You can even add a whole Oreo on top for extra flair.
And don’t forget, a drizzle of chocolate sauce never hurts, right? It’s all about making it inviting and indulgent. I mean, who wouldn’t want to plunge into a delicious, creamy treat like this?
Storage & Reheating Guide
Once you’ve whipped up that delicious Oreo mousse, you might be wondering how to keep it fresh for later.
I get it—sometimes I’m too enthusiastic to finish it all in one sitting, but leftovers can be a real treat!
Just cover your mousse tightly with plastic wrap or pour it into an airtight container. It’ll stay fresh in the fridge for about three days. To store it safely, consider using soup freezer containers that can also be used for other delicious leftovers.
Now, reheating isn’t really a thing here, but if it’s been in the fridge for a while, I recommend giving it a quick stir to revive its fluffiness.
Trust me, you won’t want a flat mousse. Yes, it’s a challenge to save some, but hey, future you’ll thank present you!
Final Thoughts
Let’s take a moment to appreciate that silky, dreamy Oreo mousse you’ve just whipped up.
Seriously, isn’t it incredible how simple ingredients can create such magic? I can’t tell you how many times I’ve devoured the leftovers—if there are any. Between the rich cream and the chocolatey crunch, it’s practically a dessert dream come true.
Just imagine serving this at your next gathering; your friends will brag about it for months. And if I can whip it up without making a mess, trust me, you can too.
Don’t forget to spoon it into pretty glasses for that extra touch. So, go ahead and indulge, because life’s too short to skip dessert, right?
Enjoy every last bite—it’s worth it.