
I’ve often found myself craving that perfect blend of creamy peanut butter and sweet jelly, and what better way to enjoy it than in cookie form? These Heartfelt Peanut Butter and Jelly Cookies bring back memories of childhood lunches but with a twist. You’ve probably got all the ingredients in your pantry, and let’s be honest, who doesn’t love a warm cookie? But wait, there’s more to this recipe than just slapping stuff together…
Why You’ll Love This Recipe
If you’ve ever loved the classic combination of peanut butter and jelly, let’s be honest: this cookie recipe is about to become your new favorite sweet treat.
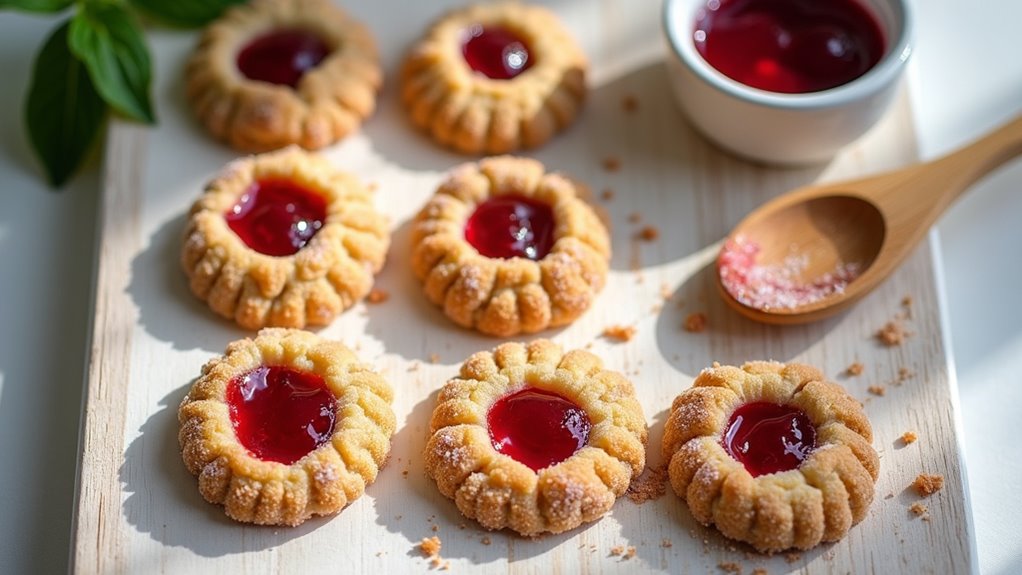
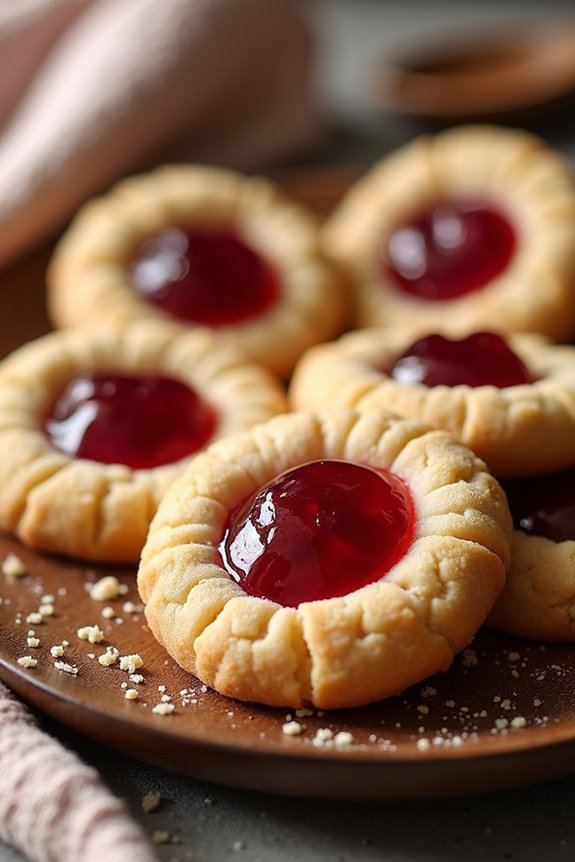
Imagine soft, chewy cookies, warm from the oven, with that perfect little thumbprint filled with your favorite jelly. It’s like a nostalgic trip back to childhood lunches but in cookie form.
The blend of creamy peanut butter and sweet jam harmonizes so well, you’ll wonder why you didn’t try peanut butter and jelly thumbprint cookies sooner.
Plus, they’re surprisingly easy to make, so even if cooking isn’t your thing, you won’t feel like a total disaster in the kitchen.
Trust me, once you take a bite, you’ll be hooked.
Equipment List
When it comes to baking peanut butter and jelly cookies, having the right tools makes a world of difference.
First, grab a mixing bowl—preferably one that’s big enough to handle my enthusiastic mixing. You’ll also need a wooden spoon or a handheld mixer to cream that butter and peanut butter together.
Don’t forget measuring cups; you’ll want to get those ingredients just right. A baking sheet lined with parchment paper is a must, too, for easy cleanup. Investing in high end baking tools can greatly enhance your precision in measuring.
I always have a small spoon handy for making those adorable indents—trust me, it’s worth it.
Finally, a cooling rack is essential for letting those cookies chill without becoming a sticky mess. Trust me, I learned that the hard way!
Investing in premium baking equipment can elevate your baking experience and ensure your cookies turn out perfectly every time.
Our Ingredients
When it comes to whipping up a batch of peanut butter and jelly thumbprint cookies, it’s crucial to gather all your ingredients first. It makes the baking experience smoother, and you won’t find yourself suddenly realizing you’re out of brown sugar halfway through.
Trust me, I’ve made that mistake—and the panicked dash to the store isn’t ideal when you just want to enjoy some warm cookies. So let’s take a look at what you’ll need to create these delightful treats.
Ingredients:
- 3 tbsp unsalted butter, softened
- ½ cup smooth peanut butter
- ½ cup brown sugar, packed
- 1 large egg
- 1 cup all-purpose flour
- ½ tsp baking powder
- ½ tsp kosher salt
- ¼ cup granulated sugar (for rolling)
- 3 tbsp raspberry jelly (or your favorite jam)
Now, a couple of things to keep in mind when choosing your ingredients. First, go for the smooth peanut butter rather than chunky. Unless you want unexpected surprises in your cookies (and not the good kind), stick to smooth.
And as for the jelly, while raspberry is a classic choice, feel free to let your taste buds wander; strawberry or even apricot jelly could play nice in this recipe. Just think of it as a little adventure in your kitchen.
Cooking is all about experimenting, anyway, right? Remember, even if things don’t go perfectly—like forgetting to preheat the oven—you’re still going to end up with something delicious to share.
And honestly, who can say no to cookies?
Step-by-Step Instructions
Making Peanut Butter and Jelly Thumbprint Cookies is a delightful journey of sweet and nutty flavors, and I promise, it’s absolutely worth every minute you spend in the kitchen. Mixing the batter is quick and simple—just follow these easy steps, and you’ll be on your way to cookie bliss in no time.
- Preheat Your Oven: Start by preheating your oven to 350°F. This step is essential because it helps the cookies bake evenly, and trust me, no one wants a cookie that’s a little crisp on one side and a gooey disaster on the other.
- Prepare Your Baking Sheet: While the oven warms up, take a moment to line a baking sheet with parchment paper. It’ll keep your cookies from sticking, and clean-up will be a breeze afterward. Bonus points for saving time.
- Cream the Butter and Peanut Butter: Grab 3 tablespoons of softened unsalted butter and ½ cup of smooth peanut butter. In a mixing bowl, cream these two together with ½ cup of packed brown sugar until the mixture is smooth and creamy—think fluffy clouds of peanut butter goodness. Using high-end cookware can truly improve the texture of your cookie dough.
- Mix in the Egg: Next, add in 1 large egg to your peanut butter mixture, and mix well until combined. You really want everything to come together nicely here, so give it a good stir. Remember, the richer the mix, the tastier the cookies!
- Combine Dry Ingredients: In a separate bowl, whisk together 1 cup of all-purpose flour, ½ teaspoon of baking powder, and ½ teaspoon of kosher salt. Then, gradually add this dry mix to your wet ingredients while mixing to form a dough. You don’t want to overmix it—just combine until it all looks well blended (a few lumps are totally fine).
- Shape the Dough Balls: Now it’s time to get your hands a little sticky. Scoop out portions of the dough and roll them into balls—about the size of a tablespoon. Once you have your dough balls ready, roll each one in ¼ cup of granulated sugar. This is where things start to get sweet, quite literally.
- Place and Prepare for Baking: Arrange the sugar-coated dough balls on the lined baking sheet, spacing them about 2 inches apart. It’s important not to crowd them; they’ll spread out as they bake, and nobody wants cookies that are stuck together like old friends.
- Initial Bake and Press: Bake the cookies in your preheated oven for 7 minutes. Yes, only 7! As soon as they’re out, take a small spoon (or your finger, if you’re feeling bold) and make a nice little indent in the center of each cookie. This is where the magic happens—your jelly is going to fit in perfectly.
- Fill with Jelly: Spoon about ½ teaspoon of raspberry jelly (or your jam of choice) into each of those indents. The jelly will melt slightly into the warm cookie, making it even more delicious.
- Finish Baking: Place the cookies back in the oven for another 8 minutes. You’re looking for that golden-brown look that tells you they’re done. Once they’re perfectly baked, remove them and let them cool on the rack.
And just like that, you have a tray full of mouthwatering Peanut Butter and Jelly Thumbprint Cookies that are just begging to be shared (or devoured solo, no judgment here). Enjoy your baking adventure, and don’t forget to enjoy the delicious results! Remember, using quality cooking equipment gourmet kitchen will elevate your baking experience to new heights.
Tips & Variations
Baking these cookies is just the beginning; there’s a whole world of tips and variations to explore that can take your peanut butter and jelly thumbprints to the next level.
Let’s get creative! Swap out the raspberry jelly for strawberry or even a zesty orange marmalade—it’s like a flavor party. If you’re feeling fancy, add a pinch of cinnamon to the dough. I once tried it, thinking, “What could go wrong?” but ended up asking for second helpings.
Don’t forget, the size of your dough balls matters; too big, and you’ll lose that perfect jelly-to-cookie ratio. And hey, if they don’t come out perfectly round, just call them “artistic.”
Trust me, nobody’s judging when they taste that peanut buttery goodness.
How to Serve?
Serving up these peanut butter and jelly thumbprint cookies is where the fun really kicks in. Imagine this: a cozy afternoon with warm cookies fresh from the oven. I like to arrange them on a colorful plate, showcasing their little jelly-filled indents.
And let’s be honest, after all that hard work, it’s perfectly okay to sneak one or two before serving.
I often serve them with a tall glass of milk or a hot cup of coffee. You can also get creative and stack them for a cookie tower. Honestly, who doesn’t love a cookie challenge?
Whether it’s a family gathering or just me, I enjoy watching everyone’s faces light up as they immerse themselves in these nostalgic treats.
Storage & Reheating Guide
After enjoying those delightful peanut butter and jelly thumbprint cookies, you’ll want to make sure they stay tasty for days to come.
Trust me, there’s nothing worse than a sad, stale cookie. So, here’s my game plan: first, place them in an airtight container. This keeps them fresh and prevents those pesky cookies from losing their charm.
If you’re thinking ahead (which I should do more often), you can freeze these cookies. Just pop them in a freezer-safe bag, and they’ll stay good for about three months.
When you’re craving a treat, just let them thaw at room temperature—or warm them in the microwave for a few seconds. Nothing beats that gooey peanut butter goodness. Additionally, consider storing your cookies in a reusable glass water bottle to keep them fresh and eco-friendly!
Final Thoughts
While you might think baking cookies is all about measuring and mixing, it’s truly an experience. I’ve spent countless afternoons with flour on my nose, shaking my head over my tendency to use too much jelly. Trust me, that gooey mess is definitely a learning curve.
But when I bite into a warm peanut butter and jelly cookie, all the sticky moments melt away. You’ll find joy in each squishy bite, especially when sharing them with friends or family.
So, don’t sweat the small stuff—just have fun with it. Experiment, maybe even throw in an extra scoop of peanut butter next time. It’s all about creating those simple, heartfelt memories, one cookie at a time.
Happy baking!