
I’ve got to tell you, making Minty Delight: A Peppermint Oreo Bark is like unwrapping a present on a chilly winter day—totally satisfying. There’s something about that creamy chocolate and crunchy Oreo combo that just warms my heart. It’s super easy to whip up, even if you’re like me and sometimes mix up the measuring cups. Want to add a little festive flair? Peppermint chips are a game changer. Let’s get to the fun stuff, shall we?
Why You’ll Love This Recipe
You know, whenever I think about making a treat that everyone loves, peppermint Oreo bark always springs to mind. It’s a combination of chocolate and crunchy cookies, and who doesn’t adore that?
Honestly, the moment I take a bite, I’m transported to a winter wonderland. The flavors dance together, and it just screams holiday cheer. Plus, it’s ridiculously easy to whip up!
You just melt some chocolate, crush Oreos, and layer it all up. I mean, what’s not to love?
Oh, and if you’re feeling extra fancy, throw some peppermint chips on top. Trust me, your friends will rave about it.
This peppermint Oreo bark is my go-to for any gathering. It’s sweet, simple, and so satisfying. Don’t you think it’s a winner?
Equipment List
When diving into the delightful world of peppermint Oreo bark, having the right equipment on hand makes all the difference. You’ll need a microwave-safe bowl or two for melting chocolate. Seriously, it’s a game changer.
A baking sheet lined with parchment paper is essential to prevent any sticky disasters—trust me, I’ve learned the hard way. Using freezer storage bags can also help keep your peppermint bark fresh for an extended period.
You’ll want a good rolling pin or a zip-top bag to crush those Oreo cookies into blissful bits. A spatula will help spread those layers perfectly, and don’t forget a microwave for melting away—no double boilers needed here.
Finally, some measuring spoons will come in handy for that coconut oil. Additionally, using a vacuum sealer machine can help keep your ingredients fresh for longer. Get your gear together, and let’s create this minty masterpiece.
Our Ingredients
Let’s talk ingredients for our delectable Peppermint Oreo Bark. This recipe is a sweet sip of holiday cheer in every bite, and having the right components is key to making it come alive. So grab your aprons, because this treat is about to become your new favorite go-to for parties or cozy nights in.
Here’s what you’ll need:
- 24 oz semi-sweet chocolate chips
- 24 oz white chocolate chips
- 4 tsp coconut oil, divided (this little gem makes everything smoother)
- 25 Oreo cookies, divided (because who ever said one was enough?)
- Peppermint chips (optional but totally recommended for that festive flair)
Now, a little something to ponder while you gather those ingredients. Quality matters, my friend. Sure, you can snag any bag of chocolate chips off the shelf, but opting for semi-sweet and real white chocolate—not the imitations—will make a world of difference in flavor.
And don’t underestimate the power of the coconut oil—it helps your chocolate melt into a dreamy consistency, which is just what you want when you’re creating this layered treat.
One more thing: if you find yourself munching on those Oreos while you work (and who wouldn’t), maybe grab an extra pack or two just in case. Trust me, it’s better to have a few cookies on hand than to be caught cookie-less. Happy cooking!
Step-by-Step Instructions

Making Peppermint Oreo Bark is a delightful way to get into the holiday spirit. Just imagine layers of sweet, creamy chocolate with crunchy bits of Oreo—all topped off with a festive dash of peppermint. It’s truly a treat that’s easy to whip up and perfect for sharing with friends and family. Additionally, you can elevate your culinary skills by exploring artisan cheese making kits, which offer an engaging way to create delicious homemade products. For those looking to enhance their cooking experience, investing in a deep fryer commercial can also open new doors to deliciousness. Now, let’s explore how to make it!
Step-by-Step Instructions
- Melt the Semi-Sweet Chocolate: Start by measuring out 24 oz of semi-sweet chocolate chips and placing them in a microwave-safe bowl. Add 2 tsp of coconut oil (this is what gives your chocolate that lovely, glossy finish) and microwave it in 30-second intervals, stirring between each, until it’s completely smooth. Be sure to keep an eye on it—chocolate can go from silky to burnt in a blink!
- Crush the First Batch of Oreos: While your chocolate is melting, take 10 Oreo cookies and crush them. You can place them in a plastic bag and gently smash them with a rolling pin or just use your hands for a little stress relief—who doesn’t need that?
- Combine and Spread: Once the chocolate is ready, stir the crushed Oreos into the melted chocolate. Spread the mixture evenly onto a baking sheet lined with parchment paper. This is your first layer. It should be thick but not too heavy. Let this sit until it’s slightly firm but still sticky on top, about 10-15 minutes—just long enough for you to find a comfy chair and maybe sneak a taste.
- Melt the White Chocolate: Now, get your 24 oz of white chocolate chips and combine them with the remaining 2 tsp of coconut oil in another microwave-safe bowl. Just like before, melt it in 30-second bursts, stirring until it’s smooth. This is where your kitchen will start smelling heavenly—a sweet, chocolatey aroma fills the air.
- Crush and Mix the Second Batch of Oreos: With the white chocolate melted, take another 10 Oreo cookies and give them a crush. Stir the crumbs into the melted white chocolate until well mixed.
- Layer It On: Pour this delightful white chocolate Oreo mixture over your first layer of semi-sweet chocolate. Spread it out evenly, covering all those chocolaty nooks and crannies.
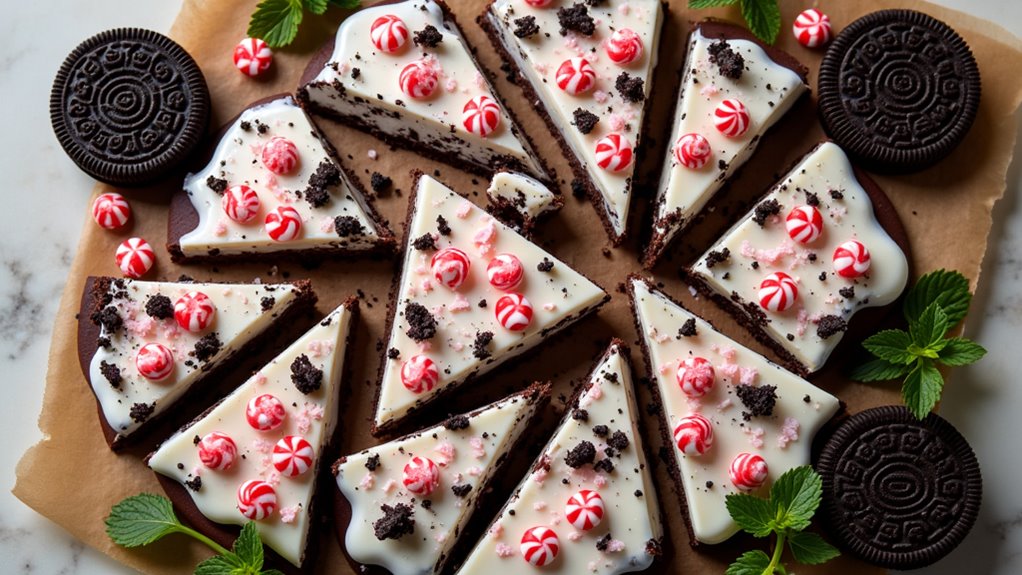
- Final Touches: Now, crush the remaining 5 Oreos and sprinkle them on top of the white chocolate layer. If you’re feeling extra festive, toss a few peppermint chips on as well—this is completely optional, but seriously, why not add a little extra cheer?
- Let it Set: Allow your bark to cool and set completely at room temperature. This can take anywhere from 30 minutes to an hour. Patience is key here! If you’re like me, sitting still may be challenging. Consider catching up on your favorite show while you wait.
- Break and Serve: Once fully set, break the bark into pieces. You might want to go for uneven chunks—they’re just more fun to eat!
And there you have it, your very own Peppermint Oreo Bark! This treat is perfect for gift-giving, holiday parties, or just a cozy night in with a movie (and let’s be honest, it pairs well with rewatching holiday classics). Enjoy every crunchy, chocolatey bite.
Tips & Variations
After letting that scrumptious Peppermint Oreo Bark set, you might find yourself thinking about how to put your own spin on this treat.
Why not switch up the chocolate? Dark chocolate adds a rich twist, while butterscotch chips can bring a sweet surprise. I’ve even tossed in crushed pretzels for a salty crunch.
If you’re a mint lover like me, extra peppermint chips on top are a must! You could also try layering in different candies, like crushed candy canes or even peanut butter cups for a nutty contrast.
Just remember to stick to the same melting methods. The best part? It’s all about experimenting, so don’t stress if it gets messy. Who doesn’t love a fun kitchen adventure?
How to Serve?
Serving Peppermint Oreo Bark is almost as fun as making it, especially since it brings a burst of festive cheer to any gathering.
I like to break it into generous chunks—who doesn’t love a big piece of chocolatey goodness? Placing it on a cute platter or even just a simple plate makes a lovely presentation.
You can add some sprigs of fresh mint or a sprinkle of extra peppermint chips for flair. Honestly, the more festive, the better.
I usually label it with a cute sign, because let’s be real, not everyone knows what they’re savoring right away.
And don’t forget to snag a piece for yourself before it disappears. Trust me, it will vanish quickly.
Storage & Reheating Guide
Once you’ve whipped up a batch of that mouthwatering Peppermint Oreo Bark, you might be wondering how to keep all that deliciousness fresh for later.
Trust me, I’ve learned the hard way—improper storage leads to sad, stale chocolate. I recommend keeping your bark in an airtight container; it’ll stay fresh for up to two weeks at room temperature.
Just make sure it’s in a cool, dry spot, away from direct sunlight. If you’re like me and can’t resist the temptation, just break off a piece now and then.
Reheating isn’t really necessary, but if you do, a gentle microwave zap for just a few seconds can soften it back up. Using a professional kitchen mixer can help you achieve the perfect texture for your bark from the start.
Always remember—how can something taste this good last so long?
Final Thoughts
When it comes to Peppermint Oreo Bark, there’s just something magical about how it all comes together—like a sweet holiday hug in candy form.
Honestly, every bite transports me to a cozy winter evening, where joy is as easy as a satisfying crunch. Making this treat is so simple, even my disaster-prone baking attempts can lead to delicious results.
Forget about fancy techniques; it’s all about melting, mixing, and layering. Plus, the blend of chocolate and mint? Pure bliss.
I often find myself sneaking back to the fridge for just one more piece, a guilty pleasure I won’t apologize for.