
Let’s talk about the magic of Cheesy Queso Fundido. I’ve whipped this up when friends come over, and honestly, who doesn’t enjoy melted cheese with a kick of chorizo? It’s simple to make, yet it feels fancy—like you’re a culinary genius. You just layer and bake, and boom, cheesy goodness. But what’s the best way to serve it? That’s where things get interesting, and trust me, you’ll want to stick around for those tasty tips.
Why You’ll Love This Recipe
If you’ve ever found yourself dreaming about gooey, savory cheese and spiced chorizo, then this Queso Fundido recipe will be your new go-to dish.
Seriously, what’s not to love? It’s incredibly easy to whip up, and the flavor combination is pure magic. You get that rich, melty cheese dancing with the spicy chorizo, creating a mouthwatering experience that’s hard to forget.
Plus, it’s perfect for sharing—if you’re feeling generous. Honestly, I’ve devoured an entire dish on my own (who could blame me?).
The best part is, it’s versatile; you can add your favorite extras like salsa or jalapeños to amp up the flavor.
Make this, and you’ll find it’s hard to not smile with every bite.
Equipment List
When you’re diving into making Queso Fundido, having the right equipment really makes a difference. First off, you’ll need a trusty cast-iron skillet. Why? It evenly bakes the cheese and stays hot while serving. Plus, using cast iron skillet cookware not only enhances the flavor but also encourages a perfect crust on your dish.
Then, don’t forget a stirring spoon; mine’s usually covered in cheese, but I love it anyway. An ovenproof dish is key for transforming your cheesy creation into a bubbly masterpiece.
Oh, and if you have an extra oven mitt or two, consider yourself lucky—trust me, melted cheese can be sneaky. Finally, have some tortilla chips or flour tortillas on hand for dipping, because who wants a cheese dip without a proper scoop? I can’t imagine life without them.
Our Ingredients
Making Queso Fundido is like plunging into a warm, cheesy hug, and who doesn’t want that? If you’re a fan of gooey, melty cheese paired with some savory chorizo, then this recipe is for you. It’s perfect for parties, game nights, or just a simple weeknight treat when you’re feeling a little indulgent. Plus, you only need a handful of ingredients to whip this up. Let’s check out what you’ll need!
- 1 tbsp vegetable oil
- 5 oz Mexican chorizo (casings removed)
- 12 oz Monterey Jack or Oaxaca cheese (grated)
- Flour tortillas or tortilla chips (for serving)
- Optional: Salsa, chopped onion, jalapeño, and garlic (for extra flavor)
Now, before you plunge into your cheesy masterpiece, think about the chorizo you pick. Mexican chorizo has a unique flavor profile that’s spicy and rich—definitely the star of the show here.
Also, when it comes to cheese, Monterey Jack is fantastic for melting, but if you can find Oaxaca cheese, it brings a nice touch of stringiness that makes every dip a cheesy delight.
And if you want to jazz things up, don’t skip those optional toppings; a sprinkle of chopped onion and a dash of salsa can really elevate the whole experience.
Step-by-Step Instructions

Making Queso Fundido is a delightful adventure into cheesiness that promises to elevate any gathering or even just a cozy night in front of the TV. With just a few simple ingredients, you’ll be on your way to enjoying a gooey, melty dish that pairs perfectly with tortillas or tortilla chips. Investing in essential kitchen appliances can make this cooking experience even more enjoyable and efficient.
Let’s explore these easy steps to create your cheesy masterpiece.
1. Preheat your oven to 350°F (175°C). This will guarantee that your cheese gets all bubbly and deliciously gooey when it comes time to bake.
2. Grab a skillet, and pour in 1 tablespoon of vegetable oil. Heat the oil over medium heat, and don’t rush this part; we want to slowly get the oil warmed up.
3. Next, add 5 ounces of Mexican chorizo (casings removed) into the skillet. Cook the chorizo for about 6–7 minutes, breaking it apart as it cooks until it’s browned and crumbly.
You should see some oiliness happening here—that’s just the chorizo getting happy in the pan. Once it’s beautifully cooked, drain any excess fat (you want flavor, not grease).
4. Now, transfer the cooked chorizo into an ovenproof dish. Reserve a little bit (maybe a tablespoon or so) for garnishing later—trust me, it adds a great finishing touch!
5. Here comes the fun part: sprinkle 12 ounces of grated Monterey Jack or Oaxaca cheese generously over the chorizo. Make sure to cover it well—no one wants a cheesy corner left behind.
6. Pop that dish into your preheated oven and bake for about 10–12 minutes. Keep an eye on it until the cheese starts to bubble and melt into gooey perfection.
You want it nice and melty, but not so much that you end up with some chewy cheese (nobody wants that).
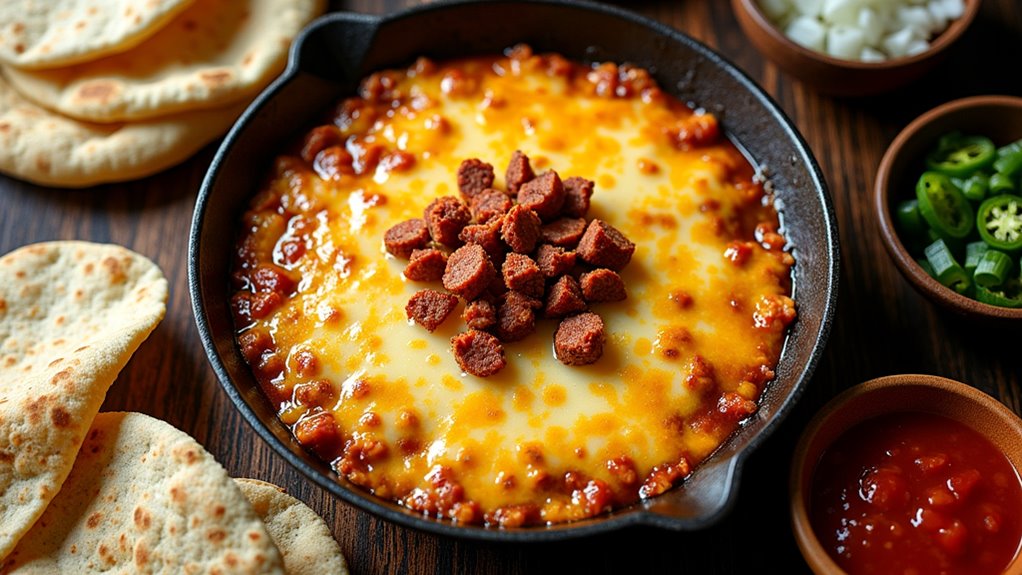
7. Once it’s ready, pull it out of the oven (caution: it’s hot!). Garnish with the reserved chorizo for that extra pop of color and flavor.
8. Serve your Queso Fundido immediately with flour tortillas or tortilla chips. Don’t forget to set out some optional salsa, chopped onion, jalapeños, and garlic for those who like to add a spicy kick.
Enjoy exploring this cheesy bliss—it’s all about sharing warm moments around the table, right? Just don’t blame me if it disappears quicker than you can say “cheesy goodness.”
Tips & Variations
While you can stick to the classic Queso Fundido recipe, I love experimenting with different flavors and additions to keep things exciting.
Ever tried adding some sautéed onions or jalapeños? They bring a real kick that makes my taste buds dance.
If I’m feeling adventurous, I mix in some roasted garlic or even a sprinkle of smoked paprika for a twist.
Don’t forget—using a cast-iron skillet not only makes baking a breeze, but it’s perfect for keeping everything warm.
And if you want to impress friends, throw in some crab meat for a fancy touch. Trust me, they’ll wonder how you got so gourmet.
Just remember, there’s no wrong way to indulge in ooey, gooey cheese!
How to Serve?
When it comes to serving Queso Fundido, I’ve found that presentation can make all the difference. To impress your friends, use a cast-iron skillet—it keeps everything warm and looks nice too.
I love to garnish with a sprinkle of chorizo on top for that “wow” factor. Serve it hot with warmed flour tortillas or crispy tortilla chips, and don’t forget the salsa.
You can even lay out chopped onions or jalapeños for DIY toppings; it’s like a build-your-own nacho bar! Honestly, there’s something delightful about watching everyone dig in and create their own cheesy masterpieces.
Just be careful; that cheese can get real stretchy! Trust me, I’ve had my fair share of awkward cheese moments.
Storage & Reheating Guide
So, what do you do with leftover Queso Fundido? First off, don’t panic; I’ve been there too. Just grab an airtight container, scoop in those cheesy delights, and pop it in the fridge. It should keep for about three days, but I’d be shocked if it lasts that long.
When it’s time to reheat, I usually go for the microwave. Just heat in short bursts, stirring in between to avoid that chewy cheese nightmare. You can also use an oven—just cover it so it doesn’t dry out, or adjust settings to keep things melty.
Honestly, I might just reheat it twice. Can you blame me? Zesty cheese goodness deserves another round, right? Plus, using soup freezer containers ensures you can keep your cheesy treats fresh for longer periods when you want to save some for later!
Final Thoughts
After all the sizzling and melting, it’s hard not to feel a little proud of what you’ve just created in your kitchen.
Seriously, who wouldn’t feel like a rockstar? This Queso Fundido isn’t just a dish; it’s a warm, gooey celebration of flavors that brings everyone together.
Imagine this—gathering friends around a bubbling skillet, chips in hand, laughing and dipping away.
And let’s be real, if you’re like me, you might end up eating most of it solo, right? Don’t worry, no judgment here.
Remember, the best part about this dish is its versatility. Whether you toss in extra toppings or stick to the classic, it’s bound to impress.