
I’ve gotta tell you, quinoa protein bars are my secret weapon for those mid-afternoon slumps. Who doesn’t crave something sweet and crunchy, right? But these bars aren’t just tasty; they’re packed with all the good stuff. Picture sunny days ahead, snacking guilt-free while you tackle your to-do list. Intrigued? Let’s break down the process so you can whip up these delicious bars yourself, and trust me, they’re way easier than you might think. Ready?
Why You’ll Love This Recipe
When you think about healthy snacks, does the thought of a bland, cardboard-tasting protein bar pop into your mind? I get it.
That’s why I love making quinoa protein bars. These little beauties are packed with flavor and nutrients. Trust me, they’ll make your taste buds dance.
Think about it: dates, almonds, and peanut butter come together to make a deliciously satisfying treat. Plus, I can’t resist chocolate, so I drizzle that on top.
You won’t believe how easy they’re to whip up. Just a few simple steps, and you’ve got a snack that’s way better than anything you’ll find in a store.
Honestly, who wouldn’t want a healthy dessert that feels indulgent? Give these a try; you won’t regret it.
Equipment List
Getting ready to whip up these quinoa protein bars? You’ll need a few tools to make this deliciousness happen.
First off, grab a medium saucepan for cooking the quinoa. You can’t skip this step; trust me, a pot without quinoa is like a donut without sprinkles.
Next, you’ll want a food processor to blend your dates and almonds. If you don’t have one, I’m not sure how you’re living your best life.
A spatula is also handy for scraping that tasty mixture out. Plus, you’ll need a baking dish lined with parchment paper for shaping your bars—non-stick is definitely your friend here.
Finally, get ready to melt those chocolate chips, maybe with a microwave or a double boiler. Using a premium slow cooker can also make the process of melting chocolate even easier.
Happy cooking!
Our Ingredients
Making quinoa protein bars isn’t just about whipping up a healthy snack; it’s an adventure in your kitchen that’s both fun and rewarding.
You get to mix textures and flavors while knowing you’re crafting something nutritious to fuel your day. Plus, it’s a great way to impress your friends with your newfound culinary skills.
Now, let’s plunge into what you’ll need to gather to start this tasty journey.
Ingredients:
- 1/3 cup pre-rinsed quinoa
- 2/3 cup water
- 16 pitted dates (no sugar added)
- 1/2 cup raw almonds (with skin)
- 1/3 cup natural crunchy peanut butter
- 1/4 cup chocolate chips
- 1 tablespoon honey (optional)
Now, a quick note about these ingredients. Each component plays an essential role in what makes these bars so delightful.
First, the quinoa is packed with protein and gives the bars a nice chewy texture. Those pitted dates are nature’s candy and provide the sweetness you’re looking for without any added sugars.
If you’re nutty about nuts (see what I did there?), the almonds not only add a satisfying crunch, they also boost the protein content.
And we can’t forget the peanut butter, which ties everything together while adding richness.
Regarding chocolate, well, is it even a bar without it? The optional honey can help if you fancy a little more sweetness, but you can totally skip it if you’re trying to keep things light.
Step-by-Step Instructions
Making your own Quinoa Protein Bars is an adventure in the kitchen that you mightn’t want to leave behind. The process is quick and simple—just follow these easy steps to create a snack that’s not only tasty but also packed with nutrition. Ready? Let’s get started.
- Cook the Quinoa: Start by taking 1/3 cup of pre-rinsed quinoa and adding it to a small pot with 2/3 cup of water. Bring this to a boil, then reduce the heat to low, and let it simmer for about 15 minutes. Once it’s fluffy and the water is absorbed, remove from heat. You’ll want to cool it down, so pop it in the fridge for at least 2 hours or longer if you can (prepping ahead is always a win).
- Prep the Dates: While the quinoa is chilling, grab 16 pitted dates (make sure they’re sugar-free) and toss them into your food processor. Pulse them until they form a big, sticky ball. Just imagine those sweet morsels breaking down—it’s like a little party in your processor. Once you’ve got a date-dough blob, set it aside for now.
- Process the Almonds: Next up, it’s time to work on the nuts. Throw 1/2 cup of raw almonds into that same food processor. Pulse them until they’re finely minced, being careful not to turn them into almond flour. You want those crunchy bits to add some great texture to your bars.
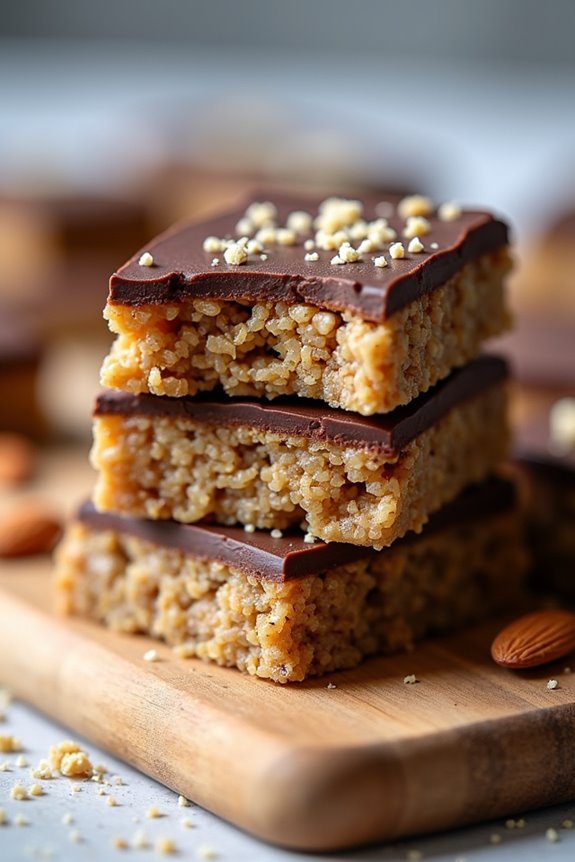
- Combine the Ingredients: Now, add the date ball, minced almonds, 1/3 cup of natural crunchy peanut butter, and that chilled quinoa to the processor. Pulse everything together until nicely mixed and well-combined. It should be a thick, somewhat sticky mixture that you can shape.
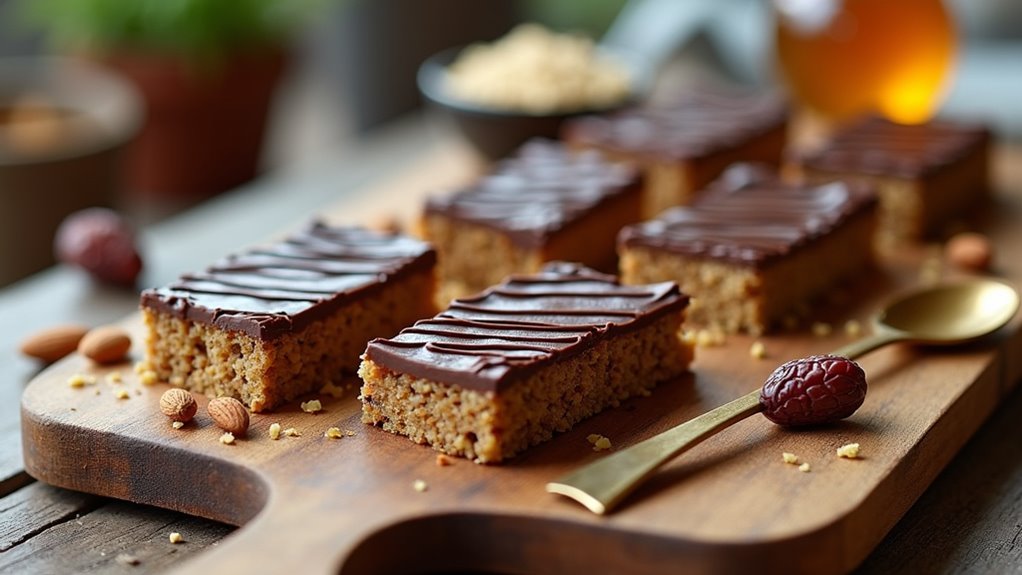
- Shape the Bars: Time to get your hands a little messy! Grab that mixture and mold it into six bars, roughly 2″x1″x1″ each. Don’t stress about making them perfect—homemade means a bit of character, right?
- Melt the Chocolate: In a microwave-safe bowl, melt 1/4 cup of chocolate chips with 1 tablespoon of honey (if you’re using it) in the microwave. Heat in 15-second intervals, stirring until it’s smooth and glossy. This step is where the magic really happens, so keep an eye on it.
- Coat the Bars: Once your chocolate is melted, spread it over the tops of your bars using a spatula or just a spoon. Make sure to cover them generously. If you really love chocolate, you can also sprinkle some more on top before refrigerating.
- Chill Until Set: Place your chocolate-drizzled bars into the fridge for about 30 minutes or until the chocolate has hardened completely. Then, they’re ready to be enjoyed.
Just think—you’re not only satisfying a snack craving but also whipping up something that’s good for you. The process might take a little time, but it’s completely worth it when you take that first bite. Enjoy your homemade Quinoa Protein Bars, and maybe share a few… or not, no judgment here.
Additionally, consider pairing your delicious bars with a gourmet cheese board set for an elevated snacking experience that impresses guests and enhances your home entertaining.
Tips & Variations
While creating your own Quinoa Protein Bars can be a delightful experience, there’s always room for a little personal touch.
I love to get creative with my bars. Want something crunchy? Toss in some chopped walnuts or sunflower seeds.
Can’t stand the taste of peanut butter? Swap it out for almond or cashew butter instead.
For chocolate lovers like me, adding chocolate chips directly into the mixture is a must. It’s a game-changer.
And remember, if you prefer less sweetness, just go ahead and ditch the honey. I’ve been there, wondering if I added too much, and I realized it’s all about finding the balance that works for you.
Enjoy the process; you might just discover your new favorite combo.
How to Serve?
After you’ve whipped up those delightful Quinoa Protein Bars with all your creative spins, serving them can be just as fun as making them.
I love placing them on a pretty platter. It just feels special, don’t you think? You could even cut them into different shapes—hey, who says snacks can’t be artistic?
I also like to add a little note for my friends, saying how much protein and energy they’re packed with. It’s kinda like a fun food trivia contest.
When I share them at parties, I watch people’s faces light up. They never guess something so healthy could taste this good.
Trust me, you’ll want to serve these bars with pride, or maybe just a cheeky grin.
Storage & Reheating Guide
Once you’ve enjoyed those delicious Quinoa Protein Bars, the next step is figuring out how to store them properly.
I usually pop them in an airtight container and stash them in the fridge. This keeps them fresh for about a week—if they last that long, right? For optimal quality, it’s best to use airtight food storage solutions to prevent moisture and air exposure.
For longer storage, I recommend freezing them. Just wrap each bar in plastic wrap and toss them in a freezer bag. They’ll be good for up to three months, which is great for those busy days when you need a quick snack on the go.
When it’s time to enjoy one, I just let it sit at room temperature for a few minutes or zap it in the microwave for about 10 seconds. Easy peasy.
Final Thoughts
When it comes to whipping up these Quinoa Protein Bars, you might find that the process becomes a fun ritual rather than just another thing on your to-do list. Seriously, who doesn’t love a kitchen adventure?
I mean, mixing dates and quinoa might sound odd, but trust me, it’s a game changer. As you shape those bars, you’ll feel like a snack magician.
Plus, they pack a delightful punch of energy, perfect for those busy days. If you sprinkle in your favorite chocolate chips, they become a little indulgent too.
Let’s not kid ourselves—who doesn’t appreciate a treat? So, grab those simple ingredients, and embrace the joy of making your own protein bars. You won’t regret it.