
Let’s talk about strawberry cheesecake bars, shall we? They’re this perfect blend of creamy and fruity goodness that makes my taste buds do a happy dance. I love how easy they are to whip up—no fancy techniques required, just some mixing and baking, and voilà. Honestly, I could eat the whole pan by myself. Trust me, you won’t want to miss out on these bars, especially when I share some insider tips for the best results. What do you say?
Why You’ll Love This Recipe
You’ll love this recipe for strawberry cheesecake bars for a bunch of reasons, but let’s start with the fact that they taste like sunshine on a plate.
Seriously, every bite is a mix of creamy, tangy goodness with that fresh strawberry kick. I still remember the first time I made these; my kitchen smelled divine, and I could hardly wait for them to chill.
I mean, who doesn’t love a dessert that’s easy to whip up and looks so fancy? Plus, if you’re like me and struggle with baking, these strawberry cheesecake bars forgive my mistakes. You just mix, pour, and bake.
Trust me, when you drizzle that white chocolate over the top, it feels like pure magic. Can’t wait for you to try them!
Equipment List
When it comes to making strawberry cheesecake bars, having the right equipment can make a world of difference. I mean, trust me, you don’t want to wrestle with a flimsy pan. I recommend a sturdy 9×13-inch baking dish—perfect for our yummy bars.
A good mixing bowl is essential too; I usually grab my large one to accommodate all that creamy goodness. Don’t forget a hand mixer or stand mixer; beating cream cheese by hand is a risky workout I’d rather avoid.
A spatula? Absolutely, it helps to scrape every bit of that cheesecake mixture into the pan. Finally, get yourself a saucepan for that luscious strawberry compote.
Investing in premium kitchen appliances can truly enhance your baking experience. With the right tools, you’re already winning!
Our Ingredients
When it comes to the ingredients for making delicious strawberry cheesecake bars, we want everything to be fresh, creamy, and decadent—just like a dessert should be. Think of this as a sweet project that brings a little happiness into your kitchen.
Have you ever indulged in a cheesecake that was so creamy you just couldn’t put your fork down? Well, that’s exactly the kind of experience we want to recreate here. Let’s explore the ingredients that make these bars not just tasty, but oh-so-confident in claim to being the star of your dessert table.
- Graham cracker crumbs
- Melted unsalted butter
- Softened cream cheese
- Sugar
- Sour cream
- Vanilla extract
- Eggs
- Fresh strawberries
- Lemon juice
- Cornstarch
- White chocolate
Now, let’s take a moment to chat about these ingredients. Quality really does matter here. Using fresh strawberries makes all the difference, elevating your cheesecake bars from good to mouth-watering. Opt for ripe, sweet strawberries; they’ll be the stars of your compote.
And don’t even think about skimping on the cream cheese—go for the full-fat version. You want that luscious creaminess that will keep you coming back for more. It’s also important to let your cream cheese soften before you start mixing. Can you imagine trying to mix cold cream cheese? It’s like wrestling with a brick. Trust me on this one.
Each ingredient plays its part beautifully in making those strawberry cheesecake bars something you’ll want to share, or maybe just keep all to yourself. No judgment here.
Step-by-Step Instructions
Making strawberry cheesecake bars is a delightful way to bring a little sweetness into your day. Mixing the batter is quick and simple—just follow these easy steps and soon you’ll be savoring a creamy, fruity treat that’s perfect for sharing or for keeping all to yourself. Ready? Let’s jump in!
1. Prepare the crust: In a mixing bowl, combine 1 ½ cups of graham cracker crumbs with ½ cup of melted unsalted butter. Use a fork to mix until everything is well blended and crumbly. You want it to hold together when pressed—like a sandy beach after the tide goes out.
Now, press this mixture firmly into the bottom of a lined 9×13 inch baking pan. Make sure it’s even!
2. Bake the crust: Preheat your oven to 350°F (175°C) and Bake the crust for about 10 minutes, or until it’s slightly golden. Just keep an eye on it; we want it to give you that lovely warmth, not toast it into a sad burnt offering.
3. Prepare the cheesecake filling**: In a large mixing bowl, beat together 24 ounces of softened cream cheese, 1 cup of sugar, ½ cup of sour cream, 1 teaspoon of vanilla extract**, and 3 eggs. Use a hand mixer on medium speed, mixing until the mixture is smooth and creamy—imagine you’re stirring a fluffy cloud.
(Pro tip: Don’t overmix; just get it smooth without turning it into a whirlwind.)
4. Add the cheesecake filling: Once your ingredients are well-combined, pour this luscious cheesecake mixture evenly over the baked crust. It should look like a soft, creamy layer nestled over your cookie base.
5. Bake the cheesecake: Slide the pan into your preheated oven and bake for about 25–30 minutes. The edges should be set, but the center might still jiggle a little bit when you give it a gentle shake. Don’t worry; it will firm up as it cools!
6. Make the strawberry compote**: While the cheesecake is baking, take 2 cups of fresh strawberries**, and chop them up. In a small saucepan, combine the chopped strawberries with ½ cup of sugar and 1 tablespoon of cornstarch.
Cook over medium heat until the strawberries begin to break down and the mixture thickens, which should take about 5–7 minutes. This is where the magic happens; your kitchen will smell like a delightful strawberry garden.
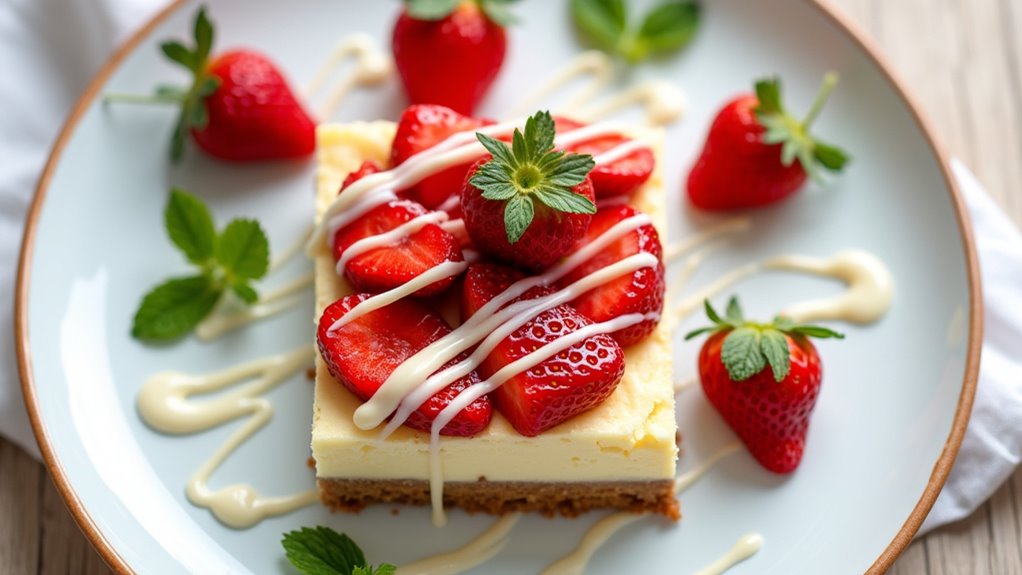
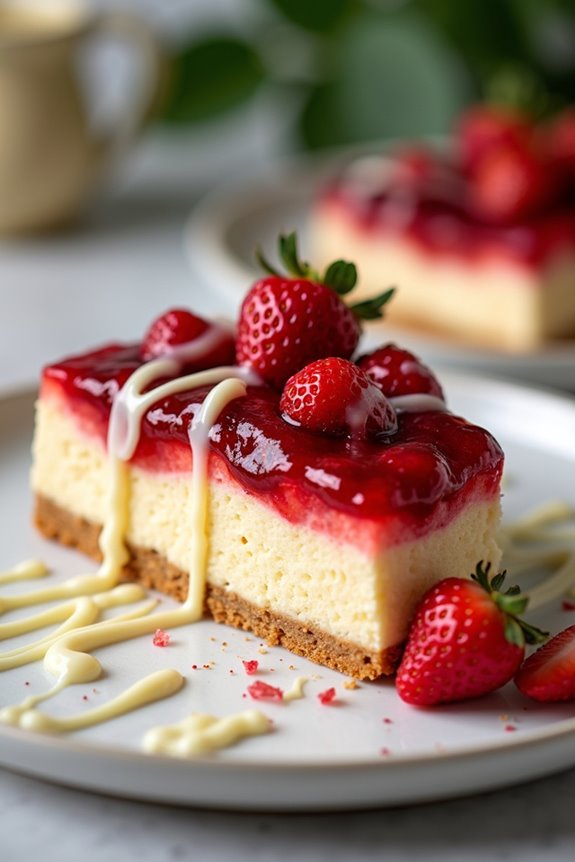
7. Spread the compote: Once your cheesecake is done baking, remove it from the oven and allow it to cool slightly. Drizzle the strawberry compote evenly over the top of the cheesecake and feel free to fancy it up with a few whole strawberries on top!
8. Chill and serve: Now, it’s time for patience (I know, it’s hard!). Cover the pan and chill in the refrigerator for at least 4 hours, or preferably overnight. This will let the flavors meld and the cheesecake set up perfectly.
9. Finish with a drizzle: When you’re ready to cut into those sweet bars, melt about ½ cup of white chocolate and drizzle it over the top for a touch of elegance.
This is your moment to shine—show off those beautiful bars!
Now, slice them into squares, grab a fork (or not, who am I to judge?), and enjoy! Whether you choose to share them or keep them all to yourself (no shame here), these strawberry cheesecake bars are bound to be a hit and may just become your new favorite dessert. Happy baking!
Your baking experience will be enhanced with premium baking equipment that ensures perfect results every time.
Tips & Variations
While these strawberry cheesecake bars are already a crowd-pleaser, there are plenty of tips and variations that can elevate them to the next level.
For a unique twist, try adding a sprinkle of lemon zest to the cheesecake mixture. It brightens flavors like no other!
Ever thought about swapping out strawberries for raspberries? Totally worth it. They’re both pretty flexible.
Don’t forget to chill those bars for at least two hours; it makes a world of difference in texture.
Oh, and I always drizzle melted white chocolate on top—it’s like a sweet surprise on every bite. Trust me, your guests will be raving.
How to Serve?
After getting creative with those tasty tips and variations, you’re probably wondering how to serve these delightful strawberry cheesecake bars, right?
First, slice them into neat squares—don’t worry if they’re a little messy; that’s what makes them charming.
I love to arrange them on a pretty platter, letting their vibrant colors shine. Drizzling warm white chocolate on top not only adds flair but also a touch of decadence.
Want to impress? Use fresh strawberries as a garnish, or serve with dollops of whipped cream.
Honestly, there’s no wrong way to serve these beauties. Whether it’s a casual movie night or a fancy gathering, they’ll steal the show—trust me, I’ve learned the hard way by tempting everyone with an empty plate.
Storage & Reheating Guide
Storing and reheating those delicious strawberry cheesecake bars is easier than you might think. First, let those bars cool completely, then wrap them tightly in plastic wrap or place them in an airtight container.
They’ll stay fresh in the fridge for up to five days—if they last that long. For longer storage, you can freeze them for up to three months. When you’re ready to indulge again, just let them thaw in the fridge overnight.
Reheating isn’t necessary, but if you prefer them warm, pop them in the microwave for about 15-20 seconds. Just keep an eye on them—I once turned a bar into a gooey disaster but learned my lesson.
Who knew cheesecake could resemble lava? Additionally, if you want to make a large batch for gatherings, using an electric griddle large capacity can significantly speed up your baking process.
Final Thoughts
Making strawberry cheesecake bars has been a delightful experience for me, and I hope yours is just as enjoyable. I mean, who doesn’t love creamy, fruity goodness?
When I first tried this recipe, I couldn’t believe how easy it was. I ended up eating half of the batch before they even chilled. Yeah, my sweet tooth got the best of me.
Just remember, patience is key—these bars taste even better after chilling. And that drizzle of white chocolate? Total game changer.
If you’re like me, you might just find your kitchen turning into a dessert paradise. So, get those strawberries ready, have fun with the process, and don’t forget to share (or not, I won’t judge).
Happy baking!