
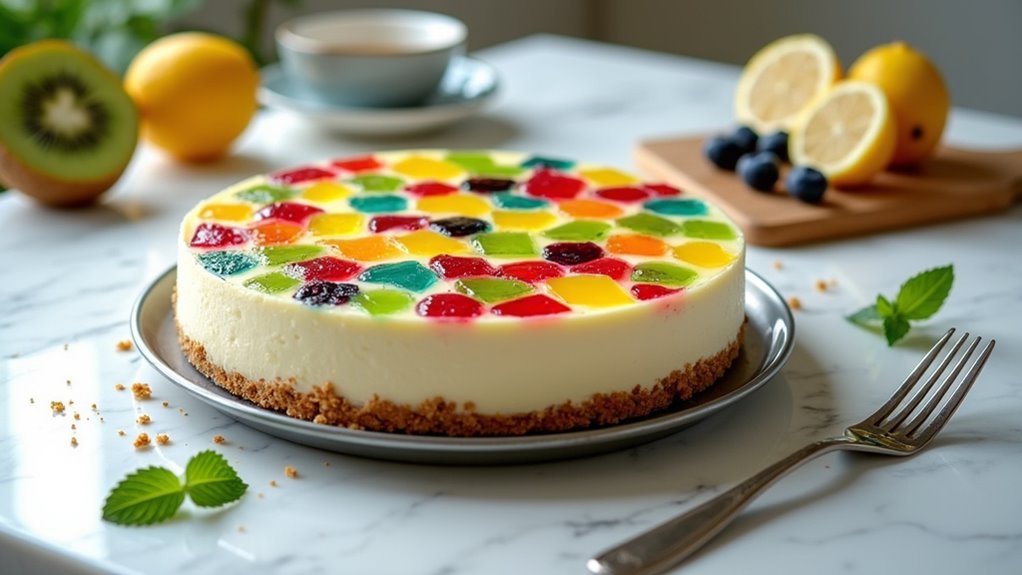
I’ve got to tell you about this Decadent Terrazzo Cheesecake recipe—it’s something special. Think creamy cheesecake meets vibrant jello, all atop a buttery biscuit crust. Sounds fancy, right? But really, it’s not. Trust me, if I can pull this off in my kitchen, so can you. It’s colorful, delicious, and sure to have your guests doing a double take. Are you ready to impress? Let’s plunge into the details.
Why You’ll Love This Recipe
When you hear “cheesecake,” you might think of that classic, creamy dessert that melts in your mouth, but believe me, this Terrazzo Cheesecake takes it to a whole new level.
Seriously, it’s like a party on your taste buds! Picture bright, colorful jello cubes dancing in rich creaminess—it’s visually stunning and a taste explosion. The combination of tangy sour cream and sweet pineapple juice makes every bite unforgettable.
Honestly, who wouldn’t want a dessert that looks like art and tastes heavenly? Plus, it’s surprisingly easy to make, even if my kitchen ends up looking like a jello factory exploded.
If you’re looking to impress friends or just treat yourself, this terrazzo cheesecake will definitely do the trick.
Equipment List
Ready to whip up this gorgeous Terrazzo Cheesecake? You’ll need some essential equipment to make the process smooth and fun.
First off, grab a 22 cm springform pan, because we want that perfect cheesecake shape. You’ll also need a mixer—if you’ve got a stand mixer, great; if not, a hand mixer works just fine.
Don’t forget a trusty mixing bowl; mine has seen some serious action over the years. A heat-proof bowl for melting gelatin is vital, and let’s not overlook a whisk for those delicate cream and cheese mixtures.
Finally, some measuring cups and spoons will keep everything on track. With the right gear, you’re halfway to cheesecake glory—you’ve got this! For ease of scraping and folding, consider using a Silicone Spatula Set to perfect your mixing technique!
Our Ingredients
Alright, folks, let’s plunge into the delicious world of our Terrazzo Cheesecake! You know, the one that combines the dreamy creaminess of cheesecake with a fun mosaic of colorful jello cubes? Sounds fancy, right?
But don’t worry, it’s deceptively simple and absolutely worth every minute spent in the kitchen. So, before we fire up our mixers and put on our apron (seriously, put one on—flour fights are real), let’s gather up our ingredients.
Here’s what you’ll need for this delightful dessert:
- 200 g digestive biscuits
- 75 g melted butter
- 1 tbsp brown sugar
- ½ pack each of kiwi, lemon, blueberry, and raspberry jello
- 6 gelatin sheets
- 100 g sugar
- 1 dl pineapple juice
- 300 g 35% fat sour cream
- 200 g cream cheese
- 3 dl heavy cream
- 1 lemon (for that zesty kick)
Now, when it comes to these ingredients, quality can really make a difference. For instance, those digestive biscuits—try to use the ones that come in a nice sturdy package because the last thing you want is a soggy crust.
Oh, and the heavy cream? Don’t skimp; grab the good stuff with at least 35% fat for that luscious, whipped perfection. You could even sneak a little taste on its own, but let’s try to maintain a level head here and save it for the cheesecake.
And if you can’t find all the jello flavors, feel free to mix and match; the beauty of this recipe is that it invites a little creativity. Just remember, the more colors you have, the more your cheesecake will shine like a star at a summer potluck!
Step-by-Step Instructions
Making the Terrazzo Cheesecake is a delightful journey that combines some straightforward steps with a splash of creativity. Mixing the batter is quick and simple—let’s plunge into these easy steps so you can impress your friends and family with this stunning dessert.
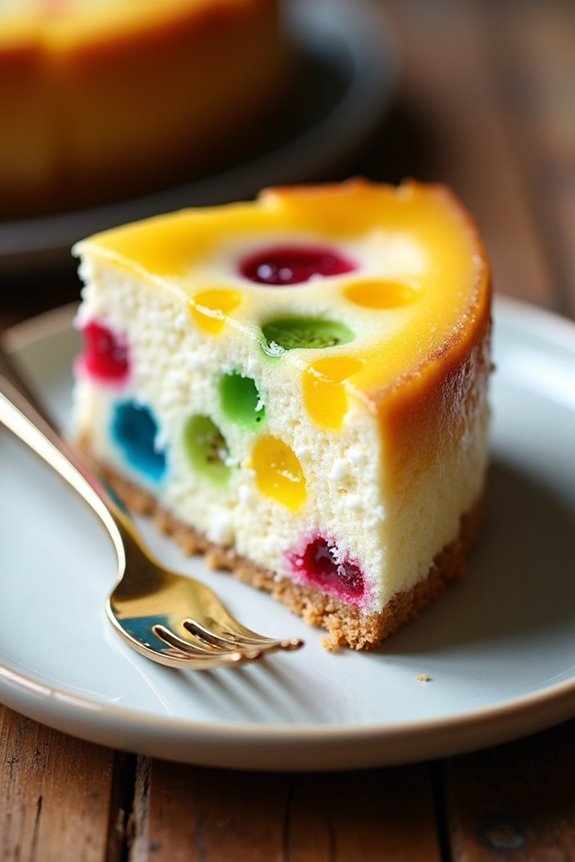
1. Prepare your jello: Start by getting your ½ pack each of kiwi, lemon, blueberry, and raspberry jello ready. Follow the instructions on each package; you’ll want them to set. Ideally, do this the day before so they’ve plenty of time to firm up into colorful cubes that you’ll eventually fold into the cheesecake mixture. (Trust me, the mosaic effect is so worth the wait.)
2. Make the crust**: Grab 200 g of digestive biscuits and crush them into fine crumbs—take out your frustrations from the day, but don’t turn it into dust, okay? Next, mix those crumbs with 75 g of melted butter and 1 tablespoon of brown sugar until it’s all well combined. Press this mixture firmly into the bottom of a 22 cm springform pan** and pop it in the fridge to chill while you get on with the filling.
3. Soak gelatin: Now, let’s tackle those 6 gelatin sheets. Soak them in cold water for about 5-10 minutes, or until they soften. They’re going to help our cheesecake be smooth and set perfectly.
4. Heat the pineapple juice****: In a small saucepan, heat up 1 dl of pineapple juice with 100 g of sugar over medium heat. Stir it until the sugar dissolves. Once that’s happening, squeeze those soaked gelatin sheets to remove excess water and add them to the warm juice mixture, stirring until they’re fully dissolved.
Let this mixture cool down (but don’t let it set!).
5. Combine the filling: In a large bowl, mix 300 g of 35% fat sour cream and 200 g of cream cheese together until they’re nice and smooth. Now, add in the lemon zest from 1 lemon and the cooled gelatin mixture. Stir everything together until well combined. This combination of flavors is going to be heavenly—just you wait.
6. Whip the heavy cream**: Take 3 dl of heavy cream and whip it up until it forms those lovely soft peaks**. You want it to be fluffy and happy, but not too stiff—so stop before it becomes butter (though if that happens, we can always make toast).
Gently fold this whipped cream into your creamy mixture, being careful to keep that airy texture intact.
7. Add the jello cubes****: Now for the fun part! Take your jello that you’ve already set and chop it into small cubes. Gently fold these colorful little guys into your filling mix. Be gentle here—think of it like folding in a delicate blanket, not flinging a spaghetti dinner.
8. Assemble and chill: Pour this beautiful, rainbow-filled mixture into the chilled crust. Spread it out evenly, and then pop it in the fridge to set—preferably overnight, but at least for a solid 6-8 hours if you can’t wait that long.
Trust me, every minute spent waiting will be worth it when you finally get to slice into that vibrant mosaic.
And there you have it! Follow these steps and you’ll have a gorgeous Terrazzo Cheesecake to wow your guests—or just to indulge in all by yourself (I won’t tell anyone). Enjoy every delightful bite of your labor of love! *Investing in proper professional baking equipment will enhance your baking experience.*
Tips & Variations
When it comes to cheesecake, there are always a few tips and variations that can elevate your baking game.
First off, I recommend making the jello a day ahead. Trust me, it’s much easier to handle all those flavors when they’re set and ready to go.
Now, if you want to get a little adventurous, try swapping in different flavors for the jello. Mango or passion fruit could be a game-changer.
And don’t forget about the crust! You can mix in some crushed nuts or chocolate for a fun twist.
Getting creative is part of the fun, right?
Just remember, if things don’t go perfectly, the taste will still win over your guests—cheesecake is pretty forgiving after all.
How to Serve?
Although serving a beautiful Terrazzo Cheesecake might seem challenging, it’s actually one of the easiest parts of the whole process.
First, once your cheesecake has set, gently remove it from the springform pan. You’ll feel like a pro at this point.
Place it on a cake stand or a nice plate—presentation matters. Slice it with a hot knife for clean edges; trust me, it makes a difference.
You can serve each slice with a dollop of whipped cream or fresh fruit on the side. When my friends see this dessert, the looks on their faces? Priceless. They can’t resist the gorgeous colors!
Storage & Reheating Guide
Now that you’ve dazzled your friends with that stunning Terrazzo Cheesecake, you might be wondering how to keep the deliciousness going.
First, store any leftovers in the fridge, tightly covering it with plastic wrap or placing it in an airtight container. It’ll stay fresh for about four days—if you can resist snacking on it. I mean, who could blame you?
If you want to feed that cheesecake craving later, leave it out for about 30 minutes before diving in. Just enough time for it to soften just right, but don’t let it get too warm.
And remember, don’t microwave it—this isn’t some cake you can zap. The creamy goodness deserves better, doesn’t it? Investing in gourmet kitchen gear can elevate your storage and presentation skills, ensuring your cheesecake remains as stunning as the day you made it.
Final Thoughts
As you savor that last delightful bite of Terrazzo Cheesecake, it’s hard not to reflect on the journey that got you here. Who knew a dessert could be this stunning and delicious?
I mean, I started with a pile of ingredients, and, somehow, ended up with pure bliss. Each colorful jello layer is like a little celebration on your plate.
Plus, it wasn’t all that complicated—well, aside from my attempts to chop those jello cubes without making a mess. I’ve had my fair share of kitchen disasters, let me tell you.
But trust me, if I can create this masterpiece, so can you.