
I’ve got to say, there’s something magical about making authentic Spanish flan. It’s creamy, it’s dreamy, and honestly, it makes me feel like a pastry chef, even if I sometimes confuse the oven with the microwave. Each step is simple, from caramelizing sugar to whipping up that luscious custard. Have you ever tasted flan so silky it practically dances on your tongue? Stick around, because I’m about to share my favorite recipe that’ll leave you impressed—trust me, you won’t want to miss this.
Why You’ll Love This Recipe
You know, there’s something magical about a dessert that feels comforting yet elegant, and Spanish flan is just that.
I mean, it’s creamy, it’s rich, and it has this silky caramel on top that practically melts in your mouth.
Trust me, when I say this is the best Spanish flan recipe you’ll ever try. It’s surprisingly simple, so you won’t end up with flour in your hair like my last baking fiasco.
Plus, it makes you feel like a culinary wizard. Imagine serving this to friends, and their faces light up with delight.
You’ll be their hero. And who doesn’t want to be a dessert hero?
You’ll impress everyone, including yourself, with how easy it is. Give it a shot, seriously!
Equipment List
Before you whip up that luscious Spanish flan, let’s talk about the equipment you’ll need. First off, grab a good mixing bowl; I tend to use my favorite one, which has seen better days but still works like a charm.
You’ll also need a whisk—an electric mixer could be great if you want to feel like a pro, but my trusty hand whisk does the job just fine. Ramekins are versatile kitchen tools that can be used for both baking and serving, which adds a great multifunctional element to your kitchen.
Don’t forget about your ramekins; I always choose ones that are cute because, well, presentation matters.
A baking dish for the bain-marie is essential, plus a saucepan. Finally, have some aluminum foil on hand to cover those little treasures while they bake. A good cutting board set can also be handy for prep work, ensuring that your ingredients are neatly handled and your kitchen stays organized.
Trust me—having everything ready makes all the difference!
Our Ingredients
Alright, let’s plunge into the delightful world of ingredients for that creamy, dreamy Spanish flan. You might be thinking, “Do I really need to know all this?” Well, yes! Because each ingredient plays a key role in the magic that transforms simple components into a rich dessert. So, buckle up, and let’s get our ingredient game on!
Here’s what you’ll need to whip up this delectable flan:
- 4 large eggs
- 1 cup granulated sugar (divided into two portions)
- 2 cups whole milk
- 1 teaspoon vanilla extract
Now, let’s chat a bit about these ingredients, shall we? It’s really important to use the best quality you can find.
For example, when it comes to vanilla extract, you’ll want the real deal, not that fake stuff. It makes a world of difference. Also, while you can experiment with the milk, whole milk gives that rich creamy texture that flan is known for.
And if you’re feeling adventurous, you could even try different sweeteners for that caramel. But be warned; sugar is a classic for a reason. It’s like the life of the flan party.
Step-by-Step Instructions
Making authentic Spanish flan is a delightful endeavor that promises creamy goodness in every bite. Mixing the batter is quick and simple—just follow these easy steps, and you’ll soon have a luscious dessert that will impress anyone lucky enough to be served it. Let’s plunge into the process!
- Make the caramel: In a medium saucepan over medium-low heat, combine 1/2 cup granulated sugar. Stir gently as the sugar begins to melt, transforming into a golden brown color. Be attentive here—it can go from perfectly caramelized to burnt in a heartbeat. Once it’s beautifully amber, carefully pour the melted caramel into your ramekins, coating the bottoms evenly. It may harden quickly, so work fast! High-quality cooking equipment can enhance your caramel-making experience by ensuring even heat distribution.
- Prepare a bain-marie: Place your caramel-coated ramekins into a baking dish. Fill the dish with hot water until it reaches halfway up the sides of the ramekins. This water bath will guarantee your flan cooks gently, avoiding any cracks and giving you that silky texture we all love.
- Beat the eggs and sugar: Grab a mixing bowl and crack 4 large eggs into it. Add in the remaining 1/2 cup of granulated sugar. Whisk vigorously until the mixture is creamy and slightly bubbly. It should look a bit frothy and inviting—like it’s shouting, “I’m ready to be dessert!”
- Mix in milk and vanilla: Next, stir in 2 cups of whole milk and 1 teaspoon of vanilla extract. Use a gentle folding motion to combine everything without splattering. The mixture should be smooth, with a lovely vanilla aroma wafting up to greet you. This is your custard base!
- Assemble the flan: Carefully pour the custard mixture over the caramel in your ramekins. Fill them to about three-quarters full, leaving some room for expansion during baking. Don’t worry if you spill a little; that just adds to the homemade charm.
- Cover and bake: Take a piece of aluminum foil and cover each ramekin tightly. Slide the baking dish into your preheated oven, set to 180°C (356°F). Bake for roughly 40 minutes, or until the custard is just set. You can check doneness by giving it a gentle jiggle—the center shouldn’t wobble like jelly.
- Cool and chill: Remove the baking dish from the oven (careful—it’s hot!). Let the flans cool to room temperature for about 30 minutes. After that, pop them into the fridge and let them chill for at least 6 hours, or overnight if you can wait that long.
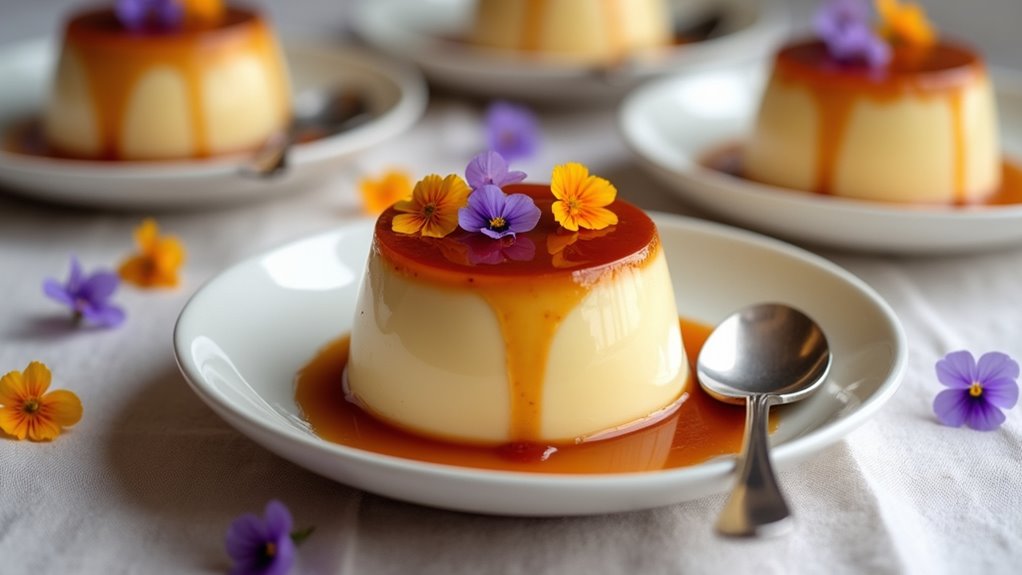
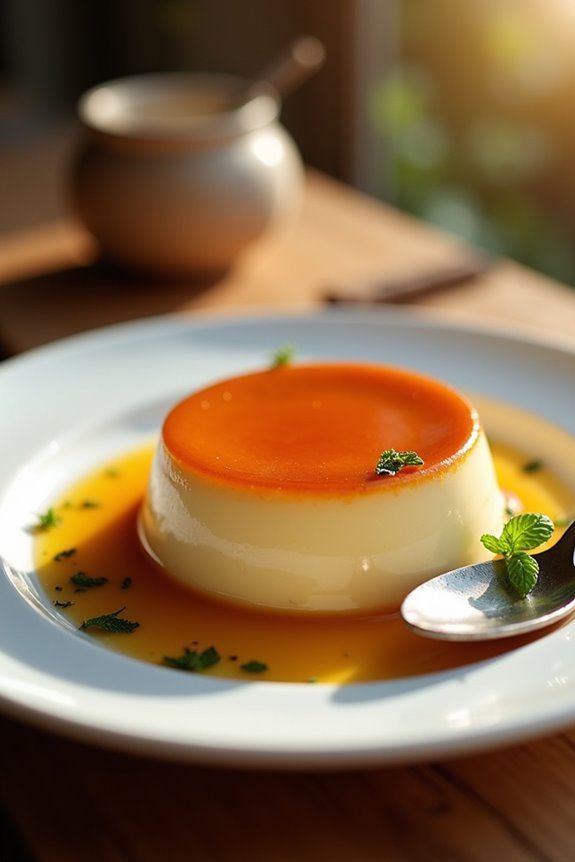
- Serve with flair: When you’re ready to serve, pull the ramekins from the fridge. Use a butter knife to gently run along the edges of the flans to loosen them. Then, take a plate, invert it on top of the ramekin, and flip it over swiftly. Give it a little shake—watch that golden caramel cascade over the flan. Admire your creation; you’ve earned it!
And there you have it—a step-by-step guide to making authentic Spanish flan. It looks fancy, tastes fabulous, and will have everyone asking for seconds (or thirds, but who’s counting?). Elevate your dessert experience with premium kitchen gadgets that can help streamline your cooking process.
Now, gather your friends and family and prepare for a dessert that’s both comforting and sophisticated, all at once. Happy flan-making!
Tips & Variations
When it comes to flan, the fun doesn’t stop at just following the recipe. You can easily put your own spin on it.
For a richer taste, why not swap half the milk for heavy cream? Oh, and if you’re feeling adventurous, add a pinch of cinnamon or nutmeg to the mix. Trust me, it adds a lovely warmth.
If you’re a chocolate lover, try drizzling melted chocolate over the top before serving. And for those who enjoy a tropical vibe, a splash of coconut milk can work wonders.
I’ve burned my share of caramel—so don’t fret if yours isn’t perfect. Embrace those imperfections, and remember, flan is about love, not perfection. Happy experimenting!
How to Serve?
Serving flan is almost as delightful as making it. Once it’s chilled and ready, I start by running a knife around the edges—this part always feels like a magic trick.
Then, I flip them onto plates, holding my breath, hoping the caramel will spill out beautifully. Spoiler alert: it usually does, and that golden glaze looks so appetizing.
I love serving flan with fresh berries or a dollop of whipped cream for a splash of color, but even plain, it’s a showstopper.
Sometimes, I’ll gather friends and share a story about how my first flan attempt ended up as a delicious pancake—uh-oh.
Just remember, no matter how it lands, it’ll taste amazing, and that’s what really counts.
Storage & Reheating Guide
While I always want to enjoy my flan fresh, there’s something comforting about knowing how to store and reheat it for later.
If you ever have leftovers, simply cover them tightly with plastic wrap or transfer them to an airtight container. They’ll stick around in the fridge for about three days—if I don’t gobble it all up first.
When it’s time to indulge again, reheating is easy. Just pop it in the microwave for about 15-20 seconds. I usually check it after 10 seconds, because, let’s be honest, no one wants a hot mess of flan.
If you prefer a warm treat, you could even place it in a warm water bath. Enjoy every delicious bite. Additionally, using freezer storage bags can extend the life of your flan, allowing for long-term storage without compromising flavor.
Final Thoughts
As you take a moment to reflect on this delightful Spanish flan, you might realize just how rewarding it’s to create something so simple yet elegant.
Seriously, I wasn’t sure I could pull it off at first; the idea of making flan felt fancy and intimidating.
But once you plunge into those smooth, creamy layers, it’s unbeatable.
Just think about how impressively you’ll serve it to friends. They’ll be thinking you’re a pro.
And trust me, watching that caramel sauce glisten is pure joy.
If I can do it, so can you.
So, go ahead and give it a whirl. Your taste buds will thank you, and you might just discover your new go-to dessert.
Happy baking!