
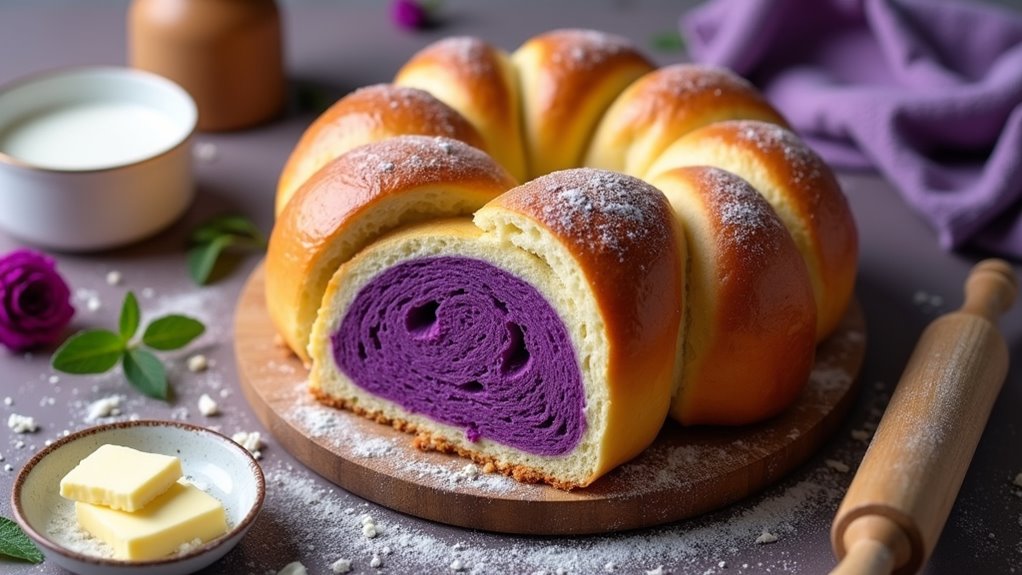
I’ve got to tell you about this ube milk bread recipe, and trust me, it’s a game changer. Using the tangzhong method makes the bread incredibly fluffy; it’s like biting into a cloud. Isn’t that intriguing? I remember the first time I tried it; I was convinced I’d created a bakery in my kitchen. The vibrant purple color draws you in, but the flavor? That’s where the magic happens. Let’s get into how you can whip this up yourself.
Why You’ll Love This Recipe
When you plunge into making ube milk bread, you might find yourself falling in love with the process as much as the end result.
Seriously, the ube milk bread tangzhong method isn’t just about stirring flour and milk; it’s almost like a science experiment. You prepare a tangzhong, and let me tell you, it feels magical as it thickens.
The way the dough transforms with every knead is mesmerizing—I might’ve stared at it a little too long once or twice.
Plus, that sweet ube aroma fills your kitchen, and you can’t help but smile. And don’t even get me started on the texture, it’s fluffy perfection.
There’s a joy in baking this bread that’s truly hard to beat.
Equipment List
Baking ube milk bread doesn’t require a lot of fancy gadgets, but having the right equipment can make your experience so much smoother.
First, you’ll need a mixer—trust me, hand-kneading is tricky when you’re dealing with this dough. A rubber spatula is essential for scraping, and a kitchen scale helps measure ingredients accurately.
Don’t forget a mixing bowl—one that’s big enough to hold all that fluffy dough.
A clean countertop is your best friend when you shape the bread.
Finally, a baking pan, preferably one that’s non-stick, will give your loaf a soft release after baking. I learned that the hard way once, and let’s just say, my bread and I didn’t part on good terms. You might also consider using a professional kitchen torch to achieve a beautiful caramelized top if you’re feeling adventurous!
Our Ingredients
Making Ube Milk Bread isn’t just about following a recipe; it’s about embracing the joy of baking. Imagine the delightful aroma wafting through your kitchen as the bread rises and bakes.
It’s an experience that fills your home with warmth and anticipation. I mean, who doesn’t love the idea of fresh, fluffy bread with that gorgeous purple hue from the ube?
So let’s gather our ingredients and get ready to create something delicious.
Here’s what you’ll need to whip up a loaf of this soft and dreamy Ube Milk Bread:
- For the Tangzhong:
- 20g bread flour
- 100g milk
- For the Main Dough:
- 130g chilled milk
- 1 tsp ube extract
- 1 egg yolk
- 30g castor sugar
- ½ tsp salt
- 10g milk powder
- 290g bread flour
- 1 tsp instant yeast
- 25g unsalted butter, softened
Now that we’ve got our ingredients lined up, let’s talk a bit more about them.
The tangzhong method is a little secret that helps keep our bread soft and fluffy, so don’t skip that step. Using chilled milk is key too—it may sound odd, but it makes for a better dough texture.
And don’t stint on the ube extract; that’s really what gives this bread its signature flavor and beautiful color. If you can, measure out everything on a kitchen scale. It’s just so much easier to get exactly what you need without the hassle.
Trust me, I’ve had my share of measuring mishaps, and let’s just say a cup of flour isn’t the same as a cup of sugar.
Happy baking.
Step-by-Step Instructions
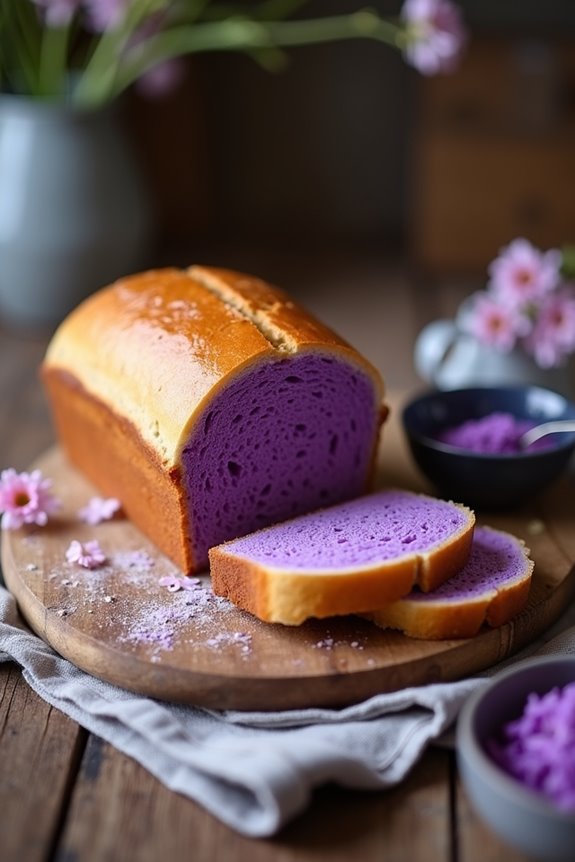
Making Ube Milk Bread is a delightful adventure that brings warmth and joy into your kitchen. With its fluffy texture and vibrant purple hue, this loaf isn’t just a treat for the taste buds—it’s a feast for the eyes. Ready to make your own? Let’s embark on these easy steps.
Step-by-Step Instructions
1. Prepare the Tangzhong: In a small saucepan, combine 20g of bread flour with 100g of milk. Whisk them together over medium heat. Keep stirring until the mixture thickens and forms a paste (this may take just a couple of minutes).
Once it reaches a pudding-like consistency, remove it from the heat and let it cool to room temperature. (Don’t rush this step—let it cool, or you might end up with scrambled flour!)
2. Mix the Wet Ingredients: In a separate bowl, mix 130g of chilled milk with 1 teaspoon of ube extract. Then, add in 1 egg yolk.
Give it a good whisk until it’s well combined. The chilled milk helps give your dough a nice texture, trust me.
3. Combine Dry Ingredients: In the bowl of your stand mixer, combine 30g of castor sugar, ½ teaspoon of salt, 10g of milk powder, 290g of bread flour, and 1 teaspoon of instant yeast.
Stir these dry ingredients together gently—it’s like waking them up, getting them ready for all that deliciousness that’s about to happen.
4. Mix Wet and Dry: Pour in the ube milk mixture and the cooled tangzhong into the dry ingredients.
Using the dough hook attachment, mix everything on low speed until it starts to come together (about 2-3 minutes). It might look a bit shaggy at first, but that’s okay—perfection takes time.
5. Knead the Dough: Increase the mixer speed to medium and Knead the Dough for 8-9 minutes.
You’ll know it’s ready when it’s smooth and elastic. Yes, you’ll have to show it some love. (Pro tip: if it’s sticking too much, sprinkle a little more flour, but be careful not to overdo it.)
6. Incorporate the Butter: Next, add 25g of softened unsalted butter to the dough.
This is where the magic happens. Knead on medium speed for an additional 15 minutes until the butter is fully absorbed and your dough is silky smooth. (Your arms might get a workout, but think of it as a mini exercise session, right?)
7. First Proof: Now it’s time to let the dough rise.
Place it in a lightly greased bowl, cover it with a clean kitchen towel, and let it proof in a warm place until it doubles in size. This usually takes about 1-2 hours. You could clean up while you’re waiting!
(Just keep reminding yourself this will be worth the wait.)
8. Shape the Dough: Once the dough has doubled, gently punch it down to release some air.
Turn it out onto a floured surface and shape it into a log or divide it into smaller pieces to form rolls—your choice! Be as creative as you’d like.
9. Second Proof: Place your shaped dough into a greased loaf pan (or on a baking sheet, if you’ve made rolls) and cover it again with a towel.
Let it proof for another 30-45 minutes. It should puff up nicely, so keep an eye on it.
10. Preheat and Bake: Preheat your oven to 340°F (170°C).
When your dough has almost doubled again, it’s baking time. For a lovely golden crust, you can lightly spray the dough with water or brush it with an egg wash before baking.
Bake for 25-30 minutes until it’s a beautiful golden brown on top.
11. Cool and Enjoy: Once out of the oven, let the bread cool on a wire rack.
The hardest part might just be waiting—trust me, the aroma will have everyone nearby drooling. Slice and enjoy your fluffy Ube Milk Bread!
Embrace the process, enjoy the scents, and savor each step. After all, there’s a little magic in the kitchen when you’re making something delicious. Remember, using premium baking equipment can enhance your baking experience as well. Happy baking!
Tips & Variations
While ube milk bread is already a delightful treat, there are plenty of ways to spice things up—or even simplify it, if you’re feeling a bit lazy.
For instance, if you want to amp up that flavor, throw in some grated coconut or even chopped nuts. Feel free to swap the milk for a nut milk like almond; trust me, it works wonders.
And if you’re short on time, you can totally skip the tangzhong step, though it does help the texture. I’ve done it when I’ve been too excited to bake—no shame, right?
Finally, don’t forget to experiment with toppings; a sprinkle of sugar before baking adds that perfect sweet crunch. Isn’t baking all about having fun?
How to Serve?
When it comes to serving ube milk bread, there’s a world of delicious possibilities that can make every bite even more enjoyable.
I love to slather mine with butter—there’s just something magical about that creamy goodness. You could also whip up a fruity jam or even a touch of Nutella for a sweet twist.
Need a cozy drink? Pair it with a warm cup of coffee or tea.
If you’re feeling extra, cut the bread into thick slices, toast them lightly, and serve with whipped cream or ice cream—it’s like a dessert in disguise.
Honestly, the options are endless. Whether for breakfast, brunch, or a snack, just make sure to savor every delicious moment.
Storage & Reheating Guide
Storing and reheating your ube milk bread can be just as important as making it in the first place, especially if you want to enjoy that soft, pillowy texture for days.
I usually wrap the bread tightly in plastic wrap or place it in an airtight container. This keeps it fresh for about three days.
If I need it to last longer, the freezer is my best friend, saving it for up to a month.
When I’m ready to devour it, I simply thaw it in the fridge overnight.
For reheating, just pop it in the oven at 350°F for about 5–10 minutes.
Trust me, you’ll feel like you just baked it fresh again, and it’s totally worth it. Using gourmet kitchen gear can also enhance your baking experience and ensure perfect results every time.
Final Thoughts
Taking care of your ube milk bread after baking is just as important as the recipe itself.
Once it’s cool, you’ll want to wrap it up tight or stash it in an airtight container to keep it fresh. I made the mistake of thinking, “It’s just bread!” before realizing it can dry out faster than my patience during a long family dinner.
And trust me, I’ve had my fair share of hard loaves! If you ever have leftovers, pop them in the toaster; you’ll be surprised how a little warmth brings the flavors back to life.
Honestly, sharing this delightful treat with friends makes it even sweeter, doesn’t it?