

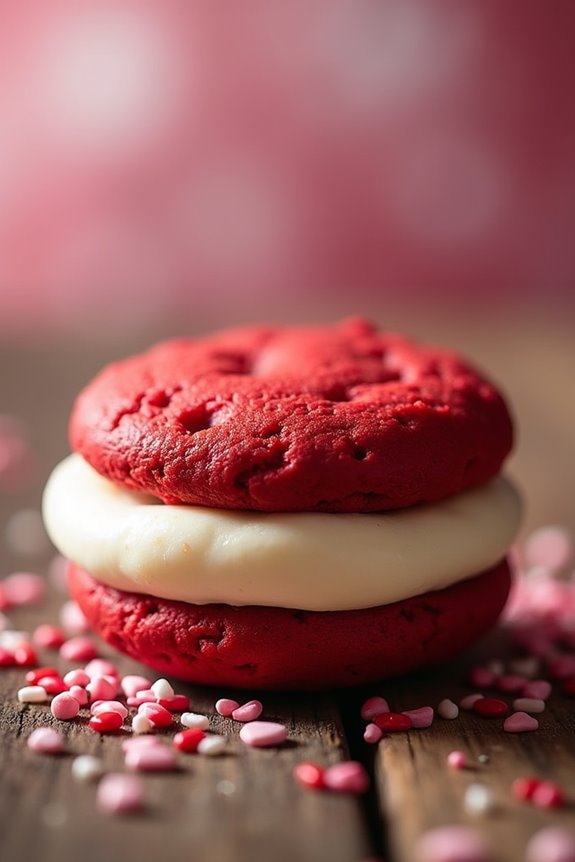
I’ve got a serious crush on these Sweet Valentine’s Red Velvet Whoopie Pies. Seriously, what’s not to love? Soft, chewy cookies with that gorgeous red hue, and a cream cheese filling that could make anyone swoon—it’s a match made in dessert heaven. Plus, they’re surprisingly easy to whip up, even for someone like me who once mistook baking soda for baking powder. Now, are you ready to get your baking hands dirty and impress someone special?
Why You’ll Love This Recipe
I know what you might be thinking: “Whoopie pies? Really?”
But trust me, these Valentine’s red velvet whoopie pies are a game changer. Imagine two soft, velvety red cookies with a rich cream cheese filling. They’re like a hug for your taste buds. What’s not to love?
Each bite feels like a celebration, perfect for sharing or indulging solo—just don’t judge me if I eat two in one sitting. Plus, they’re super easy to whip up; I promise you don’t need to be a baking wizard.
You’ll impress your friends and maybe win over a crush. So, whether you’re a baker or just starting out, this recipe makes Valentine’s feel special—not just another day.
You’ll want to make these again and again.
Equipment List
Making these red velvet whoopie pies is as fun as eating them, but first, let’s chat about the gear you’ll need.
You’ll want to grab a mixing bowl and a whisk for combining those dry ingredients. A hand mixer makes life so much easier when you’re fluffing up that butter and sugar. Parchment paper is a must for your baking sheets; it saves you from the dreaded sticking disaster.
You’ll also need a cookie scoop – trust me, it helps with uniform size. And don’t forget a spatula to spread that creamy filling! Plus, having a professional kitchen torch on hand can help you achieve that perfectly caramelized finish on your desserts.
Oh, and it’s not just for cooking; it’s a good excuse to channel your inner pastry chef. Have fun, and don’t stress too much if things get a little messy.
Our Ingredients
Making these delightful red velvet whoopie pies starts with gathering your ingredients, so let’s talk about what you’ll need. The combination of rich cocoa and that signature red hue creates magic in every bite. Whether it’s for Valentine’s Day or just because, these little treats are bound to brighten your day – and maybe even win over some hearts along the way. Are you ready to get your bake on?
Here’s your shopping list:
Red Velvet Cookies:
- 2 cups all-purpose flour
- 2 tbsp cocoa powder
- ½ tsp baking powder
- ¼ tsp salt
- 8 tbsp unsalted butter (room temperature)
- 1 cup light brown sugar
- 1 large egg (room temperature)
- 1 tsp vanilla extract
- ½ cup buttermilk (room temperature)
- 1 tbsp red gel food coloring
Cream Cheese Filling:
- 6 oz cream cheese (room temperature)
- 5 tbsp unsalted butter (room temperature)
- 2 tsp vanilla extract
- 2½ cups powdered sugar (sifted)
Now, before you hustle off to the grocery store, let’s chat about some important considerations when it comes to these ingredients. First off, using room temperature items, like butter and eggs, is a total game changer. They blend more easily, giving you that fluffy texture you want.
Oh, and if you have a high-quality cocoa powder, it’s totally worth it – trust me, flavor matters. As for the red gel food coloring, it gives that vibrant pop; just don’t go overboard unless you’re aiming for a neon effect.
And if you find yourself with extra filling (what a shame that would be, right?), it makes a delicious dip for fruit or a spread for toast. Go ahead, get creative!
Step-by-Step Instructions
Making the Valentine’s Red Velvet Whoopie Pies is a fun way to show your love—whether it’s for someone special or just yourself. With rich cocoa flavor, vibrant color, and creamy filling, these treats are sure to delight. Mixing the batter is quick and simple—just follow these easy steps.
- Preheat your oven to 350°F (175°C) and prepare your baking sheets by lining them with parchment paper. This little step makes cleanup a breeze.
- Whisk together 2 cups of all-purpose flour, 2 tablespoons of cocoa powder, ½ teaspoon of baking powder, and ¼ teaspoon of salt in a bowl. Get those ingredients blended well; it helps everything come together smoothly later.
- In a separate bowl, beat 8 tablespoons of unsalted butter (at room temperature) and 1 cup of light brown sugar until the mixture is light and fluffy. Don’t rush this—making it airy gives the cookies a wonderful texture.
- Add 1 large room temperature egg and 1 teaspoon of vanilla extract to the butter-sugar mix, and mix well. It should look like a golden cream.
- Now it’s time to alternate adding your dry mixture from step 2 and ½ cup of room temperature buttermilk to the butter mixture. First add some dry ingredients, then the buttermilk, straightforward, huh? Mix just until combined (don’t overdo it; a few lumps are totally okay!).
- Stir in 1 tablespoon of red gel food coloring until the batter is a lovely red hue. Don’t be shy; this is the part where it really starts to look like a festive treat.
- Using a spoon, drop spoonfuls of the batter (about 1–2 tablespoons each) onto your prepared baking sheets, leaving space in between each dollop for spreading.
- Bake the cookies in your preheated oven for 10–12 minutes, or until they look set. They should be slightly domed and cooked through. Once done, let them cool on the baking sheets for a bit before transferring them to a wire rack to cool completely. You can secretly eat a few while they’re still warm; I won’t judge.
- While those beauties are cooling, let’s move on to the cream cheese filling. In a medium bowl, beat 6 oz of room temperature cream cheese and 5 tablespoons of unsalted butter until smooth. Mix in 2 teaspoons of vanilla extract for that cozy flavor.
- Gradually add in 2½ cups of sifted powdered sugar, mixing until the filling is perfectly creamy and delightful. Just a heads up—this is where the temptation to taste it starts; go ahead, you’ve earned it.
- Now, it’s time to assemble those whoopie pies! Take one cooled red velvet cookie and spread a generous dollop of cream cheese filling on the flat side before topping it with another cookie. Press gently to stick them together, and voilà! You have a splendid whoopie pie.
- Optional: For an extra touch, you can chill the assembled whoopie pies briefly in the fridge. This makes handling them even easier and helps the filling set a bit. Additionally, using a good quality dough cutter can help shape your cookies evenly for a perfect presentation.
And there you have it, a scrumptious batch of Valentine’s Red Velvet Whoopie Pies that are sure to impress. Enjoy sharing (or not sharing!); these little delights might just become your new favorite treat.
Tips & Variations
What’s the secret to really making these Valentine’s Red Velvet Whoopie Pies shine? It’s all in the details.
For a little twist, I like using a heart-shaped cookie cutter on my baked rounds—it instantly ups the romance factor. Let’s face it, who doesn’t love a cute heart?
And speaking of love, don’t be shy about adjusting the food coloring; you want the red to pop just right.
Oh, and if your pies feel a bit sticky, a quick chill in the fridge makes handling them so much easier.
Trust me, I’ve had my fair share of “whoops” moments with melted filling. Your kitchen will be all heart-eyed with these delightful treats, I promise!
How to Serve?
Serving these Valentine’s Red Velvet Whoopie Pies can be as fun as making them. I love to stack them high on a cute platter, maybe sprinkle a few heart-shaped sprinkles for that extra cuteness factor.
How about inviting your friends over for a whoopie pie tasting? Each bite is like a mini celebration. You can even pair them with a glass of cold milk or a nice cup of coffee.
For a romantic touch, wrap them in clear bags tied with a ribbon and give them as sweet gifts. They’re perfect for sharing, or just keeping all to yourself, no judgment here.
Honestly, I sometimes have to hide them from myself so I don’t eat them all at once.
Storage & Reheating Guide
After you’ve whipped up a batch of those gorgeous Red Velvet Whoopie Pies and maybe shared a few with friends, you might wonder how to keep them fresh for as long as possible.
Trust me, you’ll want to savor every last bite. I like to store mine in an airtight container in the fridge, which helps keep those cream cheese fillings nice and fluffy.
If you’re saving them for later, they can last about a week—if they even survive that long.
When it’s time to indulge again, you can simply pop them in the microwave for about 10-15 seconds to warm them up—just enough to soften that cookie bliss.
For added convenience, consider using silicone lids to cover your container, as they create a tight seal to maintain freshness.
But, honestly, who’s got that kind of willpower?
Final Thoughts
While I can’t promise you’ll resist the temptation to devour these Red Velvet Whoopie Pies all at once, I can assure you they’re worth every delightful bite.
Honestly, there’s something magical about that combo of soft, velvety cookies and creamy filling. I mean, who wouldn’t want a little piece of heaven as a treat?
You might find yourself wanting to whip these up for every occasion, or just because it’s a Tuesday. Trust me, these pies will impress anyone at your next gathering.
Plus, they’re surprisingly easy to make, even if you think you’re not a baking expert.