
I’ve been making these Viennese Whirls for years, and honestly, they’re a total game changer. Soft, buttery, and filled with that delightful raspberry jam, they almost melt in your mouth. It’s like each bite whispers sweet nothings. I mean, who wouldn’t want a cookie that looks fancy but is surprisingly easy? And trust me, my first attempts were, let’s just say, less than stellar. But I promise, with a few tips, you’ll be whipping these up like a pro. Shall we get started?
Why You’ll Love This Recipe
If you’ve ever tasted a Viennese whirl, you probably know exactly why they’re so beloved.
These delightful treats are buttery, melt-in-your-mouth cookies with the perfect balance of sweetness. When I first made them, I was amazed at how easy they were—and let’s be honest, who doesn’t want to impress friends with fancy desserts without spending hours in the kitchen?
The rich butter, a hint of vanilla, and that luscious raspberry jam make each bite a mini celebration.
Plus, piping those swirls? It’s like a creative outlet for my inner pastry chef. Seriously, if I can do it, anyone can.
Have you ever thought about baking something that looks impressive but feels simple? This is it.
Grab your piping bag and get started!
Equipment List
Getting ready to whip up some Viennese whirls is as exciting as it sounds, and having the right gear really helps everything go smoothly.
First off, you’ll need a mixing bowl—preferably one that won’t wobble away while you’re beating that butter. A hand mixer or stand mixer makes life easier, trust me, unless you enjoy arm workouts for fun.
You’ll want a piping bag with a star tip for those adorable swirls; it’s like giving your cookies a hairstyle. Don’t forget parchment paper to keep things tidy on your baking trays.
A set of measuring cups and spoons is essential, and I always keep a spatula handy for scraping down sides. Plus, for those wanting to take their baking adventures further, consider investing in an artisan cheese making kit to explore new culinary delights.
Believe me, the right tools make a world of difference in your baking adventure.
Our Ingredients
When it comes to mastering the art of baking Viennese whirls, having the right ingredients makes all the difference. It’s like trying to paint a masterpiece without good paint—just doesn’t quite work.
You’ll want to gather up some essentials that will help you create those light, buttery treats filled with sweet raspberry joy. Nothing too exotic, just a few pantry staples and special touches to make the whirls shine.
Here’s what you’ll need to whip up your Viennese whirls:
- 250g unsalted butter, very soft
- 50g powdered sugar
- 225g all-purpose flour
- 25g cornstarch
- A pinch of salt
- ½ tsp vanilla extract
- ½ cup seedless raspberry jam
Filling:
- 100g unsalted butter, at room temperature
- 200g powdered sugar
- ½ tsp vanilla extract
Now, let’s chat about the ingredients for a moment. First, it’s vital to use very soft butter for that dreamy, fluffy texture.
If your butter fights back while you’re mixing, it’s just too firm. I once tried to whip up a batch with cold butter, and let’s say my arm got quite the workout—needless to say, I learned my lesson.
As for the flour and cornstarch combo, that’s the secret to achieving that melt-in-your-mouth crumb. Don’t skip on the raspberry jam; it ties everything together beautifully—just imagine that burst of fruity goodness with every bite.
And, of course, you can always sneak in a little extra vanilla extract because, why not? It’s like giving your cookies a warm hug.
Happy baking!
Step-by-Step Instructions
Making Viennese whirls is like taking a delightful plunge into the world of baking; it’s simple, rewarding, and oh-so-satisfying. Mix the batter quickly, and you’ll soon have delicate, buttery cookies filled with raspberry goodness. So, let’s roll up those sleeves and get started!
Step-by-Step Instructions
- Preheat the Oven: First things first, preheat your oven to 375°F (190°C). You want it nice and hot when your cookies slide in, ready to transform into golden morsels of joy.
- Cream Butter and Sugar: In a large mixing bowl, take 250g of very soft unsalted butter and 50g of powdered sugar. Beat them together until the mixture is creamy and smooth. Seriously, you’ll want it to be as fluffy as a cloud.
- Combine Dry Ingredients: In a separate bowl, sift together 225g of all-purpose flour, 25g of cornstarch, and a pinch of salt. This step guarantees that everything blends evenly and you don’t end up with floury lumps, which, let’s be honest, can really ruin your day.
- Fold in the Dry Mix: Now, gently fold the sifted dry ingredients into your butter mixture. Be careful not to overmix—aim for a soft dough that’s just combined. We’re not trying to make a workout routine out of this.
- Pipe Your Swirls: Transfer the dough into a piping bag fitted with a star tip. Pipe 2-inch swirls onto your parchment-lined baking trays. Don’t stress if they’re not perfect; a little character never hurt anyone.
- Chill the Cookies: Pop those piped swirls into the fridge for about 30 minutes. This helps them hold their shape when baking. You can take this time to clean up a bit or nap—no judgment here.
- Bake to Perfection: Place your trays in the oven and bake for 12-15 minutes. Keep an eye on them; you want the edges to turn lightly golden. When they’re done, let them cool completely on a wire rack. Patience is a virtue, especially when it comes to cooling baked goods.
- Prepare the Filling: While those cookies cool, let’s whip up the filling. In a bowl, beat together 100g of unsalted butter (make sure it’s at room temperature, not cold like a polar bear) and 200g of powdered sugar along with ½ tsp of vanilla extract. Mix until it’s smooth and creamy. You’ll be tempted to eat it by the spoonful—resist this urge, unless you want some seriously satisfied taste buds.
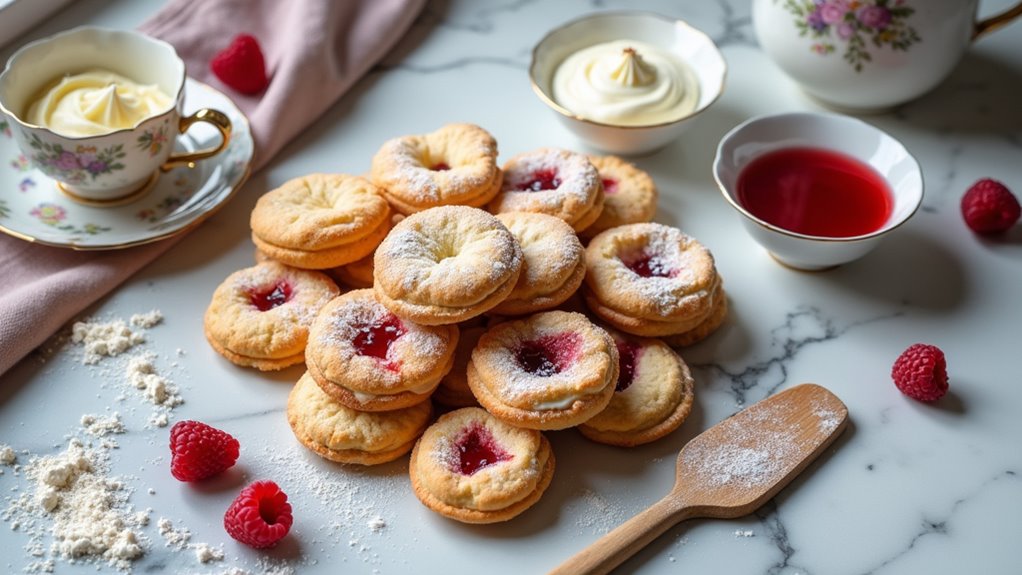
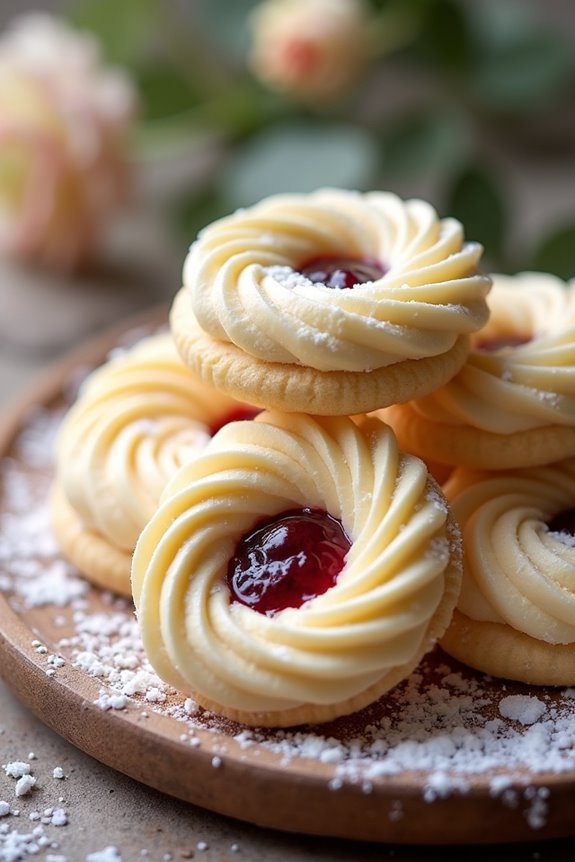
- Assemble the Whirls: Once your cookies are completely cool, pipe a bit of buttercream onto the flat side of one cookie, add a small spoonful of the delicious seedless raspberry jam, and then sandwich it with another cookie. Repeat until you run out of filling or cookies—whichever comes first.
- Optional Dusting: If you want a touch of elegance, dust the finished Viennese whirls with powdered sugar. It’s like a light snowfall on your cookies, and who wouldn’t want that? Additionally, you can unleash your creativity by organizing your treats with stylish pantry labels to elevate your baking presentation.
And there you have it! Your Viennese whirls are ready to impress. Enjoy them with a cup of tea, coffee, or just whenever you feel like treating yourself. Happy baking and even happier munching!
Tips & Variations
While you might think that making Viennese whirls is all about sticking to the recipe, there’s actually a world of possibilities to explore.
For a fun twist, why not swap out the jam for some lemon curd or chocolate spread? Trust me, it’s a delightful change. I sometimes add a dash of almond extract to the dough—it’s like a mini flavor party.
And here’s a tip: really, make sure your butter is soft. If it’s not, you’ll end up wrestling with a piping bag, and nobody wants that.
Oh, and consider dusting with a little cocoa powder instead of powdered sugar for a sophisticated touch.
Experimenting makes baking more enjoyable; let your creativity shine. Happy baking!
How to Serve?
Serving up my beloved Viennese whirls can feel like an art form, especially when I think about how they’ll impress friends and family.
I love placing them on a lovely platter, maybe even dusting a little powdered sugar on top for that extra touch. It’s all about the presentation, right? You can arrange the whirls in a circle or stack them high like a sweet tower.
Pairing them with a cup of tea or coffee makes it a delightful indulgence, and trust me, your guests won’t be able to resist.
If you’re feeling fancy, why not add some fresh berries or a dollop of whipped cream on the side?
Just remember, watching them disappear is the best reward.
Storage & Reheating Guide
Even though I can’t quite manage to keep all my Viennese whirls from disappearing in a flash, figuring out how to store them is just as important as baking them.
I usually place them in an airtight container to keep them fresh. Honestly, they can last about a week, but who am I kidding? They rarely make it past three days around my family.
If you’ve got leftovers, storing them in the fridge can help prolong that delightful taste. When I’m ready to enjoy another whirl, I simply let them sit at room temperature for a bit. Alternatively, pop them in the microwave for just a few seconds. They’ll feel just as indulgent, even if it’s only a tiny bite. Additionally, using essential outdoor equipment can enhance your grilling experience, making it even more enjoyable when pairing with these sweet treats.
Final Thoughts
As I stood in my kitchen, the sweet aroma of freshly baked Viennese whirls dancing around me, I couldn’t help but feel a little proud.
I mean, who wouldn’t feel accomplished after whipping up these delightful treats? They’re perfect for impressing friends or just indulging yourself—guilty pleasure, anyone?
Honestly, the process can be a bit messy, and I sometimes wonder how much flour I’ll wear by the end. But hey, that’s part of the fun, right?
These cookies, with their buttery, melt-in-your-mouth texture, are simply irresistible.
Once you’ve tasted one, you may find it hard to stop. So, go ahead, treat yourself, and see what sweet memories you can create. Trust me; they’re worth every buttery bite.